Showing posts with label Happy Birthday w/Shadow. Show all posts

Saturday, September 16, 2023

Gate Fold Masculine Birthday

Hello CottageCutz friends! Thanks for taking the time to stop and visit with us today. It's Mary Marsh here bringing you the Saturday edition of the Blog.

Our Folk Art release is still available in the online store at 35% off individual dies. There are 19 new designs that are so perfect for cardmaking, journaling, and scrapbooking.

In fact, all of the releases from 2023 through Halloween of 2022 are currently on sale. Check them out here if you want to pick up any that you may have missed and still want.

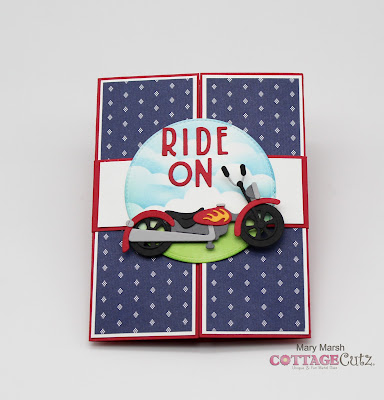
Today for your viewing pleasure, I am featuring a die from our Classic 50's release . It's the Motorcycle die, and I used it for a masculine birthday fun fold card. The fold is a gate fold with a belly band. My friend asked me to make a card for her son who loves to ride his motorcycle.
 
Design Steps:

I started by preparing the card base and the layering panels. 

Card Base - 8 1/2" x 5 1/2". I scored both panels at 2 1/8" on each side.

White Layers - 5 3/8" x 2"
Designer Paper Layer - 5" x 1 7/8"
Next, I adhered these pieces with double sided tape.
Belly Band -11" x 1 1/2" - scored at 7 3/8" & 3 1/8". 
I placed the band around the card front and then folded in on the score lines. I used clear drying glue to form the band. 
I cut the pieces for the motorcycle. I used red and black since that's the color of her son's bike. 
I cut a circle using the 3rd largest Stitched Circle die. Sponged some clouds using Tumbled Glass distress ink and Mowed Lawn distress ink for grass. Attached the motorcycle image with dimensional adhesive. 
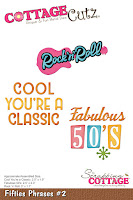
I wanted a sentiment on the front but I didn't have any stamps that would work. So I used the letters from the Cinema Drive-In Sign and Fifties Phrases #2 dies for the "Ride On" phrase. 
I attached the image on the belly band and slid it over the card front. 
I finished the inside of my card using the Happy Birthday w/ shadow die. I also stamped a sentiment. 
That's it for me for this post. See you again next Saturday. 

Reminder: Marla has a new video up on the CottageCutz YouTube channel. Click here. 


Tuesday, July 11, 2023

Folk Art Mixed Flowers Birthday Card

Happy Tuesday crafty friends,
I hope your day is going well and you are beating the heat wherever you're at. It has been sizzling here in Florida.

One of the best ways to beat the heat, is to stay inside and do a little crafting. I had the chance to work with some of the wonderful dies from Cottage Cutz's rescent Folk Art dies release. Here is what I created.
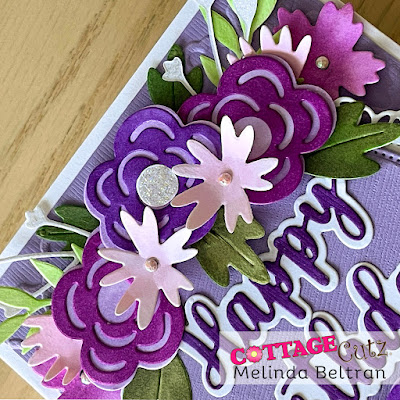
I created this birthday card for my future sister in law's 30th birthday. My card is a side folding A4 card. I used the pretty flower dies from the Folk Art Mixed Flowers Die Set available from their website:  CottageCutz.com

I started by cutting out the various flowers from the die. I cut them all out from White cardstock. I then proceeded to color them with my markers. Some I did leave white. I added some foam to the back of some of them so I could give them some lift.

I used some lavendar paper for a mat. Here you can see that I ran it through my die cut machine with an embossing folder. Towards the top you can see where I used the nested stitched circle doily die. I used one of the smaller pierced circle dies for a mat. I then added the Happy Birthday Shadow die for the top and main sentiment.

Here is a closeup of some of the flowers I assembled on the top. I added some stickles to some of the centers and the various flowers. I also used some diamond dots for the centers of some of the others.

Here's another photo and it also shows the happy birthday on top of the circle pierced mat on top of the doily die cut. You can see I used some foam tape to give it some lift. I also used a tiny diamond dot to dot the "i" in birthday.

Here is one last look at my finished card. I think it turned out very cute and I think she liked it. I used various shades of purple as that is her favorite color.


Happy Birthday w Shadow
Out of Stock


Don't forget to check out the Cottage Cutz You Tube channel to see all the wonderful project on there as well. It will really get your creative juices going!

Well that about covers it for today. Be sure to keep coming by each day to see what else the super creative designers are up to! Until the next time, have a wonderfully crafty day.

Tuesday, June 06, 2023

Folk Art Easel Card With Extra Opening

Happy Tuesday cottage cutz friends,
Melinda here and today I am sharing a card I created with some wonderful dies from the new Cottage Cutz Folk Art Release. There are some unique and fun dies in this set! Here is what I created.
My card is a top folding easel card with an additional inside opening. Here is a view of the card as it stands open with the easel base.


This is the top flap of the card. It is top folded so the card opening is at the bottom. It is a horizontal 5x7 top folding size.  I love the way it turned out.


To create my card, I started with two card bases of white cardstock. They are both folded 5x7 cards. To achieve these, I cut my papers to 7 x 10 and scored and folded them along the 10" side at 5" I turned them so the folds would be on the top. 

For the easel base, I did an additional score at 2.5" along the same 10" side. Essentially that is one flap of your card folded in half.


Once I did that, I took the second top folded card and glued the bottom 2.5" flap to the bottom of the back of the second card. 


I then used some patterned paper from an old paper pad from Hobby Lobby called Kellerkurtz & company. The pad has a vintage type theme. The two photos above show the different layers with the patterned paper only. 


Next I went ahead and cut out all the die cuts I planned to use in white cardstock. I decided I wanted the card to have a very minimalist type look even though the patterned paper was a bit shabby and vintage looking. Here is a closer look at the beautiful heart and butterfly dies from this collection. I added some Nuvo Pearl drops as well as some stickles and some clear glaze to the various areas to give them a bit of understated pizzaz.


Here is a look at the card when it is opened up and with the easel flap. I left two areas to write a sentiment and also for other co-workers to sign as this card is for a co-worker. This card turned out so nice and I love this new release from Cottage Cutz. Be sure to head over and pick yours up today!


Happy Birthday w/Shadow
(Out of Stock)


Well that about covers it for today. Be sure to head back by each day this week as the rest of the design team will be sharing projects featuring this fantastic set. Also be sure to come by Friday and Saturday as we will have ADDITIONAL group project featuring this amazing release!

Also, don't forget to head over to the Cottage Cutz YouTube channel for some more great content and inspiration!

Until the next time, have a wonderfully crafty day!

-Melinda

Monday, April 17, 2023

Froggy Birthday

Hey there CottageCutz friends!  

Kris here again to share with you some crafty inspiration! For today's card I used the new Spring Frog w/ Mushroom and the Pond w/ Cattails and Lily Pad from the Easter/Spring Release.  


Design Steps:


I used some papers by Doodlebug Design and since I hate to waste pretty papers, I cut my red down to a 5-1/2" square, then I cut the inside out since it will be covered up anyways, and now I have a cute ladybug paper (backside of the red) to use on another project ☺

I cut some green and teal patterned papers to 5-1/4" wide and layered them onto card front (as shown in my completed card photo).

I used a sunrays stencil to apply green distress oxide inks to a white circle I had die cut using the Pierced Circles Set, then layered that onto 2 larger nested circles in shades of green.

I then die cut all my decorative elements from white cardstock and colored with Copics, and the sentiments I cut from blue and red cardstock + white glittered cardstock.  Easy peasy!


I hope you enjoyed my project today!  ✿ Kris