Showing posts with label Halloween. Show all posts

Friday, September 30, 2022

Hangin' with my Gnomies

Hello CottageCutz friends! Thanks for taking the time to stop and visit with us today. It's Mary Marsh here bringing you the Saturday edition of the Blog.

It's new release time!!! We have new dies in the online store. It's our Halloween release with 22 new designs. So many whimsical designs that are perfect for your Halloween card-making.  They are currently on sale with 30% off individual dies. The sale is just for a limited time so hurry over to the online store to make your selections.

For my card sample today, I am featuring the new Spooky Tree Gnome die. So let's get started with some details of how I created my card. 

Design Steps:

I started my card this week with the colors from the Splitcoaststampers color challenge #915. We were to use soft suede, pale papaya and pear pizzazz. Optional was to add any darker or lighter shades of the challenge colors. 
I wanted to see if I could use one of the new dies to create a Halloween card. I took the option and used darker shades of all the colors. 
soft suede, pale papaya, pear pizzazz
I also found this sketch online and thought it would work well for my card. Sketches always help to give my creativity a jump start.
I selected a designer paper from my collection for the card background. I liked the leaf design on the paper and thought it complemented the sleeping gnome. For the image panel I used the largest die (3 1/4" x 4 1/4") from the Double Stitched Rectangle set. 
I cut the images from the Spooky Tree Gnome die in cardstock using darker shades of the color challenge. For the pale papaya, I used pumpkin pie, for the pear pizzazz I used old olive and mossy meadow and for soft suede I used choc chip and a metallic brown cardstock (cat's bowtie).
Next, I stenciled a few stars with pumpkin carved ink and stamped my sentiment in choc chip ink. When I started card assembly I realized, I stamped the sentiment too low on the panel, so I redid it. But I forgot to take another photo. You can see the re-do in the photo below.
Now that all my elements are prepared I am ready to start card assembly. I attached the spooky tree gnome with clear drying glue. 
Attached the designer paper to the card base with double sided tape. 
To finish off my card I attached the image panel to the card base with dimensional adhesive. Scatter a few pale papaya gems for added interest. 
That's my sample for this week. I hope I have given you an idea for a way to use this new Spooky Tree Gnome

Make sure you stop by the Blog on Sunday. We are having a group post with samples featuring the Halloween dies. 

Reminder: Our YouTube Channel has a new video featuring a shaker card from Marla Harris. There is a giveaway for being a subscriber, liking the video and leaving a comment. Click here.

Dies I used to create card:


Monday, September 26, 2022

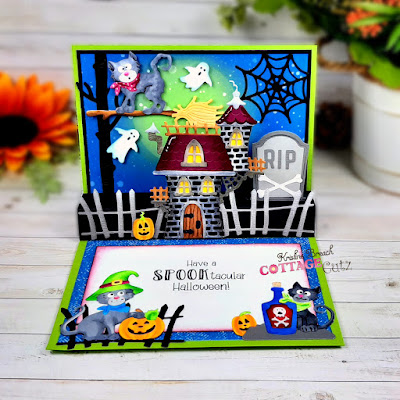
Spooky Castle Pop Up Card

Happy Monday, crafty friends!  Kris here with a super easy-to-make inside pop up card featuring dies from our Halloween Release!

Here's the inside of my card...

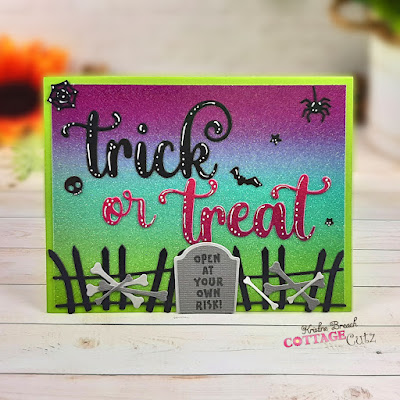
And here's the front...


There are 21 dies in this release and they're currently on sale with a 50% discount on the entire bundle or 30% off individual dies for a limited time ~ so hurry over to the online store to make your selections!!

I used the Spooky Halloween Castle, the Spooky KittiesSpooky Fence Mini, the Web and Graveyard for the inside of my card - and for the front, I also used Trick or Treat Phrase, and Spooky Truck (just the spider).  As always, you can click on the pictures to see them larger. ☺

Design Steps:

I started with a piece of white cardstock cut at 5-1/8" x 3-7/8".  

I made a circle stencil from a scrap piece of cardstock by die cutting the 4th largest of the Pierced Circle set from the middle of my paper and alternating the positive and negative die cuts to sponge Distress Oxide inks.  I then misted with water and let dry.  Then I spattered white paint mixed with a li'l water over the top and heat set it to dry.


I cut my card base from Granny Apple Green cardstock at 5-1/2" x 8-1/2," scored at 4-1/2" 

I layered a piece of black cardstock, 5-1/4" x 4" to the inside upper half of my card, then attached my sponged piece on top.

I cut a piece of blue patterned paper at 5-1/4" x 3-1/4" and attached to the lower inside half of card. (see photo below for placement) 

I computer-generated my sentiment onto white cardstock, then cut it to 4-3/4" x 2-3/4".  I sponged the edges with Rich Razzleberry ink and centered it onto the blue patterned paper.

I then added my black silhouette tree and web to my inked layer before adding the mechanism as it will cover up part of the tree.


Now to make our POP UP feature!  

I cut a piece of black cardstock at 5-1/2" x 3-1/2" and then with the short edge along top of score board, I scored at 3/4", 1-1/2", 2-1/4", and 3".  Then I added tape to the last 1/2" piece and attached the other end to it to make a long box!


To add it inside my card, I added tape to the bottom side of my box and laid it down so it's just up to the score line w/out going over it.  (see photo below)

Then, I added tape to the adjacent side that will be attached to the "Back".  Then I closed my card front down over it and pressed.  Easy Peasy!!


I created a smaller pop up box to give dimension to the gravestone by cutting a pc. of black cardstock at 3/4" x 2-1/2" and scored it at 1/2", 1", 1-1/2" and 2" then folded score lines and attached the ends. I glued it in place by pressing it up against the inside back (blue) part and down.  Then I added the gravestone to the front section with glue.


And then I added all my elements as pictured  ☺


For the front, I cut a piece of rainbow glittered cardstock at 5-1/4" x 4".  Then added my die cuts and made them pop a li'l with a white gel pen... and DONE!!  ☺

PRODUCTS I USED:


Check out the whole HALLOWEEN RELEASE HERE!


I hope I inspired you to get crafty with your favorite CotageCutz dies ~ Have a blessed week ☺

~Kristine

❄❄❄

We are happy to announce that CottageCutz dies will be available for purchase in a boutique in Southern California. If you're in the neighborhood please drop by!

Wild Skyes
42050 Main St.
Temecula CA 92590

❄❄❄

Friday, May 20, 2022

Theme Your Cake Shoppe And Use it All Year Long!


Hi everyone! My name is Linh and I'm honored and excited to be here as a guest designer. I have a new video up on the CottageCutz YouTube Channel. In this video, I'll show you how I took the Cake Shoppe from the new Sweet Treat release and combined it with the Spooky Camper set to create two different cards. The Cake Shoppe is super versatile and can be themed so you can use it all year long.

For both cards, I die cut from solid color cardstock. It's a great way to use up all your scraps and saves you from having to color little pieces. For the smaller pieces, I used a glue pen to apply adhesive. This allows you to get glue precisely where you want it.  I like to die cut a lot of elements so I can mix and match and have a lot of choices when I go to create my card. I had so many leftover pieces, I made a second card!


This first card is a Halloween themed cake shoppe.


This card converts the cake shoppe to a haunted house.


On this second card, I used some of the Cake Shoppe elements differently.  The small windows and front porch step I used as bricks. The greenery in the pots I used as bushes. And I combined more of the Spooky Camper elements to complete my haunted house.  I had so much fun tucking all the spooky elements here and there. I especially love the cat that's hiding behind the pumpkin. :)


Saturday, October 10, 2020

Monster Cupcake


Hello Scrapping Cottage friends! Thanks for taking the time to stop and visit with us today. It's Mary Marsh here bringing you the Saturday edition of the Blog. 

We have four brand new releases in the online store. It's Christmas Part 1 (22 new designs), Christmas Part 2 (21 new designs) and a Halloween release (14 new designs). They are all currently on sale and you can save 25% on the individual dies. Christmas Part 3 has just been released and is also on a limited time sale. This one has savings of up to 60% if you purchase the complete bundle

Today, I am here with a card from the Halloween release. Many of you create cards for Halloween and are looking for ideas to use these new dies. So, I am featuring the new Monster Cupcake die. 

Nothing to scary at all so it would be one you could send to a child or to your cupcake loving friend. So let's get started with some details on how I created my card.

Design Steps:

I started my card this week with the layout. As I have said so many times before, having a layout in mind at the start of my card is always a big boost for me. It jump starts my creative thought process. I love working with the sketches that are out there in the online world. That way I just choose the colors and designer paper and I am good to go.

I liked this week's sketch #822 from Splitcoaststampers. It's a simple layout and would give me space to display the monster cupcake image and also the sentiment. 

Next, I chose my card colors. I found this nighttime sky background paper in my stash. I thought it would work for a Halloween card. I paired it with a coral card base. I cut 3 pieces of cardstock for the 3 lines behind the shape. 
Coral Card Base: 4 1/2" x 5 3/4"
Designer Paper: 4 1/4" x 5 1/2"
Coral Strips: 1/4" x 5 1/2"
My monster cupcake image was cut with cardstock that coordinated with my background paper.
At this point I decided to start card assembly. I attached the designer paper to the card base with double sided tape. The 3 coral card strips are also attached with tape. 
I decided to place the cupcake on a circle die. I used the Wacky Stitched Circle die (3rd largest) and cut a circle from coral designer paper. The cupcake is attached with dimensional adhesive and I also used dimensional adhesive to attach the circle to the designer paper. 
For my sentiment I used the Halloween Phrase die and cut the Trick or Treat words in a grape cardstock. I attached to the designer paper with Ranger multi medium matte. Then to finish off the card I added 3 star metallic enamel shapes. 
Well that's it for me for this week. See you again next Saturday. We are also having a Columbus Day sale with savings of up to 50% on select dies. Click here to see what's on sale. The sale runs through October 14. 

dies I used to create card:


Tuesday, September 19, 2017

Happy Halloween Hanger

Hello creative peeps!  Sheila here to share a mixed media Happy Halloween Hanger.
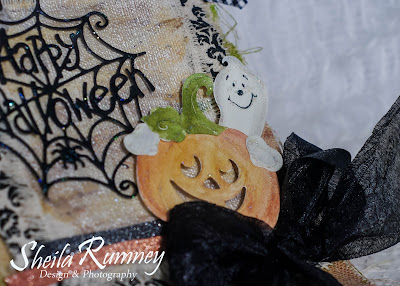
I used while watercolor paper to die cut the Happy Ghost Cottage Cutz.  
I used different shades of yellow and orange watercolors to start layering color on the dies.
I continued to add layers for watercolor color in the pumpkin, stem and ghosts.  Once dried, I assembled the Happy Ghost die gluing together then adding glitter glue.
Then, I die cut black cardstock with the Happy Halloween Web.  Then adding glitter glue to add a little sparkle.

For the canvas pennant hanger, I used spritzed on glimmer mist in coordinating colors. Then I used high impact paints, in coordinate colors, to add dimension and shimmer to the canvas.  Next I layered the canvas pieces on top of the pennant hanger.  
(Created with Cottage Cutz dies, Canvas Corp Brands, Tattered Angels products and Prima Marketing Watercolors.)

Then, I added ribbons, lace, vintage button and washi tape to complete.

I hope you enjoyed a little Halloween inspiration!  Remember to go to the online store on Wednesday, Sept 20th for ordering.

Die cuts used:

CC-381 Happy Ghost
CCE-493 Happy Halloween Web