Showing posts with label Gnome on Tree Stump. Show all posts

Friday, July 12, 2019

You Gnome Me

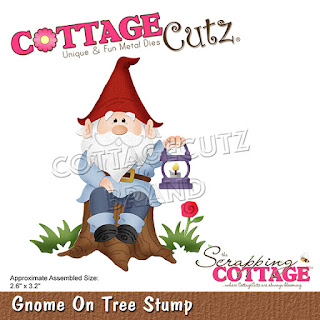
Happy Friday!!! It's Jeanne today with another card using the Magical Garden dies.  This one features the cute little gnome an a tree stump.
The card came together very quickly, in large part because I used the sketch from this week's sketch challenge at Splitcoaststampers.
The first thing I did was pick the papers so I knew what colors I'd use for the gnome.  The panel is A2 size and I used the largest tag from the Mail Tag dies and the third smallest rectangle from the Stitched Rectangle set.  I had this cute sentiment which I thought worked perfectly for this little guy if I had him hold a rose instead of his lantern.
Once I had the panel, tag and sentiment cut out, I die cut the gnome from both white and vanilla card stock.  Normally I would just use the vanilla for everything but I needed a white beard so I used the white as well.
I ended up coloring him in a combination of regular dye inks, Distress Oxide Ink (the tree stump) and Copic markers (the small pieces - belt, rose, stem, etc.).  I used just a touch of the DO on his nose and cheeks for a rosy glow.
To get him to hold the rose I simply rotated his hand and snipped off part of the underneath part of the arm/hand.  When he was assembled I glued him to the tag.
I then assembled the card.  The tag is popped up using foam and I added the baker's twine to the top of the tag. 
Super quick and fun card to make!

Don't forget to stop by the online store today where there is a NEW RELEASE of Birthday Dies!!!! They are really cute and on sale for a limited time.  Be sure to visit the blog in the upcoming weeks for great inspiration with the new dies!

Dies used:
http://www.scrappingcottage.com/cottagecutzgnomeontreestump.aspx

http://www.scrappingcottage.com/cottagecutzstitchedrectanglesetbasics.aspx


Thanks for stopping by today.  I hope you have a fun and creative weekend!


Saturday, July 06, 2019

Gnome Sending Birhtday Wishes

Hello Scrapping Cottage friends! Thanks for taking the time to stop and visit with us today. It's Mary Marsh here bringing you the Saturday edition of the Blog. 

The new Magical Garden dies are the latest release from CottageCutz.  There are 14 new designs and they are currently on sale at 25% off. If you love fairies, fairy gardens, gnomes and flowers, you will love these dies.  Today, I am featuring the new Gnome on Tree Stump die. 

The Gnomies in this release are so cute, and I thought he would make a great birthday card. I wanted it to lean more toward the masculine side because that's my intended recipient.  But, with the colors I used it could be a card for a kiddo or a gal. My card idea took so many turns from what I intended but in the end I was satisfied how it turned out. Let's get started with some details on how I created my card. 

Step 1: I decided to cut the gnome first. I used bright cardstock because even though this is a guy card, it doesn't have to sport dull colors. My intent was to use a white background as the image panel but that was one of several changes. 
So instead of a white background for the image panel, I went with seafoam green designer paper. The plain white background was just to stark for my liking.  I layered the designer paper on seafoam green cardstock and my card base is rich razzleberry. 
 
Rich Razzleberry Card Base: 4 1/2" x 5 3/4"
Seafoam Green Layering Panel: 4 1/4" x 5 1/2"
Designer Paper Panel: 4 1/8" x 5 3/8"

I cut my wish sentiment using the Stitched Alphabet die. The heart balloon is part of the Fairytale Birthday die. The streamers are from the Birthday Birdies die. This die is on sale at 70% off. 
Step 2: I am ready to start card assembly. I adhered the designer paper to the seafoam green layering panel with double sided tape.
I decided to stamp a sentiment in addition to the Wish Phrase on my card. This was another change. I used my MISTI for placement and just in case I needed to ink twice. Which I did on all 3 stamps. I pulled the sentiments from 3 different stamp sets. Used rich razzleberry ink for stamping. 
 I placed the gnome on my image panel using dimensional adhesive. I didn't want him to far down and also I wanted his feet to be on top of the letter S.
Attached the Wish phrase with double sided tape. 
Added the heart balloon and birthday streamers using Ranger multi-matte adhesive. I decided not to use the green metallic streamer. I didn't think the green matched with the background. This was another change. 
To complete my card, I added the image panel to the card base. Well, that's it for me for this week. I hope I have given you another idea on a way to use Gnome on Tree Stump die. See you next Saturday! 

As a reminder there is a big 4th of July sale going on in the online store with savings up to 70%. Check it out here
dies I used to create card:


Thursday, July 04, 2019

Hey Gnomie!

Hi Scrapping Cottage Friends!

It is Pam creating with you on the blog today!

HAPPY 4TH OF JULY!! COTTAGECUTZ IS CELEBRATING WITH A HUGH SALE WITH SAVINGS UP TO 70%!  CHECK IT OUT NOW IN OUR ONLINE STORE!!

On to todays project! Our New Release Magical Garden has lots of wonderful whimsical dies and all of them just make the most fanciful cards, tags and gift boxes!  They are 25% off in the store right now take a peek.  The card I am showing you today has our adorable Gnome on it!


Design Steps:
 1.  Using the Gnome on a Tree Stomp cut out the pieces.  I used DP for the shirt and pants and card stock for the other pieces
 2.  Shade the pieces with inks and markers and begin assembly.  I cut the hat and flower out of red shimmer card stock
 3.  Add the lantern and candle to his hand
 4.  Cut the stump out of brown card stock and the grass and stem out of green then add the shading
 5.  Use a birch tree stencil over a light tan piece of card stock.  I used navy ink to create the night sky
 5.  Add a little brown ink to the ground
 6.  Pop up the gnome on the stomp and add the grass and flower.  I also added a little yellow ink behind the lantern
 7.  I used a light tan A2 card base and a slightly smaller piece of navy card stock as my layer
8.  Glue the gnome scene to the navy card stock and add your ribbon and then glue it to the tan card base.  Add your sentiment and your card is complete


CottageCutz Products

I hope have a wonderful time celebrating this amazing country we live in! 
Blessings
Pam


Sunday, June 30, 2019

Gnome On Tree Stump


Hi!

It's Anja here. I have a cute and simple card for today's post.


For this card I used:
- Cottage Cutz dies (Gnome On Tree Stump, Magical Forest),
- Distress Inks (Peeled Paint, Vintage Photo, Black Soot, Tattered Rose, Fired Brick, Stormy Sky, Faded Jeans, Pumice Stone, Mustard Seed) and Oxides (Broken China, Faded Jeans),
- craft card base (18x13 cm),
- gold pigment ink,
- water spritzer,
- heat gun,
- black pen,
- adhesive foam pads,
- paper glue.

First I cut and colored the gnome.


Next the stump. I used some of the greenery from the die.


Last I made the background. I used Oxides for coloring. I spritzed a few water drops over it and dried it with the heat gun.


When I had everything cut and colored I adhere all the pieces to the background. I used adhesive foam pads for the gnome. And my card was done.


Before I go I want to invite you to the Scrapping Cottage online store. All the new dies are still available for 25 % off.

Have a nice Sunday and see you again next week.

Anja Z.


Cottage Cutz dies I used:


Saturday, June 29, 2019

Make Gnome Mistake

Hello Scrapping Cottage friends! Thanks for taking the time to stop and visit with us today. It's Mary Marsh here bringing you the Saturday edition of the Blog. 
We have released the new Magical Garden dies. There are 14 new designs and they are currently on sale at 25% off.
If you love fairies, fairy gardens, gnomes and flowers, you will love these dies.  Today, I am featuring the new Gnome on Tree Stump die. Let's get started with some details on how I created my card. 

Step 1:  As I have said so many times before, having a layout in mind at the start of my card is always a big boost for me. It jump starts my creative thought process. I love working with the sketches that are out there in the online world. That way I just choose the colors and designer paper and I am good to go.
I liked this week's sketch #755 from Splitcoaststampers.
I used this blue watercolor wash patterned paper for my background. It has an outdoor sky look to it. Then I found this other paper that had a rainbow in on it and decided to use it for the circle that the gnome is sitting on. The paper is also element 2, 3 and 4 of the sketch.
Blueberry Card Base: 4 1/4" x 5 1/2"
Patterned Paper Background: 4 3/8' x 5 3/8"
Sketch Element 2: 2 3/8" x 7/8" 
Sketch Element 3 : 1/2" x 1"
Sketch Element 4: 1 3/8" x 5 3/8"
Sketch Element 5: 3/8" x 5 3/8"
Circle: 2nd largest of double stitched circle die. 

I cut my gnome image in different colored cardstock. I used the colors that were on the packaging. I colored his face, ears and hands with Copic markers. I used E000, E00, and E21. 
I stamped my sentiment directly on the patterned paper in blueberry ink. Used my MISTI for placement and also I knew I was going to stamp twice to make sure it was dark enough. It's element 2 of the sketch. I started off with a larger piece of paper than what I needed and then trimmed it down to the 2 3/8" x 7/8".
Step 2: I am ready to start card assembly. Attached the background layer and element 2 and 3 of the sketch to the card base with double sided tape. 
I am ready to attach the image panel. I used dimensional adhesive on the gnome and double sided tape on the circle. 
To finish off my card, I added a few glitter enamel sequins. Well, that's it for me for this post See you next Saturday! I hope I gave given you an idea for another way to use this Gnome die. 

dies I used to create card: