Showing posts with label Garden Phrases. Show all posts

Monday, May 11, 2020

Blooming Wagon 2

Hi Cottage Cutz fans!  It's Jeanne again today.  On Friday I posted a card and said that I had made two cards with the same die.  Today I am featuring the second card.
The sentiment here really guided the design of this card.  While working on Friday's card, I came across this sentiment and loved it but it did not work for that particular card.  However, it is a wonderful sentiment for a clean and simple card, so I created one using my leftover die cut pieces from Friday!
I glued all the pieces to an A2 panel that I had stamped with the sentiment - then I added a strip of washi tape.  I glued that to an A2 card base. A super easy, fun and understated card!

Here are both cards I made using the Garden Wheelbarrow die.
The colors of the cardstock and paper as well as the shading of the dies with ink can lend a totally different feel to cards created with the same die.  A great way to make the dies go further!

Dies used:
http://www.scrappingcottage.com/cottagecutzgardenwheelbarrow.aspx
http://www.scrappingcottage.com/cottagecutzgardenphrases.aspx

Thanks for stopping by today!  Be sure to visit the online store where select dies are on sale for a limited time!

Friday, May 08, 2020

Blooming Wagon

Happy Friday! It's Jeanne today with a card featuring a die from the new Gardening release.  This release, along with other dies, are on sale right now for Mother's Day - but this is for a limited time only!

I wanted to make a card with a vintage feel to it and thought the Garden Wheelbarrow die would be perfect.
I started the card by choosing the paper for the background and then going through my scraps to choose colors for the flowers.
From the patterned background paper I cut a panel 4 1/8 x 5 3/8 inches.  I used a fine point multiliner pen to draw small flowers in the corners and lines joining them.  The trick to doing this is to draw at a steady, rather quick pace.  The point is to get a line that is not dead straight (if so, use a ruler!) but just a little wavy.  With a little practice it really is quite easy.  For me it's a matter of speed.  Try to draw a straight line at a certain speed and it comes out perfectly waved!  I did this twice to make a double line.
Next, I cut a lot of flowers from my scraps.  More than I knew I'd need, but wanted play with the number and colors of flowers in the wheelbarrow.  I glued them all together.

I then cut the leaves and two colors of wheelbarrows - one rose red and the other green.
 I decided to use the green wheel barrow as it allowed the focus more on the flowers and not the wheelbarrow itself.  I used some Distress Oxide ink to antique the edges of the panel and the wheelbarrow.
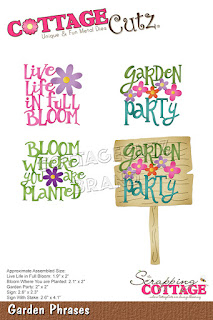
 I adhered the wheelbarrow to the panel.  I cut the word "Bloom" by using the Garden Phrases die and cutting away the rest of the phrase.
When I glued down the wheelbarrow I adhered only the bottom of the cart so I could tuck the greenery and flowers into the wagon.
For my finished card I used the flowers in pinks and purples.  I had many flowers leftover and one wheelbarrow, so I made another card that is very different in look and feel from this one.  This is something I love about these dies - you can achieve so many different looks depending on the paper colors and patterns, and how you cut and color the dies.  Visit the blog on Monday, May 11 and see the second card I created!

Dies used:
http://www.scrappingcottage.com/cottagecutzgardenwheelbarrow.aspx

http://www.scrappingcottage.com/cottagecutzgardenphrases.aspx

Thanks for visiting today!  I hope you have a great weekend and a terrific Mother's Day - whether you are being celebrated, you are celebrating your mother or both!


Friday, April 24, 2020

New Release - Bloom Where You are Planted!

Happy Friday Cottage Cutz fans!  It's Jeanne today with a clean and simple card featuring dies from the beautiful new Gardening release.  All the dies are wonderful, but I fell in love with the Puppy in Garden Cart die as soon as I saw it! This little guy poking through the flowers is adorable.
To begin the card I picked a floral patterned paper so I could match some colors to use on my card.  I cut a white panel 4.25 x 5.5 inches and a strip of the floral paper .5 x 6 inches for the right side.  I glued the strip to the panel and snipped off the excess paper.
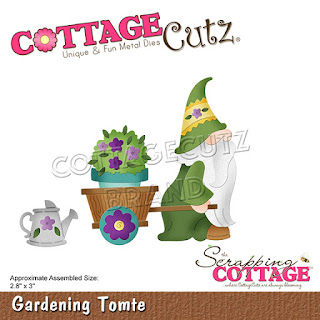
I then cut my pieces from matching colors of cardstock using the Puppy with Garden Cart die and the watering can from the Gardening Tomte die.
I cut a lot of flowers!  Before assembling the cart and flower pots I used Distress Oxide ink in Vintage Photo to edge the cart, pots and greenery.
I used Basic Grey ink to edge and shade the dog, then I assembled him.
Next, I cut my sentiment and a few flowers using the Garden Phrases die.  I thought this particular sentiment worked perfectly with this little pup!
I assembled everything flat on the panel.  When I added the watering can I used a foam dot to pop it up from the card.
I added a few matching sequins near the lower pots and a very thin strip of solid pink cardstock next to the floral panel to finish everything off.  I glued the panel to an A2 card base.

These dies are on sale for a very LIMITED time so be sure to stop by the online store!  They are all wonderful!

Dies used:
http://www.scrappingcottage.com/cottagecutzpuppyingardencart.aspx

http://www.scrappingcottage.com/cottagecutzgardenphrases.aspx
http://www.scrappingcottage.com/cottagecutzgardeningtomte.aspx

Thanks for stopping by!  I hope you have a relaxing and creative weekend!


Saturday, April 18, 2020

Garden Wheelbarrow (new die)

Hello Scrapping Cottage friends! Thanks for taking the time to stop and visit with us today. It's Mary Marsh here bringing you the Saturday edition of the Blog. Hope you are doing ok in the midst of the pandemic. It's a great time to make some cards. I find it so relaxing being able to create and have my mind off all that's going on. 

We have a brand new release of dies in the online store. This one is garden themed and has 19 new designs. For a limited time, each individual die is 25% off or you can get the entire bundle for only $99. That's 69% off the retail price of each die. These new dies are perfect for birthdays, Mother's Day, Father's Day or even a thinking of you card for the person who loves to garden.

For my card today, I am featuring the new Garden Wheelbarrow  and the Garden Phrases dies. So let's get started with some details on how I created my card.

Design Steps:

This was a work in progress for me this week. I had a basic idea of what I wanted to do, but I would have to lay it all out to see how it would look. I started by cutting the wheelbarrow and flowers. I used various colors of cardstock for the die elements. You could also use white cardstock and color with your choice of medium. Either way will produce a beautiful image.
Next, I cut a phrase from the Garden Phrases die. I couldn't decide which one to use but eventually settled on the Live life in full bloom phrase. But any of the three would have worked for my card. I am going to use this as a birthday card with the birthday sentiment on the inside.
I wanted the wheelbarrow and phrase to have a fence as the backdrop. I first used an embossing folder but I didn't like that look. So I pulled out this stamp and used it to stamp my fence background. I used a light gray cardstock (smoky slate) and the matching ink. 

I didn't like the look of the fence without a bottom border of grass. So I cut a grass layer using the Spring Grass die.  It gave a more finished look to my fence.
Now that everything is cut, I can start the card assembly. I attached the wheelbarrow first using dimensional adhesive. I lifted it off the fence background slightly.
Next up, I attached the phrase using Ranger multi matte adhesive. I cut it 2x to give the phrase a bit more dimension. That's just my preference, because it looked ok with just a single cut.
To finish off my card, I attached the image panel to the red (lovely lipstick) card base. I also scattered a few lovely lipstick enamel dots.

Well that's it for me for this post. Our DT will be posting additional samples next week with these new beautiful dies. I will see you next Saturday.

dies I used to create card: