Showing posts with label Fairytale Birthday. Show all posts

Saturday, July 06, 2019

Gnome Sending Birhtday Wishes

Hello Scrapping Cottage friends! Thanks for taking the time to stop and visit with us today. It's Mary Marsh here bringing you the Saturday edition of the Blog. 

The new Magical Garden dies are the latest release from CottageCutz.  There are 14 new designs and they are currently on sale at 25% off. If you love fairies, fairy gardens, gnomes and flowers, you will love these dies.  Today, I am featuring the new Gnome on Tree Stump die. 

The Gnomies in this release are so cute, and I thought he would make a great birthday card. I wanted it to lean more toward the masculine side because that's my intended recipient.  But, with the colors I used it could be a card for a kiddo or a gal. My card idea took so many turns from what I intended but in the end I was satisfied how it turned out. Let's get started with some details on how I created my card. 

Step 1: I decided to cut the gnome first. I used bright cardstock because even though this is a guy card, it doesn't have to sport dull colors. My intent was to use a white background as the image panel but that was one of several changes. 
So instead of a white background for the image panel, I went with seafoam green designer paper. The plain white background was just to stark for my liking.  I layered the designer paper on seafoam green cardstock and my card base is rich razzleberry. 
 
Rich Razzleberry Card Base: 4 1/2" x 5 3/4"
Seafoam Green Layering Panel: 4 1/4" x 5 1/2"
Designer Paper Panel: 4 1/8" x 5 3/8"

I cut my wish sentiment using the Stitched Alphabet die. The heart balloon is part of the Fairytale Birthday die. The streamers are from the Birthday Birdies die. This die is on sale at 70% off. 
Step 2: I am ready to start card assembly. I adhered the designer paper to the seafoam green layering panel with double sided tape.
I decided to stamp a sentiment in addition to the Wish Phrase on my card. This was another change. I used my MISTI for placement and just in case I needed to ink twice. Which I did on all 3 stamps. I pulled the sentiments from 3 different stamp sets. Used rich razzleberry ink for stamping. 
 I placed the gnome on my image panel using dimensional adhesive. I didn't want him to far down and also I wanted his feet to be on top of the letter S.
Attached the Wish phrase with double sided tape. 
Added the heart balloon and birthday streamers using Ranger multi-matte adhesive. I decided not to use the green metallic streamer. I didn't think the green matched with the background. This was another change. 
To complete my card, I added the image panel to the card base. Well, that's it for me for this week. I hope I have given you another idea on a way to use Gnome on Tree Stump die. See you next Saturday! 

As a reminder there is a big 4th of July sale going on in the online store with savings up to 70%. Check it out here
dies I used to create card:


Wednesday, June 26, 2019

DT Samples w/Magic Garden Dies (Day 8)

Hello Scrapping Cottage friends! Thanks for taking the time to stop and visit today. This is our last day of DT samples using the new Magic Garden release. If you have missed any of the posts, just look back on the Blog for some fabulous projects and cards.

There are 14 new dies in the Magic Garden release. And for a limited time the individual dies are on sale at 25% off.  If you love fairies, fairy gardens, gnomes and flowers, you will love these dies. 

So let's get started with our projects for today. It's a Fairy garden house theme today.  

Sample 1:  Our first sample today is from Sukie Dhillon. She used the new Cottage w/Petal Roof die and Fairy Garden Flowers die to create this super cute card. This cheery card is sure to brighten anyone's day. The sweet fairies look so contented fluttering above their little cottage.  Her magical scene is framed using the Wacky Stitched Rectangle die. Notice how she placed her sentiment inside a speech bubble. It gives the effect of the fairies sending a greeting.    


Sample 2:  Our last sample for today is from Jeanne Knobbe. She used the Magical Forest, Fairytale Birthday and Forest Critters dies to create a beautiful birthday card. Love the little mouse and birthday cupcake she brought to the house party. The glitter cardstock adds a magical touch to the card. So perfect for a little (or big) girl. Lots of detail with this die but as you can see the effort is so worth it for the resulting card.
Well, that's it for our group posts . We hope that we gave you some ideas for different ways to use these new dies. And, remember you can also check out DT samples on our FaceBook page and Instagram gallery.

dies used to create cards:


Thursday, May 23, 2019

Make A Wish

Hello Scrapping Cottage friends! Thanks for taking the time to stop and visit with us today. It's Mary Marsh here bringing you the Thursday edition of the Blog.

We are still featuring cards using the new Magical Fantasy release.  If you haven't seen the Magical Fantasy release yet, you have to drop by the online store and check it out. These new dies are all so cute and whimsical. There are 27 new designs and I am in love with everyone of them. 

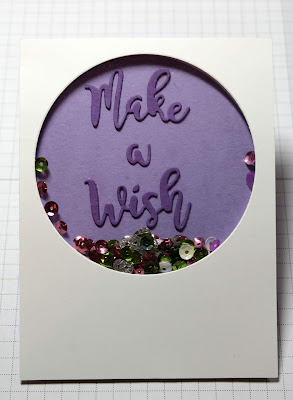
Today, I am featuring the new Sweet Unicorns die. It looks like it's currently out of stock but it should return soon. I needed a birthday card for a 4 year old girl and she loves unicorns. They are hot with the kids these days. Unicorns are everywhere along with rainbows and glitter. I thought I would turn it into a shaker card. She will love shaking the sequins around. They really aren't hard to make and it has that "wow" factor. So let's get started with some details on how I created this card. 

Step 1: I decided to cut the circle first to make sure I had enough room for my sentiment inside the circle. Using white cardstock 3 3/4" x 5" and the 2nd largest double stitched circle die I cut my circle. I used this die because it was the size I wanted for my opening. I will save the die cut circle for another use. 
Now I need to make my "window". I used a window sheet cut to 4" x 3 1/2". It's smaller than my white panel but larger than the circle opening. I used double sided tape to secure the window sheet in place. To avoid static on the window sheet I used my powder tool on both sides of the sheet. You could also use an embossing buddy. It will keep the sequins from sticking to the sheet. 
Next I used foam tape and ran it around my circle opening. I also used dimensional adhesive on the corners to make sure it's the same height all around my card. I again used the powder tool on the inside of the foam tape. It cuts down on the stickiness and the sequins won't stick to it. 
I cut the Make a Wish words in grape cardstock from the Fairytale Birthday die. I added to a lighter shade of purple. I wanted to have some color in the shaker background. 
Added the sequins to the inside of the circle. I added a little more than I thought  I would need because I wanted her to be able to shake it. 
I peeled off the foam backing and placed my sentiment panel on top. Since it is the same size as the shaker panel I lined it up at the top first. 
I wanted the shaker panel to pop and so I added a layer of the grape cardstock to this panel. The layering panel is 4" x 5 1/4"

Step 2:  Now that the image panel is ready, I cut my unicorn images from the Sweet Unicorns die. I used the package coloring as my color guide. 
Added them to the image panel and secured with double sided tape. 
To finish off my card, I secured the image panel to the pink card base. The base is 4 1/4" x 5 1/2". Added a few pink enamel dots and my card is complete. Don't you just love the unicorn images? I hope I have given you an idea for a way to use this new die. See you on Saturday with another card from this new release. 
dies I used to create card:


Thursday, May 09, 2019

Birthday Wishes!

Good Morning Crafty Friends!

It is Pam creating with you today on the blog!

I have a ton of birthdays in the summer months so I am getting started.  The Fairytale Birthday die has a number of cute items that are perfect for all different kinds of birthday cards.  The Magical Fairytale dies are still on sale at a big 25% off! Check it out here!
Design Steps:

 1.  Using the Fairytale Birthday die cut out 3 cupcakes using light green, blue, pink and light yellow. Also cut out 3 white squares using the Double Stitched Square die the 4th from the largest
 2.  Assemble the cupcakes and apply Glossy Accents to the icing then add clear glitter
 3.  After the icing is dry add yellow stickles to the flames
 4.  Pop up the cupcakes to the squares
 5.  Use an A2 white card base, a slightly smaller piece of light blue, and  a slightly smaller piece of DP.  Glue the blue to the white card base then glue down the DP.  Cut a strip of light blue card stock 5 1/4 x 3/4 glue it to the center of the card
6.  Use Versa Mark and white embossing powder to create the sentiment.  Pop up the squares to the card front and sentiment as shown


CottageCutz Products

Thanks so much for stopping by!  I really appreciate it and love your comments!
Blessings
Pam