Showing posts with label Easter Release 2023. Show all posts

Monday, May 08, 2023

Car and Balloons

Hi and welcome to a new week of crafty inspiration!! 

Kris here to share with you a cute and simple card featuring the car from the Spring Bunny Car, the balloons from the Spring Party Car, (both from our latest Spring Release!) and I added some previously released dies such as a dog from the Christmas Puppies, and the Slimline Clouds and Slimline Grass to help create my scene.  ☺


I started with this week's Color Challenge at SCS (CC946)
Cherry Cobbler
Pacific Point
Old Olive
Bermuda Bay
+ the dessert option= masculine


also used last week's Ways to Use It Challenge (WT946):
Feature a cloud/s - I stenciled them AND used a cloud border die!


Design Steps:

• I cut my card base 5-1/2" x 8-1/2" and scored at 4-1/4" for a top folding A2 card.

• I cut a scrap piece of white cardstock to 5-1/4" wide and shorter than 4" which is what I would have cut it to if it wasn't a scrap.  I then sponged clouds on it using Salty Ocean Distress Oxide ink.

• I cut a piece of Old Olive c.s. at 5-1/4" wide & die cut the top with the Grass Slimline die, then I stamped a sentiment in bottom right corner.

• I cut a piece of white at 5-1/4" wide and die cut the bottom with the Clouds Slimline die. 

• I cut a piece of road patterned paper (from La-La Land Crafts) at 5-1/4" wide.

 • I then die cut my car from Pacific Point, Bermuda Bay and white cardstock and used Copics to color the white pieces.  I cut the dog from white and the balloons from each of the challenge colors.  

• I then layered them onto my card front as shown below:


• I added some baker's twine in the Bermuda Bay color behind each balloon, then loosely tied them together (I removed this tie later).


• I then added a pop dot behind each balloon and attached it where I wanted them on my card front.

• I then added a strip of Scor Tape where I wanted to tack down the strings (behind the car) and removed the tie.


• I pulled the strings kinda tight and attached onto the tape, then added another strip of Scor Tape over the strings, then a piece of scrap paper to hold in place (and to keep from sticking to the car).

• Next, I added some mini dimensionals (foam hexagons) to pop the car up.  This is needed so there won't be that hump where the strings are bunched up.


• Lastly, I added my car and done!  Easy peasy! 


PRODUCTS I USED:

30% OFF!

30% OFF!

30% OFF!


Thanks so much for looking!  I hope this fun li'l card inspires you in some way to use your favorite CottageCutz dies!  

Reminder - We're having a Design Team Call!!  See this post for details!
View more design team creations on our YouTube channel here

~Kristine

Monday, May 01, 2023

Mother's Day Vase Pop Up Card

Happy May Day, crafty friends!

Kris here to share with you a pretty pop up card with a vase and bouquet!  This one is called a Vase Pop Up card... so the wow factor is on the inside of your card.  I decided to make it a Mother's Day theme featuring the NEW Spring Daffodils. 

I'll show you the inside of my card first ☺

and below is the front of my card...

Here's a short clip of how the vase pops up when you open the card ☺  
If you can't see it here, please click HERE.

I followed a video tutorial on Splitcoast Stampers by Gloria here.  It may be most helpful to watch that video (or there are others on YT if you search Vase Pop Up ☺)

The patterned paper I used is called Sunshine and Rainbows from SU!

DESIGN STEPS:

I started with a white A2 card base:  5-1/2" x 4-1/4"

INSIDE RIGHT:
Mango Melody mat = 5-1/4" x 4"
White cardstock = 3-3/4" x 5" 

INSIDE LEFT:
 • Blue patterned paper (same DSP) = 5-1/4" x 4"
• Rainbow striped patterned paper = 2-1/4" x 5"  
- then score along the 5" side at 1" and 4"
- then score along the 2-1/4" side at 3/4" and 1-1/2" just up to the scored line!
- then cut as shown in photo 
• white cardstock = 3/4" x 2"
• white cardstock = 3/4" x 3-7/8" 
- then scored at  3/8" on just one end


It's best to watch the video to see how to create the vase with moving mechanism ;)  


I die cut the Daffodils from yellow (Daffodil Delight), orange (Mango Melody) and green cardstock then gave some shadowing with Copics.


I glued a few of the flowers/stems to the blue layer above the vase, and some I glued to the top back-side of the vase so they pop out along with the vase when the card is open. 

I then decided to print a poem for the right side of my card since I didn't have any big Mother's Day sentiment stamps.  So I cut my white piece down to 3-1/4" x 4-1/4", then I matted it with a piece of blue/white patterned paper that I first die cut with largest Nested Scalloped Rectangle.


For the front, I die cut the Stitched Alphabet in oranges and yellow, and the Daffodils in green and yellow, then I used Copic markers to give the orange shade into it.  The li'l hearts were die cut from the Celebrate Banner die.  And the blue inverted scallops frame is just what was left after I die cut the scalloped rectangle from the middle of it for the inside mat!  


I hope I've inspired you to try something NEW to you using your favorite CottageCutz dies! 

~Kristine

PRODUCTS I USED:


Monday, April 24, 2023

Hello Friend Easel Card

Hello Friends!  

Kris here with an easel card for a friend.  I used the new Spring Birdhouse Cup and some papers that were meant for Fall, but I just LOVE the colors so I went with it.  These birds are so cute, and what a fun idea for a birdhouse---out of a cup?!  I actually have a collection of birdhouses, but not quite like this one ☺   


and here's what it looks like closed (taking it out of the envelope)


Design Steps:

I cut my magenta card base at 5-1/2" x 11" and scored at 5-1/2" and at 2-3/4".

I cut (2) pieces of patterned paper at 5-1/4" x 2-1/2" and glued onto the front of card.

I die cut the largest scalloped circle from the Nested Scallop Circle Set
and I die cut the 2nd largest die from the Pierced Circle Set and glued onto the scalloped circle.


I die cut the Spring Birdhouse Cup from white cardstock as well as a red/white polka-dot paper.  I then colored my pieces with Copic markers.


I sponged some Peacock Feathers (Distress Oxide Ink) onto my white circle and then assembled my die cut elements onto it.


I then added foam strips on the back LOWER HALF of my circle piece and attached to the center of my card front.

For the INSIDE of card:

I cut (2) pieces of white cardstock (for writing a message) at 5-1/4" x 2-1/2" and taped to upper 2 portions.

I cut a piece of patterned paper at 5-1/4" square and taped to lower half.

I cut a piece of green cardstock at 5-1/4" x 1-3/4"

I cut a piece of white cardstock at 5-1/4" x 1-1/2" and stamped a sentiment and some leaves, then taped it onto the green piece.

*Important!!  I then added foam tape to the back of sentiment piece and attached to inside - it acts as an easel top prop up the front of my card.  


and here it is in display position:


PRODUCTS USED:


I hope you enjoyed my card today!

Remember, all the individual dies in the Spring/Easter Release are still 30% OFF for a limited time!


~Kristine

Monday, April 17, 2023

Froggy Birthday

Hey there CottageCutz friends!  

Kris here again to share with you some crafty inspiration! For today's card I used the new Spring Frog w/ Mushroom and the Pond w/ Cattails and Lily Pad from the Easter/Spring Release.  


Design Steps:


I used some papers by Doodlebug Design and since I hate to waste pretty papers, I cut my red down to a 5-1/2" square, then I cut the inside out since it will be covered up anyways, and now I have a cute ladybug paper (backside of the red) to use on another project ☺

I cut some green and teal patterned papers to 5-1/4" wide and layered them onto card front (as shown in my completed card photo).

I used a sunrays stencil to apply green distress oxide inks to a white circle I had die cut using the Pierced Circles Set, then layered that onto 2 larger nested circles in shades of green.

I then die cut all my decorative elements from white cardstock and colored with Copics, and the sentiments I cut from blue and red cardstock + white glittered cardstock.  Easy peasy!


I hope you enjoyed my project today!  ✿ Kris


Sunday, April 16, 2023

Lattice Card with 3D Vellum Butterfly


Happy Sunday friends ღ

Kris here to share with you some crafty inspiration! I had some fun with vellum and metallic foil cardstock with the brand new Spring Butterflies from the new Easter/Spring Release.  

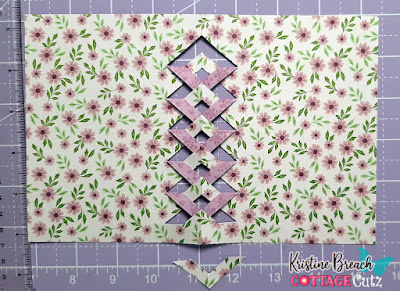
I decided to revisit a very old fun fold (I made some of these about 15+ years ago) but haven't made them in such a long time... it's called the Lattice Fold. 

Design Steps:

1.  I started with a double sided 12" piece of patterned cardstock and cut it to 5-1/2" x 8-1/2" - and scored the long edge at 4-1/4"

2.  I created a lattice template by cutting a piece of  65 lb. paper at 2-1/2" x 5-1/2"

3.  With paper placed vertically in front of me, I measured and made tick marks at 1/2" and 7/8" (from the left edge of paper) and drew straight lines to connect them as shown below.


4.  Along the very left edge of template, I made tick marks at 1/2".... 7/8".... 1-1/4".... 1-5/8".... 2".... 2-3/8".... 2-3/4".... 3-1/8".... 3-1/2".... 3-7/8".... 4-1/4".... 4-5/8"

5.  Along the 1/2" and 7/8" lines, I made tick marks at 1-1/4".... 2".... 2-3/4".... 3-1/2".... 4-1/4".... 5"


6.  I then used my ruler to draw diagonal lines to connect the tick marks as shown below.  Start at the top and connect the top tick mark on the left with the top mark on the 7/8" line.  Then 2nd line will connect to the 2nd tick mark on the left with the 1st mark in the 1/2" line and so on (see photo below)


7.  Fold your card base in half and align your template with the left folded edge of card.  Use clips to keep template in place and CUT only the diagonal lines.


8.  Remove the template and open your base.  Carefully cut off the bottom mountain (or upside-down "V") as shown below.


9.  Skip the next mountain, and bend the next one down and fold tip under the mountain that it overlaps as shown.  Continue moving up, and skipping every other mountain.


10.  Next I took that mountain I cut off in the beginning and added it to the TOP to complete that unfinished lattice area, only gluing the top of the "V" on each side.


11.  Next. I cut a piece of coordinating cardstock (green) that is 4-3/16" x 5-1/2" and taped it to the inside right of card.  It's best to apply your tape/glue to the (inside) card base instead of the insert.

*IMPORTANT - do not just adhere tape or glue to your green piece as you normally would, or you'll have adhesive showing thru the lattice on the front of your card and possibly stick to your envelope.


12.  Next I applied some glue to the parts of the lattice that are near the edge of the green cardstock.


13.  I stamped a sentiment onto lavender cardstock and die cut it with the largest of the Nested Scallop Rectangles set, then attached it to a darker purple cardstock that I had cut at 3-1/8" x 4-1/8" and adhered to card front as shown.

14.  I die cut the Spring Butterflies 3x --- once from vellum and twice from pink foiled cardstock, but one of those I ran it thru the machine with less pressure so that it would keep the inner parts in tact.  


15.  I glued all of the pink full butterfly with all the tiny pieces directly to my card front as shown below.

16.  The next pink butterfly, I punched out all the tiny pieces, and only applied glue to the body and adhered to body already there.  Then I slightly bend the wings upwards for more dimension.


17.  The vellum butterfly, I punched out all the tiny bits and applied glue to just the body, then bent the wings upwards even more than the pink one, for a very 3D effect.  The glue I use is Dries Clear by Art Glitter Glue so it won't show under the vellum. 


Thanks so much for popping by today!  
Have a BLESSED Sunday y'all! ♥Kris

PRODUCTS: