Showing posts with label Easter. Show all posts

Friday, March 01, 2024

Hippity Hoppity Easter Express

Happy Friday friends!

It's Kris sharing with you today. It's the first day of March, which means there's  30 more days til Easter!  I have a few more Easter cards to make and today's turned out super cute, in my humble opinion. ☺  This slimline features the Bunny Express Engine and Bunny Express Carrot Cars along with the Spring Sentiments from the Spring 2022 release.  


Design Steps:

My card base is 4" x 9" (folded).  My next layer (SU! Berry Burst) is cut at 3-3/4" x 8-3/4" (I actually cut it 1/16" shy of those figures, but if you don't like working in 16th inches, you can easily round up to 3/4")

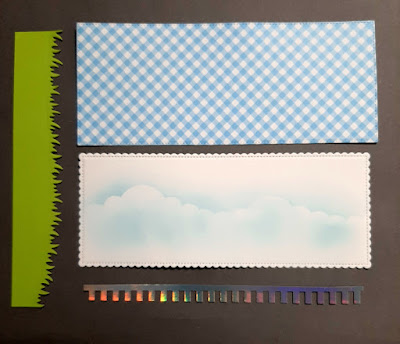
Next, I die cut a piece of blue/white gingham paper (Divinity Designs Polka Dots & Gingham)  using the largest of the Nested Stitched Rectangles Slimline set.  And for my main focal panel, I die cut a piece of white cardstock using the largest of the Scalloped Stitched Rectangles Slimline set.  I then sponged some clouds with Tumbled Glass Distress Oxide ink. 

I cut a piece of (SU! Granny Apple Green) at 1-1/2" x 7-15/16" and I die cut the top with a die from the Grass Slimline set. 

I die cut a piece of iridescent cardstock using the Picket Fence Slimline die and then trimmed it as shown in the photo below to look like train tracks. 


I layered all those pieces onto my card base.

Next, I die cut all of my Easter elements from white cardstock and colored with Copic markers and then I assembled them.  I popped the train onto the track with foam dots and I glued the sentiment to the top.  


I love the font and how the ending letters include bunny ears! 


Thanks so much for looking today!  I hope you are inspired to create something CUTE with your favorite CottageCutz dies ☺

~Kristine


Head over to Cottage Cutz and do a little shopping today!

Get Social With Cottage Cutz

Friday, April 14, 2023

Spring Bunny Car Scrapbook Page


Hey Krafty Friends, Jen from Katahdin Krafts, back with another CottageCutz YouTube video on the CottageCutz Channel.  I used two dies from the latest "Easter" release, "Spring Bunny Car" and "Spring Party Car."  I also used one of my favorites "Spring Sentiments" to finish my layout.


My purple base paper is 8" x 8", the floral paper is 7.75" x 7.75".  The photo mat is sized to fit a 3" x 5" photo, but you can size this to your discretion.  

I really love coming up with ways of using the Cottage Cutz dies to embellish scrapbook pages.  I love how versatile they are, and how accomplished I feel when I finish a layout!

You can find all the layout details over on the  YouTube Channel!

While over on the channel, make sure you like and comment for a chance to win the "Spring Bunny Car" die!

The winner of the "Bunny Tree Cottage" die from my last video is Mary's Card Craft, the details for collecting your giveaway prize are over on YouTube!  

Thanks for stopping in, and happy krafting!


Monday, April 03, 2023

Spring Blessings Slimline


Welcome back Scrapping Cottage friends ☺

Kris here to share with you some more Easter inspiration! I decided to make a slimline card with the new Spring Blessings die from the Easter/Spring ReleaseI also framed them using the Filmstrip Slimline die, and I used the heart from that set for the middle of my cross.  Aren't these lambs and bunnies adorable?!  And I love the pretty flowers and bird around the cross too.  

I used some papers from Doodlebug Designs.

Design Steps:

1.  I cut my white card base at 7-1/2" x 8-3/4" and scored the 7-1/2" side at 3-3/4" 

2.  I cut my plaid paper at 3-3/4" x 8-3/4" and glued to card front

3.  I die cut the Filmstrip die once and the Spring Blessings die 3x and colored the die cuts

*It's hard to see in the photo, but I also added Wink of Stella to all their pink ears, noses, sheep's swirls, bunnies tails, flowers, heart & cross for a bit of sparkle!


4. I cut (2) purple strips at 8-3/16" x 3/8" and glued to back of the filmstrip openings (see below)

5.  I cut 3 pieces of patterned paper at 2-3/4" x 3" and glued to back of filmstrip (along purple edges)


6.   Lastly, I added all my die cut elements and stamped and glued a sentiment and done!


Thanks for taking a peek!  I hope I've inspired you in some way to get creative with your favorite CottageCutz dies!  

~Kristine


PRODUCTS I USED:


Check out the WHOLE RELEASE!!


Sunday, April 02, 2023

Easter Lilies


Hello crafty friends  

I hope you're having a wonderful Palm Sunday (if you celebrate that)!  Kris here to share with you some Sunday inspiration! 

This new Easter 2023 Release is lovely and has dies that can be used for Spring and other occasions, not just Easter!  But I did want to get a couple more Easter cards made, so I've used the Cross w/ Draped Cloth and the Spring Lilies.

Here's a few process pics of my card☺ 


*The stencil I used is from La-La Land Crafts -- I ran it thru with the embossing mat/plate first, then leaving the stencil in place, I added ink on top, fading it out as I went towards the top.

*The sentiment stamp I embossed in white is from Divinity Designs


PRODUCTS:


I hope you have a wonderful Holy Week and a blessed Easter next week!
~Kristine


Monday, March 20, 2023

Hexagon Pop Up Easter Card


Welcome CottageCutz peeps!

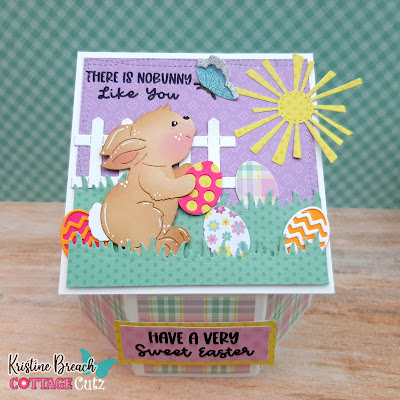
Kris here with some Monday inspiration for you.  My card today is an easy Hexagon Pop Up card featuring some cute Easter dies and more!  This style of card was a li'l harder to photograph, but it's pretty cute when displayed and squishes flat-ish to fit into an envelope.  

I will share my design steps below, but if it's easier to watch a video, you can watch Sam's here.


I used heavy 100 lb cardstock for my springy mechanism that makes it pop out to its hexagon shape, and if you do not burnish the folds, it pops out even more!  However, this also causes the front panel to lean backwards more.  If I had used a lighter weight like an 80 lb. it might stand up more, but then the hexagon would be more wide than deep.  You'll get that idea once you make one.


I've listed & linked all products at end of post.

DESIGN STEPS:

1)   I began with the base of my card that forms the hexagon shape by cutting (2) strips of 2" x 6-1/2" white cardstock and scored at 2", 4", and 6". Mitered the corners of the li'l 1/2" tab on the end. Then I added (3) 1-3/4" squares of patterned paper onto just one of the strips as shown.


2)  I added glue to both 1/2" tabs and glued one tab to a non-tabbed end of the other piece to form a hexagon as pictured.


3) I cut a piece of white cardstock to 2" x 8" and scored at 2", 4", and 6" - fold and burnish score lines. I don't have a photo of this, but add glue to the 2 end sections (the first 2" and then between 6-8") and with it folded in half, insert into base so that it's attached to the center panel of the FRONT of hexagon base and to the center BACK of hexagon base.

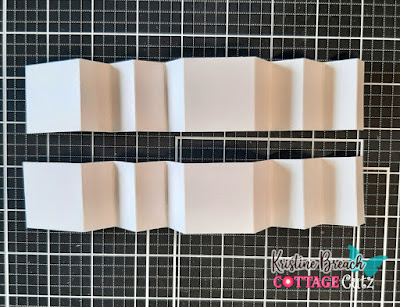
4)  Next, I cut the pieces for the springy mechanism.  Cut (2) strips of 1-1/2" x 9-1/2" and score both strips at 1/2", 1-1/4", 2", 2-3/4", 3-1/2", 5" 5-3/4", 6-1/2", 7-1/4", 8" - Accordion fold as pictured below, but DO NOT BURNISH the folds as it won't pop out as much if you do.  


5)  I glued the small tabs to the opposite end of each strip to make this shape...


6)  Then glue the two together.


7)  Add glue to each of the square ends and insert into the base of the hexagon piece.

8)  I cut my pieces for my main image panel....
--- 4" square from white cardstock.
--- purple patterned paper using the 2nd largest Nested Wacky Stitched Rectangles
--- 2 pieces of green patterned paper using the Grass Slimline die in varying heights
--- die cut the Bunny w/ Butterfly, Spring Bowl w/ Eggs (just eggs), Fence and Grass (just fence) and Stitched Sun, Clouds & Umbrella (just sun)


9)  I glued my purple layer to white square, then the tallest green grass, leaving the very top unattached. Then I glued and tucked the fence and an egg behind that grass.

10)  I popped up the shorter grass with foam strip and glued in the rest of the eggs.  I popped up bunny with foam tape.  I stamped my sentiment in top left corner, then glued my butterfly and sun.


11)  I added glue to the front white mechanism piece sticking up (from the hexagon base) and attached my bunny piece.  I then stamped a 2nd sentiment and attached it to the center of card base.


Here's how it looks from the side...


There's room on the back to write your message. 
 Or you can choose to add patterned paper ☺


Thank you for taking a peek!  

I hope you get crafty with your favorite CottageCutz dies!


PRODUCTS I USED:


And be sure to check out the beautiful 
NEW EASTER RELEASE 
as it's all on SALE!!