Showing posts with label CottageCutz Double Stitched Rectangle Dies. Show all posts

Tuesday, January 02, 2024

Love You Card

Hey crafty friends,
Happy New Year! I hope 2024 will be a GREAT year for you. Here is my first project share for 2024!

I started by die cutting the sweet little Jolly Reindeer w sled die cut pieces in...you guessed it. White cardstock. I then colored my pieces in. I also cut the hearts out of the slimeline die and colored those in as well.  I then cut out a scalloped oval mat from some white paper. I sliced it in half. 
In this above photo off to the right, you can also see where I used one of the cute little bow die cut pieces from the little Reindeer w Sled die cut and cut off the long strand or piece from the little bow. It was one of the pieces of the present, but I used it for the little reindeer's collar. I didn't use the bell because I thought it was a little to "christmasy". 

I then created a pink paper mat for my double stitched mat that I was going to be using. Here is a pic of the pink mat.

I attached the two halves of the scalloped white oval to the bottom of the pink mat. You can also see in the photo that I lightly inked the edges with my blue ink.

Here is a view of the attached scalloped die pieces from the back of the pink mat.

Here is a shot of the pink mat with my little "snow mounds" once it was attached to my double stitched rectangle mat. It is always so satisfying to use your die cuts in unconventional ways. It makes you feel like you are getting a little more mileage out of your tools and save a few pennies by not having to by absolutely every crafty tool out there...lol!

Here is a close up of the sweet little reindeer and his sled loaded down with a ton o' love (hearts) to give. I finished off my card by adding the Love You die sentiment to the bottom. I used some cute Doodlebug patterned paper for the background mat.  My finised card is an A2 size, top folding with a "landscape" size.

Dies Used For This Project


Well, that about covers it for today. Be sure to come back real soon. You will want to keep up with my crafty adventures!  Don't forget to find me on social media too! Links are below.
Until the next time, have a wonderfully crafty day!
Melinda

Tuesday, December 05, 2023

Garden Tub And Flowers Thank You Card

Hello crafty friends,
Today I am back again sharing another easy, quick and pretty card using the new Cottage Cutz Black Friday release dies. Here is what I created.
I created a top folding A4 sized card. I started with black cardstock for my base. I used the new pretty Trellis background die and cut it out of white cardstock.


I then cut out flowers from the Garden Flowers die. I cut them in white cardstock and then colored them in.

I also used the Greenhouse Plants die and did the same, cutting them out in white and then coloring them with my markers.

Here is a closer look at the flowers once I put them in the garden tub die that is also a part of the new release. I cut the tub out in black and the handles in white. I colored the handles with a tan marker that made them look more wooden. I added some chalk and some white accents with my gel pen. I added the cute little Thank you sentiment from the Sentiment, Thank You Berry Much die. I colored it in the same color as some of the flowers.  I mounted all of that onto a double stitched rectangle mat with a piece of patterned paper for a little touch of color.

Here's a closer look at me adding in some diamond dots where the trellis lines meet. I thought this gave the background a little extra subtle touch.

Here is one last look at my completed card. I think it turned out really cute and love the almost farmhouse kind of feel I think it has :-)


Garden Flowers

Garden Tub & Urn

Sentiment, Thank You Berry Much

Trellis Background


Well that about covers it for today. 
Until the next time, have a wonderfully crafty day!
Melinda

Tuesday, October 24, 2023

Easy Snowman Die Cut DIY Card

Happy Tuesday crafty friends,
Today I am sharing a cute, quick and easy card you can easily recreate. It features a super cute snowman die cut from the new Cottage Cutz release. Here is my card.
It is a standard top folding A4 card. It is a very easy card that you can recreate and make several for the upcoming holiday season.
I started by cutting out some base dies and some corresponding mats from some patterned paper. The paper is from an Echo Park 6x6 paper pad. I used the Pierced Circle Die set and the double stitched rectangle die set for the die cut bases and then cut some mats from the patterned paper to fit. For the circle, I used the next size down in the die set. The base of the card is a white cardstock cut at 4.25 x 11 and folded at the 5.5 mark to make it a top folding card.


I then went to work on that super cute snowman. I cut him out in all white cardstock. My typical MO. I then colored him in with corresponding colors to the papers I chose. I love doing this method so I can come close to the colors and not have to have so many different paper colors. After coloring the snowman, I assembled him and added him on to the card top I then cut out the stay warm from one of the pieces of paper, You could just as easily  use a stamp or another die cut for a sentiment.

Here's a view of the card standing up and slightly angled. I think it turned out super cute and very clean.


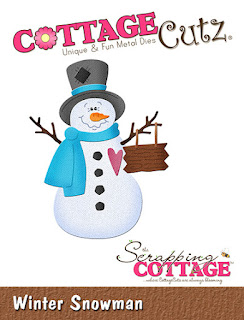
Winter Snowman


Double-Stitched Rectangle Set


Pierced Circle Set

Well that about covers it for today. Be sure to keep stopping back by for some more creative inspiration and the holiday crafting season gets heated up! Also, stop back by this Wednesday as I showcase a super cute project I created for an Instagram Hop I will be participating in! You don't want to miss it!

YOU WILL WANT TO JOIN THE FUN!
You could win 1 of 2 great prizes!
1 $50 Prize from La-La Land Crafts
1- $50 Prize from Cottage Cutz!
Winners will be chosen over on Instagram.

I will also have a full post on my blog with deets on my project! I can't wait to share what I created!

Until then, have a wonderfully crafty day!
-Melinda

Thursday, May 04, 2023

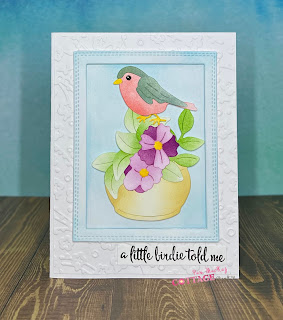
A Little Birdie Told Me!

Hello Friends,

It is Pam creating with you today!   We have a giant Anniversary Sale going on in the store.  Some of the items are up to 75% off!!  Check it out HERE.  The sale ends May 5th so don't miss out!

The Birds in this Easter collection are so versatile and beautiful.  They would be perfect for a mother's day card, thank you, sympathy or just about anything! I am using the Spring Potted Flower w/Bird for my Birthday card.

Design Steps:

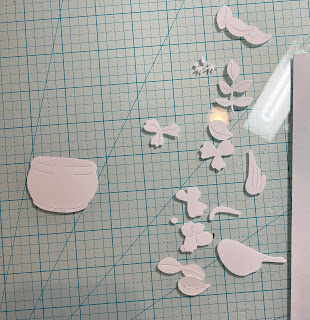
1.  Using the Spring Potted Flower w/Bird cut out all the pieces in white card stock
2.  Using a variety of ink colors shade in all the pieces
3.  To create the frame I used the largest Double Stitched Rectangle and taped the second largest Rectangle  die in the center.  Run it through your machine twice for two frames.  Glue the frames together and also glue the inside of the frame pieces together.  Use a blue ink and blend the frames and the inside of the frames
4.  The card base is white A2 card stock.  Cut a piece of white 4 1/8 x 5 3/8 and then run through an embossing folder.  Glue the embossed piece to the card front.  Place dimension tape around the frame and place it just slightly above center
5.  Pop in the blue inside of the frame and then assemble your bird as shown.  I did use dimension dots on the pot and bird.  Add the sentiment and your card is complete

CottageCutz Products


We have more inspiration on our YouTube Channel check it out HERE

Thanks so much for stopping by!  And I will see you next Thursday.

Blessings and Take Care


Tuesday, May 02, 2023

Thanks Floral Card

Hello Cottage Cutz friends,
Melinda here with you, Today I am sharing a simple card that you can make in bulk to build your stash.
Here is a look at my completed card. I started with a top folding A2 card base. I used some white cardstock for the base.

To the card base, I added a patterned paper mat. I then cut out two mats from the double stitched rectangle die set. I added some patterned paper mats to both of those.

Next, I cut out the pretty Flower 7 die cut twice in white cardstock. I then colored my flower pieces and added them to the smaller of the two mats. I added a bow towards the bottom of the larger mat and adhered it to the base. I added a few layers of foam tape to the back of the smaller mat with the flowers. I wanted to give it a little lift.

I then cut out the word Thanks from the die in white cardstock. I colored it with the same color as the stamen of my flowers. I very  much like to start with white cardstock for my die cuts as then I can color them in to try and match them to my patterned paper selection without worrying about not having all the right colored cardstock. Plus coloring is so much fun and relaxing!

To finish up my card, I added my sentiment on the flower mat and then added three little sequins to give it that little extra touch. It all came together and the flowers were the perfect stars of the card!


Dies Used


In case you didn't know, CottageCutz.com is having a terrific Anniversary Sale! Many dies up to 75% off! Shop Now for the best selection!!!

Well that about covers it for today! Be sure to stop back by and see what the other super talented designers create and don't forget to check out Cottage Cutz on YouTube!

Until the next time, have a wonderfully crafty day!