Showing posts with label Christmas. Show all posts

Tuesday, December 06, 2022

Peace and Joy Wreath

Hello CottageCutz friends! Thanks for taking the time to stop and visit with us today. It's Mary Marsh here bringing you the Tuesday edition of the Blog.

I hoped you enjoyed all the cards and projects the DT has shown with the Classic 50's release. We are heading back to Christmas designs now for even more inspiration. The Christmas Part 1 and Christmas Part 2 dies are still 30% off individual dies. It's only for a limited time so don't delay.

Today I am featuring the new Peace and Joy Wreath die. I thought the wreath should have a bow so I used the Halloween Wreath die. I created a quick and easy Christmas card that would be easy to make multiples of, if you are running short on time for Christmas. 
I also chose an easy layout that features designer paper. That always ups the look of a clean and simple card. It's from a Christmas collection that has lots of greenery, foliage and pinecones. I chose the pinecone pattern. 
Light Green Card Base: 5 3/4" x 4 1/2"
Designer Paper Layer: 5 1/2" x 4 1/4"
White Image Panel: 4" x 3 3/4"
The wreath is cut in a dark green cardstock, and I used red for my berries, bow and the peace and joy phrase. That completed this card. 

dies used to create card:


Sunday, December 04, 2022

Polar Bear Trio Slimline

Hello CottageCutz friends! Thanks for taking the time to stop and visit with us today. It's Mary Marsh here bringing you the Sunday edition of the Blog.

I hoped you enjoyed all the cards and projects the DT has shown with the Classic 50's release. We are heading back to Christmas designs now for even more inspiration. Today I am featuring the new Polar Bear Trio & Igloo die. 

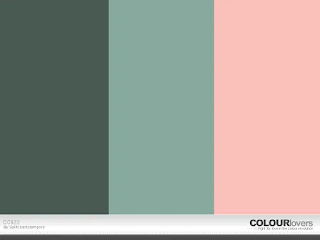
I started my card with the colors from the Splitcoaststampers color challenge #923. We were to use the colors of pacific point, fresh freesia and balmy blue. Optional was to add your favorite pink. I chose polished pink.
I decided to go with a slimline card. I started with the background designer paper. I just bought this new pack of Christmas themed slimline card fronts. The patterns are so pretty and perfect for creating outdoor scenes.

I used the challenge colors for their hats & scarves. For the North Pole sign, I used balmy blue and then merry merlot for the pole. It is a candy cane after all. That's an allowed neutral in this challenge. Not wild about the shade-just a bit dark.

The sentiment phrase is the new Season's Greetings die. I cut that in pacific point cardstock. Added a few more pine trees in white to finish off my card. 

That's it for this post. See you again on Saturday.

dies I used to create card:


Monday, November 21, 2022

Christmas Eve Campsite


Hello CottageCutz friends! Thanks for taking the time to stop and visit with us today. It's Mary Marsh here bringing you the Monday edition of the Blog.

It's new Christmas release time!!! We have new dies in the online store. Our Christmas Part 2 release with 36 new designs is available and ready for shipment.

The individual dies are on sale for 30% off. It's only for a limited time so don't delay. You are going to love all the whimsical designs that are available in this release. There is something for everyone to make your Christmas cards extra special this year.

The Christmas Part 1 dies are also available with 21 new designs and on sale for 30% off individual dies.

Today, I am featuring the new Christmas Eve Campsite die in a slimline design. I have several friends who have campers so this will go to one of them. 

I just purchased this new designer paper, and the background is so perfect for my campsite scene. It has the nighttime sky and the snowbank just ready for a die cut scene.  It comes in the slimline size of 3 3/4" x 9". I trimmed it down to 8 1/2". So, my card is 3 3/4" x 8 1/2". I placed the designer paper over my white card base.

I cut the Christmas Eve Campsite scene in white cardstock. I added a snowman, 2 small trees on the snowbank and a larger tree from the Snowy Village Accessories die. 

Well that's it for me for this post. We have a group post coming this week featuring our new Black Friday release. You won't want to miss our posts. 

Reminder: Our YouTube Channel has a new video from Linh Van. There is a giveaway for being a subscriber, liking the video and leaving a comment. Click here.

dies I used to create card:


Tuesday, November 15, 2022

Silent Night Forest

Hello CottageCutz friends! Thanks for taking the time to stop and visit with us today. It's Mary Marsh here bringing you the Tuesday edition of the Blog.

It's new Christmas release time!!! We have new dies in the online store. Our Christmas Part 2 release with 36 new designs is available and ready for shipment.

The individual dies are on sale for 30% off. It's only for a limited time so don't delay. You are going to love all the whimsical designs that are available in this release. There is something for everyone to make your Christmas cards extra special this year.

The Christmas Part 1 dies are also available with 21 new designs and on sale for 30% off individual dies.

Today, I am featuring the new Silent Night Forest die. It's part of the Christmas Part 1 collection. If you are looking for some quick cards that you can multiples of, this card is for you. 

I used the colors from the Splitcoaststampers color challenge #922. We were to use soft succulent, blushing bride and evening evergreen for our color trio. Optional was to use a die cut. 
evening evergreen, soft succulent, blushing bride

I selected designer paper that is in the soft succulent color. I liked the subtle background script. I cut the designer paper so that it would cover the white card base. I also made it just a bit larger to accommodate the die cut image.  

White card base: 4 3/4" x 5 3/4"
Soft Succulent Designer Paper: 4 3/4" x 5 3/4"

The image was cut in the evening evergreen cardstock. To cover the blushing bride shade, I added some stars in that color cardstock. 
I made a 2nd card using the same die but with different background paper. You can give your card a different look just by changing the designer paper. This card is the same size as the previous one. I used a black designer paper with snowflakes then cut the image in white. I like the bold contrast on this one. 
Well, that's it for me for this post. I hope I have given you an idea for a clean & simple card. I will be back on Sunday with another idea for a quick card.

Die I used to create card: 


Monday, November 14, 2022

Peace Dove with Floral

Hello friends - welcome back on this inspirational Monday ☺

Kris here with a Christmas card featuring the Holiday Dove w/ Floral die from the Christmas Part 2 release!


I played in the color challenge at Splitcoast Stampers again (#CC921):


I got out my Let It Snow 6x6" paper pad from Doodle Bug Designs and found a paper that had all those cute colors in it!  So even though it is flowery, I think it totally goes with this beautiful die!

CUTTING & SCORING:

• Thick White Cardstock -  5-1/2" square, top folding card base
• Flowery paper from Let it Snow -  5-1/4" square 
• Pink Hearts paper (oldie from SU!)  -  4-1/8" x 3-7/8"
• White Cardstock - Die cut largest of the Nested Scalloped Rectangles *With the extended cut technique to make it slightly larger than the Heart paper
• White Cardstock - Die cut the largest of the Nested Stitched Scallop Circles set

• Die cut the Holiday Dove w/ Floral from the following cardstock colors: 
 White / Granny Apple Green / Melon Mambo / Bermuda Bay

***Use my card photo at top to assemble your layers***

 I colored the beak, flower centers and dove with Copic marker on the white die-cuts.  Then I gave the Melon Mambo flowers some shadows with a Copic marker and white gel pen highlights.  


I popped the dove onto my scalloped circle with foam dots and then I glued the branches and flowers behind. 

I die cut the "peace" from the Peace and Joy Wreath and glued it to the bottom of the scalloped circle.

 I finished it off with some pretty silver half beads. ☺

If you haven't been to the store yet, NOW is a great time to shop!!  All the Christmas Part 1 & Part 2 dies are on sale - 30% OFF!!  

PRODUCTS I USED:


I hope you're inspired to create with your favorite CottageCutz dies!

Kris

Tuesday, November 08, 2022

Snowman Friends

Hello CottageCutz friends! Thanks for taking the time to stop and visit with us today. It's Mary Marsh here bringing you the Tuesday edition of the Blog.

It's new Christmas release time!!! We have new dies in the online store. Our Christmas Part 2 release with 36 new designs is available and ready for shipment.

The individual dies are on sale for 30% off. It's only for a limited time so don't delay. You are going to love all the whimsical designs that are available in this release. There is something for everyone to make your Christmas cards extra special this year.


The Christmas Part 1 dies are also available with 21 new designs and on sale for 30% off individual dies.

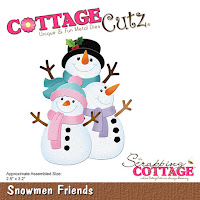
Today, I am featuring the new Snowman Friends die. It's such a cute and playful die so perfect for a fun Christmas card. So, let's get started on some details of how I created my card. 

Design Steps:

I started with the card background. I had this 6x6 piece of bermuda bay ombre designer paper. I stenciled some snowflakes with white pigment ink and then embossed with an icicle embossing powder. I didn't realize the ep would be clear. In hindsight I should have used a white embossing powder. So, I just added some clear wink of stella to each snowflake IRL they are sparkly and stand out a bit more. 
My card colors are from the color challenge #921 on Splitcoaststampers. We are to use bermuda bay, melon mambo and granny apple green for our color trio. Optional was to use a snowman. 
bermuda bay, melon mambo, granny apple green

Then I moved onto my snowmen images. Their faces are so cute and happy. Just makes you want to smile looking at them. I cut them in various shades of cardstock. You could also cut in white and then color with your favorite medium. Either way works fine. 
My card base is the bermuda bay color. I used a white layering panel against the designer paper. 

Bermuda Bay card base: 4 1/2" x 5 3/4"
White layering panel: 4 1/2" x 5 1/2"
Designer paper layer: 4 1/8" x 5 3/8"
Now that all my card elements are prepared I am ready to start card assembly. I wanted a snowbank for the snowmen to stand on, so I used the Happy Reindeer & Snowman die. I cut 2 of the snowbanks and then used some dazzling diamonds glitter for a little sparkle. 
I attached the snowmen with double sided tape. 
I wanted a fun sentiment to compliment these fun images, so I decided on the "tis the season" sentiment. It's from the "Tis the Season" die. I cut it in the melon mambo cardstock. The same color I used for the showgirl's scarf. The snowflakes are part of this die so I used a few. 
To finish off my card, I attached the image panel to the card base. Well, that's it for me for this week. 
Reminder: Our YouTube Channel has a new video from Jen Hartsgrove. There is a giveaway for being a subscriber, liking the video and leaving a comment. Click here.


Saturday, November 05, 2022

Peace and Joy Rustic Wreath


Hello CottageCutz friends! Thanks for taking the time to stop and visit with us today. It's Mary Marsh here bringing you the Sunday edition of the Blog.

It's new Christmas release time!!! We have new dies in the online store. Our Christmas Part 2 release with 36 new designs is available and ready for shipment.

The individual dies are on sale for 30% off. It's only for a limited time so don't delay. You are going to love all the whimsical designs that are available in this release. There is something for everyone to make your Christmas cards extra special this year.

The Christmas Part 1 dies are also available with 21 new designs and on sale for 30% off individual dies.

Today, I am featuring the new Rustic Wreath and Peace and Joy Wreath dies. They are both part of the Christmas Part 2 release. 

I used the colors from the Splitcoaststampers color challenge #920 for the wreath colors. An option this week was to add a 4th color. I chose blue for my bird image. 
merry merlot, polished pink, garden green

The grapevine wreath image is cut in kraft cardstock, and I sponged tea dye distress ink for shading. I used brick wall designer paper for the background. You can use neutral shades in this color challenge. 

The Peace and Joy phrase is from the Peace and Joy Wreath die. I cut it in the merlot cardstock 2x for more definition. 
To finish off the card I scattered a few garden green glitter enamel dots. Well, that's it for me for this post. See you next Saturday. 

Reminder: Our YouTube Channel has a new video from Jen Hartsgrove. There is a giveaway for being a subscriber, liking the video and leaving a comment. Click here.