Showing posts with label Christmas 2022 Release 1. Show all posts

Monday, September 12, 2022

Wintery Village Book Fold Card


Happy Monday crafters!  Kris here with a special card I made for my mom this Christmas.  The newest CHRISTMAS RELEASE has me in full on Christmas card mode! I am not one to pick just one design and mass produce my Christmas cards each year.  Instead, I like to make each one unique ... although I admit, it does make picking whom gets which card a li'l difficult!  LOL!  But I always have made a "special" card for my mom - something that took a li'l extra love and THIS is that card!   

This is a version of the Pop Up Book Fold card, with the addition of a window scene and I'm going to show you how I did it with the photo tutorial below.  You can always click on the picture to see a larger version.  For those who prefer a video tutorial instead, check out this one by Ann Melvin.


Products I Used:

Additional:
Gold foiled snowflake design paper, 12"
Light Pink cardstock, 12" (Bazzil)
Gold foiled cardstock (Recollections)
Pink glittered cardstock (Park Lane)
White glittered cardstock (Park Lane)
Snow-Tex

Design Steps:

 Pink Cardstock:  CUT at 6" x 12" and SCORE in middle at 6".

White/gold snowflake paper:  CUT at 11-3/4" x 5-5/8" and SCORE in middle at 5-7/8".

 I then measured in 3/4" on all 4 sides and placed a pencil mark, then I lightly drew lines between each intersecting point to make a large rectangle.

 I then CUT on the longest lines and SCORED on the shortest lines.

On the short ends, I measured in 1" from the score line and SCORED between the cut lines.

Next, I measured along the longest edge and placed marks at 3-1/4" at top and at bottom.  Then I turned my paper 180 degrees and did the same at the other end.  Then I scored from the edge just down to the cut line on all 4 marks.  

Now it's time to fold and burnish!  Use the photo below for reference.  
Top & Bottom:  Outer score lines are valley folds, middle is a mountain fold.
Middle:  Outer score lines are valley folds, next one in is a mountain fold, and the middle is a valley fold.  
 

I then used the 2nd largest of the Pierced Circle Set and cut a circle from the middle of each "book" panel as shown.


From gold foil cardstock, I die cut 2 of the largest die from the Pierced Wide Circle Frame Set and added glue to the outer edge of the backside of gold circles and attached as shown.  Set aside.


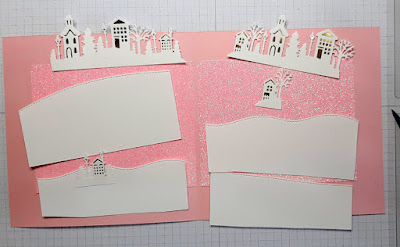
I cut 2 pieces of pink glittered cardstock at 4" x 5" and attached about 1/16" on each side of the score line, and so that there's equal amount on top and bottom as shown.


I then cut 2 of the Wintery Village die.  Then I cut small pieces of gold and glued behind the building and lanterns.


I cut 4 hills for my scenes.  Two of them are a li'l shorter and narrower than the back two, which are cut to 5" wide.


THE FUN PART (and slightly messy! Lol)

I added Snow-Tex to the roofs and trees of my villages.


I then built my scenes by gluing the larger hills to the pink c.s. and I added foam tape behind the front hills.  I also added foam dots behind the li'l buildings in front


I cut 2 more short hills from the white glittered cardstock and attached behind my circle window panels.

Next, I folded my inner (white snowflake) piece and lined it up with the left side of cardstock so it doesn't stick out of the card.  Then I put double sided tape JUST on the short edge and the 2 adjoining sections up to the first score line as shown.  Then folded the right side of card over onto it.


I die cut 2 of the Silent Night Forest die and from one of them, I cut the li'l deer out and attached just behind the front hill.


Next, I created a belly band to help hold my card together as it's pretty thick!  This is completely optional, especially if you're putting in an envelope.  

BELLY BAND:

I cut a gold frame using the largest from the Nested Scalloped Rectangles then, I cut a window from the middle of it using my paper trimmer.  I added 1/8" foam strips all along the backside to pop it up.

I wanted my scene on a li'l bit larger piece of cardstock than the inside of my frame, so I cut a piece on my trimmer and attached the Silent Night Forest (I did trim some off the left side so it would fit)


I attached the frame to top.


I CUT a strip of gold cardstock at 2-1/2" x 11"
I CUT a strip of white snowflake patterned paper to 2-1/4" x 10-1/2"
I attached the patterned paper on top of the gold and wrapped it around my closed card (not too tight!)

I then added tape to each end of the band and placed my Silent Night Forest piece on top.


Here are the Products I Used:


THANK YOU for taking time to visit today!  
I hope I inspired you to get crafty with your favorite CotageCutz dies!  

~Kristine

Saturday, September 10, 2022

Christmas Puppies Slimline Card


Hey Krafty Friends, Jen from Katahdin Krafts, back with another  CottageCutz YouTube  video on the CottageCutz Channel I created my slimline card using several dies from the latest "Christmas Part 1" release.  I love all of these dies!  I'm a Christmas junkie, and love that I can get an early start!


I chose to make a slimline card for this weeks project because of the extra real estate it provided, the puppies needed to spread out in the living room to open their Christmas treats!


You can find all my project instructions over on the YouTube Channel!

While over at the channel, make sure you like and comment for a chance to win the "Christmas Puppies" die!

The winner of the "Baseball Phrase w/ Shadow" die from my last video is Grave V, you can find all the details over on YouTube!


Thanks for stopping in!  Happy Krafting!


Wednesday, September 07, 2022

Here Comes Santa Clause!


Hi everyone! Linh here and I have a new video up on the Cottage Cutz YouTube channel. The holidays will be here before you know it!  The first Christmas collection has just released and there are some really fun sets to play with.  On this card, I'm featuring the Nordic Santa & Reindeer along with the Wintery Village to create this fun night scene! They say a picture is a thousand words, so I've left the sentiment off this time.


Monday, September 05, 2022

Peeking Reindeer Window Shaker


Happy Monday CottageCutz peeps!  
 
Kris here with a card featuring the cute Peeking Reindeer Window die from the NEW CHRISTMAS RELEASE!  I thought with all the open spaces, it would be perfect for making into a shaker ~ and I even had some snowflakes and star sequins to put inside! 

Great News for YOU!!

This whole Christmas Release 1 bundle is 50% OFF for a limited time! And the individual dies are 30% OFF!!

And don't miss our BIG LABOR DAY SALE!! Up to 65% OFF so many dies -  Sale ends Thursday, September 8, 2022 at 9:00 PM Pacific Time sHURRY OVER and save!!!  

~ DESIGN STEPS ~

Creating the Card Base:

The design papers I used are from the Christmas 2019 collection at Divinity Designs.  The glittered cardstock is from the Park Lane collection at Joanne's.

From the following, I cut and attached in this order:

Thick White Card Base:  5-1/4" square 
Purple Cardstock:  5-1/4" square
Large Snowflake Layer:  5" square
White Glittered Cardstock:  5" x 2" - cut the top off with a die from the  Hills Slimline set

Creating My Shaker:

1.  I die cut my Peeking Reindeer Window 3x:  white glittered cardstock, tan, and black.

Since this die is all one piece, you COULD cut it from white cardstock and color the different parts, but since I wanted the icicles to be sparkly, I went ahead and pieced my die cuts.  

2. From the glittered white die cut, I carefully cut away the images of Santa's sled and flying reindeer, leaving a nice straight edge for the window pane.   


3.  From the black die cut, I did the same, except I cut away the window pane and left the Santa & reindeer all in one piece.  I then glued it behind the window as shown.


4.  From the tan die cut, I carefully cut the reindeer out.  I then added some Vintage Photo Distress Oxide ink over his head and feet, and just a tiny bit of the antlers to give him more dimension.  I cut out the eyeballs.  (Sorry!  but they were brown after I sponged ink and wanted to color them green, so with scissors, I simply cut those away.)  I colored the eyeballs and nose with Copic markers.


5.  I added some 1/8" Score Tape around the outside edges of the window on the backside.  

6.  I cut a piece of acetate to 3-1/2" and attached it to the back of my window. 


7.  I then added 1/8" foam strips on top of the acetate, just around the outer edges.  Then added my shaker elements in the middle.  Removed the backing from the foam strips. 

8.  I cut a 3-1/2" square from the light purple with snowflakes paper from the design pack and placed it upside down on my foam strips to cover the back of shaker. 

9. Then I glued the shaker to my card front.


10.  I thought it needed a sentiment, so I cut a pennant from the Windows Slimline set.  Then I stamped "Ho Ho Ho" (from a Stampin' Up! stamp set) in light blue, medium blue and purple, fussy cut them out and glued onto the pennant.  Then I attached with thick foam strips to my card front, and done!


Thanks so much for PEEKING!  :)  

Products I used:


We'd LOVE to see what you do with this fabby Christmas Release!

~Kristine