Hello Scrapping Cottage Friends,
It is Pam sharing with you today!
I am sure most of you have your Christmas card making well under way! I have just a few more to make so I decided to use Christmas Kitty Car and the Wintery Village. This one will probably go to my sister in New York. She has a house full of cats and kittens!! And she has a great hubby who never says no to those strays!
Design Steps:
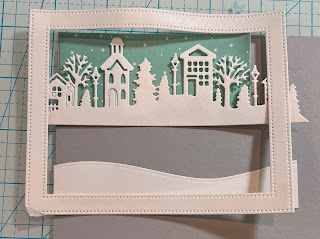
1. Use the Christmas Kitty Car die and cut out the following card stock colors: pink, teal, black, silver, red, brown, yellow green and blue. Shade the pieces with matching inks then assemble with a fine tip glue2. For the card base use a white A2 size, cut two frames from white using the Pierced Wide Frame Retangle set (glue them together), cut piece of teal snowy DP 4 1/2 x 3 1/2, gray card stock 4 1/2 x 2, strip of white 4 1/2 x 1 1/4 cut with the Slimline Hills die, and finally a piece of white cut with the Wintery Village die (I backed the village windows with yellow card stock)
3. The picture above is done with scraps so I could see how it would go together. I glued the snowbank to the frame and set it aside. I then glued down the teal snowy DP to the card center. Then glue the gray strip for the road. Making sure that it will fit perfectly inside the frame. Next add the little village using the frame as a guide to make sure it is just below the top of the frame opening as shown below 4. Next glue down the car and then place dimension tape on the frame and pop it over the little scene. Add your sentiment and your card is complete
We have more inspiration on our YouTube Channel check it out HERE


1 comment:
So cute Pam! I love the houses in the background - looks like a realistic scene here... if cats drove cars! LOL ♥ LOVE IT!
Post a Comment