We have the new release of Christmas Part 2 in the online store and they are all in stock and available for delivery. There are 34 new designs in this release.
This release has something for everyone. So if you prefer a more religious tone to your cards- we have you covered. If you like a more whimsical design featuring Santa, reindeer, gnomes, moose or even a hot chocolate theme you will find some really cute dies.
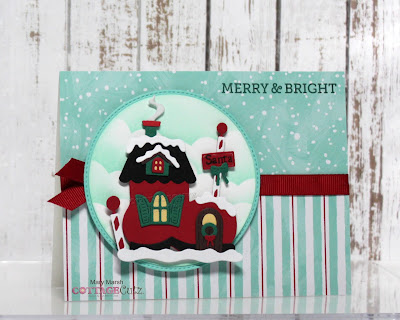
I actually do a combo of religious and whimsical for my Christmas cards. Today, for your viewing pleasure, I am going whimsical with the new Santa's Workshop die. So let's get started with some details on how I created this card.
Step 1: I had somewhat of a layout in mind. So I selected my designer papers. I was looking for something bright and festive and I think I found it in these papers. I like the mix of dots and stripes.
White Card Base: 5 1/2" x 4 1/4"
Snowy Designer Paper: 5 1/2" x 2 1/8"
Striped Designer Paper: 5 1/2" x 2 1/8"
I cut Santa's Workshop with a combo of Christmas red and green cardstocks. I stuck pretty much to the packaging colors. I stamped the Santa sentiment on the light post. Even though there are several pieces to this die, it came together quickly, And, if you were to cut the pieces in white then color it would even be faster.
Step 2: I am ready to start the card assembly. Since I was using ribbon and I didn't want it to show on the inside of the card, I cut another pieces of white cardstock 5 1/2" x 4 1/4". I taped the designer paper to this layer and then wrapped the ribbon. I then attached it to my white card base. It really doesn't add much weight so no issues on mailing.
I wanted the Santa Workshop image on a circle. I used the 2nd largest die from the Circle Set and 2nd largest Stitched Circle dies. I sponged some clouds using a cloud stencil on the white circle in cracked pistachio ink. This color coordinated with my coastal cabana cardstock and designer paper.
I attached the Santa Workshop image using dimensional adhesive.
I attached this image panel to the card base with dimensional adhesive. I cut 2 small tufts of red ribbon and added them to the side. Just for a little card interest.
I wanted a sentiment on the card and my original thought was to stamp on a flag banner. But it just didn't fit this card. So I stamped directly on the designer paper using a spruce ink.
Well that's it for me for this card post. I hope I have given you a bit of inspiration on a way to use this new die. See you next Saturday!
dies I used to create card:


5 comments:
So pretty. I’ll ovr the colors you used and your cloud background.
Haha - that should be love not ovr
Another beautiful card Mary.
Wonderful card! Love that adorable die!
Beautiful card! The color combination is absolutely gorgeous and I love that die too!
Post a Comment