Saturday, May 06, 2023

O Snap Card

Hello Cottage Cutz friends,
Melinda here with you today. I am sharing a fun and quick card for that time when you "forget" someone's birthday or "special" day.

Here is what I created. It is a horizontal A2 card base from white cardstock. I then used a green cardstock for the base mat. I used some cute patterned papers from Doodlebug and matted them with a black cardstock mat as well as a double stitched rectangle mat. I also used the double stitched oval die for the base of the title and to put on the camera. I used the sweet little Elephant die and one of the birthday hats. I also used the cute Celebrate Banner. I colored in all those sweet little heart and stars. I then used the cute little camera and then used the Lemonade Stand title for the sentiment.


Here is a closer look at the banner. I cut it out in white and then colored in the various stars and hearts with my markers. This sweet banner is from the Celebrate Banner die.

Here is a closer look at the Camera. I also put on the title O Snap I created. I adhered all of that to one of the Double-Stitched Oval Dies. I cut it out in white cardstock so the camera and title would really pop. 
I used the O from the lemonade title. I then used the title stand and created the word snap by cutting out the "t" and flipping the "d". I also moved the n in front of the a. This is from the Lemonade Phrases die set.


Here is a closer look at the sweet little elephant from the Festive Elephant Die set. I colored him with my gray markers and some chalks. I used one of the birthday hats from the Party Hats die to dress him up. I used some stickles for some extra touches.


Here is one last look at my finished card. I think it turned out super cute!

Dies Used


Well that about covers it for today! Be sure to stop back by and see what the other super talented designers create and don't forget to check out Cottage Cutz on YouTube!

Until the next time, have a wonderfully crafty day! Melinda.

Thursday, May 04, 2023

A Little Birdie Told Me!

Hello Friends,

It is Pam creating with you today!   We have a giant Anniversary Sale going on in the store.  Some of the items are up to 75% off!!  Check it out HERE.  The sale ends May 5th so don't miss out!

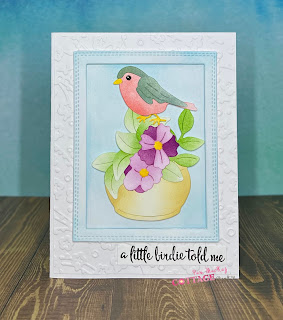
The Birds in this Easter collection are so versatile and beautiful.  They would be perfect for a mother's day card, thank you, sympathy or just about anything! I am using the Spring Potted Flower w/Bird for my Birthday card.

Design Steps:

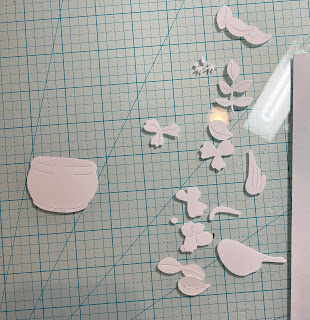
1.  Using the Spring Potted Flower w/Bird cut out all the pieces in white card stock
2.  Using a variety of ink colors shade in all the pieces
3.  To create the frame I used the largest Double Stitched Rectangle and taped the second largest Rectangle  die in the center.  Run it through your machine twice for two frames.  Glue the frames together and also glue the inside of the frame pieces together.  Use a blue ink and blend the frames and the inside of the frames
4.  The card base is white A2 card stock.  Cut a piece of white 4 1/8 x 5 3/8 and then run through an embossing folder.  Glue the embossed piece to the card front.  Place dimension tape around the frame and place it just slightly above center
5.  Pop in the blue inside of the frame and then assemble your bird as shown.  I did use dimension dots on the pot and bird.  Add the sentiment and your card is complete

CottageCutz Products


We have more inspiration on our YouTube Channel check it out HERE

Thanks so much for stopping by!  And I will see you next Thursday.

Blessings and Take Care


Wednesday, May 03, 2023

CottageCutz Design Team Openings

We currently are looking for two designers to join our team. One position would be posting to the CottageCutz Blog and another position as a video designer. The video designer will be posting to the CottageCutz YouTube channel with a how-to tutorial project. 

We are looking for Design Team members who are very active on social media. These sites include: Blogger, Facebook (page or groups), Pinterest, and Instagram. The position will be a 3-month term commitment from July -September 2023with an option to extend. 

We are looking for dependable, energetic, enthusiastic and talented designers who enjoy papercrafting with die-cutting and can showcase CottageCutz dies in different ways (layouts, cards, altered items, tags, etc.) whatever your style may be, we would love to see what you have to bring to our team.

What we expect:

*Must have a personal active blog, Facebook page, Instagram or Pinterest account.

*Good communicator, reliable, dedicated and on time with deadlines.

*Post to the CottageCutz Blog and your personal blog or Facebook Page 4 times per month using only CottageCutz dies. No other dies are permitted. Video designers will post twice a month.

*Actively promote CottageCutz product on your personal blog, Facebook, Instagram accounts or Pinterest account.

*List all CottageCutz dies used and appropriate links back to the store.

*Be able to give instructions to how you used our CottageCutz dies.

*Access to camera that is able to take high quality well-lit photos.

*Upload to at least 1 online gallery such as Splitcoaststampers, Instagram, Facebook or Pinterest.

*Create at least one project for each die given. All dies & stamps need to be used and featured in a project.

*Team spirit and able to follow directions accordingly

*Support DT members by commenting on their posts on the CottageCutz Blog, Facebook or Instagram accounts.

Selected Designer will receive:

*Generous amount in product each month.

*Your name and picture linked to your blog from the CottageCutz Blog.

*CottageCutz Design badge to feature on your blog.

*Great product discount.

*Bonus given to those who are published in a printed crafting publication. CottageCutz  must be listed in the supply list for your project.

To apply, please do the following:

1. Please e-mail Mary Marsh at mrmarsh917@gmail.com with the subject line: CottageCutz Design Team Call.

 2. Please attach 2 projects showcasing dies. These can be projects you have already done or current projects. We would like to see Cards, layouts, altered items, etc. For video applications also send a link to your YouTube channel. 

3. Links to your personal blog or Facebook Page and any online galleries where you upload your projects.

4. Tell us why you think you would be a perfect fit for the CottageCutz design team.

5. Please list current and past design teams.

** We will be accepting applications until May 31 and the selected stamper will be announced shortly after**.

Tuesday, May 02, 2023

Thanks Floral Card

Hello Cottage Cutz friends,
Melinda here with you, Today I am sharing a simple card that you can make in bulk to build your stash.
Here is a look at my completed card. I started with a top folding A2 card base. I used some white cardstock for the base.

To the card base, I added a patterned paper mat. I then cut out two mats from the double stitched rectangle die set. I added some patterned paper mats to both of those.

Next, I cut out the pretty Flower 7 die cut twice in white cardstock. I then colored my flower pieces and added them to the smaller of the two mats. I added a bow towards the bottom of the larger mat and adhered it to the base. I added a few layers of foam tape to the back of the smaller mat with the flowers. I wanted to give it a little lift.

I then cut out the word Thanks from the die in white cardstock. I colored it with the same color as the stamen of my flowers. I very  much like to start with white cardstock for my die cuts as then I can color them in to try and match them to my patterned paper selection without worrying about not having all the right colored cardstock. Plus coloring is so much fun and relaxing!

To finish up my card, I added my sentiment on the flower mat and then added three little sequins to give it that little extra touch. It all came together and the flowers were the perfect stars of the card!


Dies Used


In case you didn't know, CottageCutz.com is having a terrific Anniversary Sale! Many dies up to 75% off! Shop Now for the best selection!!!

Well that about covers it for today! Be sure to stop back by and see what the other super talented designers create and don't forget to check out Cottage Cutz on YouTube!

Until the next time, have a wonderfully crafty day!

Monday, May 01, 2023

Mother's Day Vase Pop Up Card

Happy May Day, crafty friends!

Kris here to share with you a pretty pop up card with a vase and bouquet!  This one is called a Vase Pop Up card... so the wow factor is on the inside of your card.  I decided to make it a Mother's Day theme featuring the NEW Spring Daffodils. 

I'll show you the inside of my card first ☺

and below is the front of my card...

Here's a short clip of how the vase pops up when you open the card ☺  
If you can't see it here, please click HERE.

I followed a video tutorial on Splitcoast Stampers by Gloria here.  It may be most helpful to watch that video (or there are others on YT if you search Vase Pop Up ☺)

The patterned paper I used is called Sunshine and Rainbows from SU!

DESIGN STEPS:

I started with a white A2 card base:  5-1/2" x 4-1/4"

INSIDE RIGHT:
Mango Melody mat = 5-1/4" x 4"
White cardstock = 3-3/4" x 5" 

INSIDE LEFT:
 • Blue patterned paper (same DSP) = 5-1/4" x 4"
• Rainbow striped patterned paper = 2-1/4" x 5"  
- then score along the 5" side at 1" and 4"
- then score along the 2-1/4" side at 3/4" and 1-1/2" just up to the scored line!
- then cut as shown in photo 
• white cardstock = 3/4" x 2"
• white cardstock = 3/4" x 3-7/8" 
- then scored at  3/8" on just one end


It's best to watch the video to see how to create the vase with moving mechanism ;)  


I die cut the Daffodils from yellow (Daffodil Delight), orange (Mango Melody) and green cardstock then gave some shadowing with Copics.


I glued a few of the flowers/stems to the blue layer above the vase, and some I glued to the top back-side of the vase so they pop out along with the vase when the card is open. 

I then decided to print a poem for the right side of my card since I didn't have any big Mother's Day sentiment stamps.  So I cut my white piece down to 3-1/4" x 4-1/4", then I matted it with a piece of blue/white patterned paper that I first die cut with largest Nested Scalloped Rectangle.


For the front, I die cut the Stitched Alphabet in oranges and yellow, and the Daffodils in green and yellow, then I used Copic markers to give the orange shade into it.  The li'l hearts were die cut from the Celebrate Banner die.  And the blue inverted scallops frame is just what was left after I die cut the scalloped rectangle from the middle of it for the inside mat!  


I hope I've inspired you to try something NEW to you using your favorite CottageCutz dies! 

~Kristine

PRODUCTS I USED: