Wednesday, February 08, 2023

Easy Coloring with Distress Inks


Hello my crafty friends.  It's Marla back again with a new video over on the CottageCutz YouTube Channel.  The new "Flowers & More" release is live and packed with products to get you longing for spring.  My card today, features Flower 1, Flower 6 and Flower 7 dies from this release.  I just love a good flower die, don't you?

I have linked the products that I used on my card today.  If you would like an opportunity to enter to win the Flower 6 die, head over to the CottageCutz YouTube Channel to see how you can win.  Prize opportunity open to those in the U.S.A. only, due to shipping costs.


Until next time....Marla


Tuesday, February 07, 2023

It's Your Birthday

Hello Friends

IT'S NEW RELEASE TIME!  The collection is called Flowers and More.  The whole set is on sale at a bundle price of 50% off and individual dies are at 30% off.  The unique thing about this release is that there are not as many pieces in each of the dies.  So they go together really quick and easy!

I have a number of birthdays on the way.  So I decided to make a happy little card using the new Camera die mixed with a few older dies.


Design Steps:

1. Using the following dies: Camera, Mouse w/Cupcake, Film Strips, and Slimline Filmstrip Oh Snap cut them out in the following colors of card stock as shown above: black, silver, white, pink, yellow, checked yellow DP, orange, gray, blue, and black
2.  Assemble the pieces I inked the little mouse around the edges.  To make the picture frame I cut a rectangle 3 x 2 3/4 and then took the 4th from the largest Pierced Square and cut out the opening slight above center
3.  The base is a white A2
  • Pink card stock cut 4 1/8 x 5 3/8
  • Mint polka dot DP 4 x 5 1/4
  • Glue mint DP to the pink
4.  Stamp the white frame with It's Your Birthday.  Lay out your pieces as shown but before you glue.  I cut part of the film and glued it under the popped up camera.  Everything else is glued flat and then glue the pink panel to the white card base
5.  Add a few sequins to your card and it is complete

CottageCutz Products


Here is just a peek at the new release to see it all click HERE

We have more inspiration on our YouTube Channel check it out HERE

Thanks so much for stopping by!  And I will see you next Thursday.

Blessings and Take Care


Monday, February 06, 2023

So BLOOMIN' Sweet

Hello sweet friends!

Kris here with a Springy card for someone 'So Bloomin' Sweet'!

My card today uses 3 brand new dies from the "Flowers & More" Release!  For a limited time, the whole bundle is 50% OFF!!  Or, if you want to choose individual dies, they are 30% off!  ☺ 

Center Step Fold Card
When folded, this card will be a 5-1/2" square


How to Make It

Photo reference for cutting/scoring your base.  
BLACK lines = CUT  \  RED dashes = SCORING
You can click on the pic to see it larger.


• Cut base at 5-1/2 x 11".  

• Put cardstock in paper trimmer VERTICALLY and line the right side up on the 1" line.  Position the blade at 1" and cut down to 6-1/2".

• We need the same cut on the parallel edge.  To do so, you can flip it over (side to side, not bottom to top) and repeat that step.  

• Turn card horizontally and score from the outside edge to the cut lines at 1", 2" and 6-1/2"

• Score between the 2 cut lines at 5-1/2"

The 2" score lines are both valley folds.  All other score lines are mountain folds ☺


• Die cut the largest die from the Nested Wacky Stitched Rectangles set from white cardstock.   If you don't have these or similar, you can cut a rectangle that is 3-1/2" x 4-1/2" - I then sponged it with clouds.

•  Die cut 4 grass borders using the Grass Slimline set from lime green cardstock.  Trim 2 of them to 3-1/2" wide, and 2 of them to 5-1/2" wide.  I sponged Mowed Lawn Distress Oxide ink to 3 of them, leaving one of the 5-1/2" wide ones a lighter green.

• Die cut Bunny with Butterfly |  Little Flowers |  Fence w/ Flower Garland | Arch Sun - then  color and assemble them. 


Glue the sun to the top of the cloud layer, and one of the grassy layers to the lower part.

• Add foam strips to the back of the other shorter grassy layers and pop it to the bottom of the cloud layer, overlapping the glued grass.

• Add foam strips to the back of the fence and attach it between the 2 grassy layers.

• Pop the butterfly up with a foam dot.

•  Glue that whole layer to the middle section of  card base, aligning top edges.

• Add foam strips to the bottom 1" x 5-1/2" section and attach the lightest widest grassy layer.

• Add foam strips to the bottom only of the shorter grassy section and attach to the front bottom of card. You will want to leave the top part non-glued so you can tuck flowers behind it.  

•  Glue the lower half of the bunny between the 2 bottom layers of grass and the little flowers behind each layer of grass.

-- I added some Wink of Stella to the butterfly, bunny's bouquet, and the garland flowers for some shine!


• Cut 2 patterned paper strips to 7/8" x 4-1/4" and tape to each side panel.

• Die cut sentiments and glue to bottom front of card.   -  The "Bloomin" is pieced together from the Garden Phrases.  The "SO" is from Berry Phrases.  And "Sweet" is from Sweet w/ Shadow die.


Hope your week is BLOOMIN' with creativity! 
Kristine


Products I used:


Sunday, February 05, 2023

Galentine Day Floral card

Hello CottageCutz friends! Thanks for taking the time to stop and visit with us today. It's Mary Marsh here bringing you the Sunday edition of the Blog.

We have a brand-new release of dies in the online store. It's our Flowers & More release. For a limited time, you can get the entire bundle for 50% off. The individual dies are 30% off. This release has what we are calling "simple cuts". Meaning not as many pieces to put together so they assemble quickly.

The team has started to make samples so if you have missed any, check back on the Blog. And we will have samples + videos so come back each day to see what we are featuring. If you haven't done so, you can subscribe to the Blog and never miss a post. 

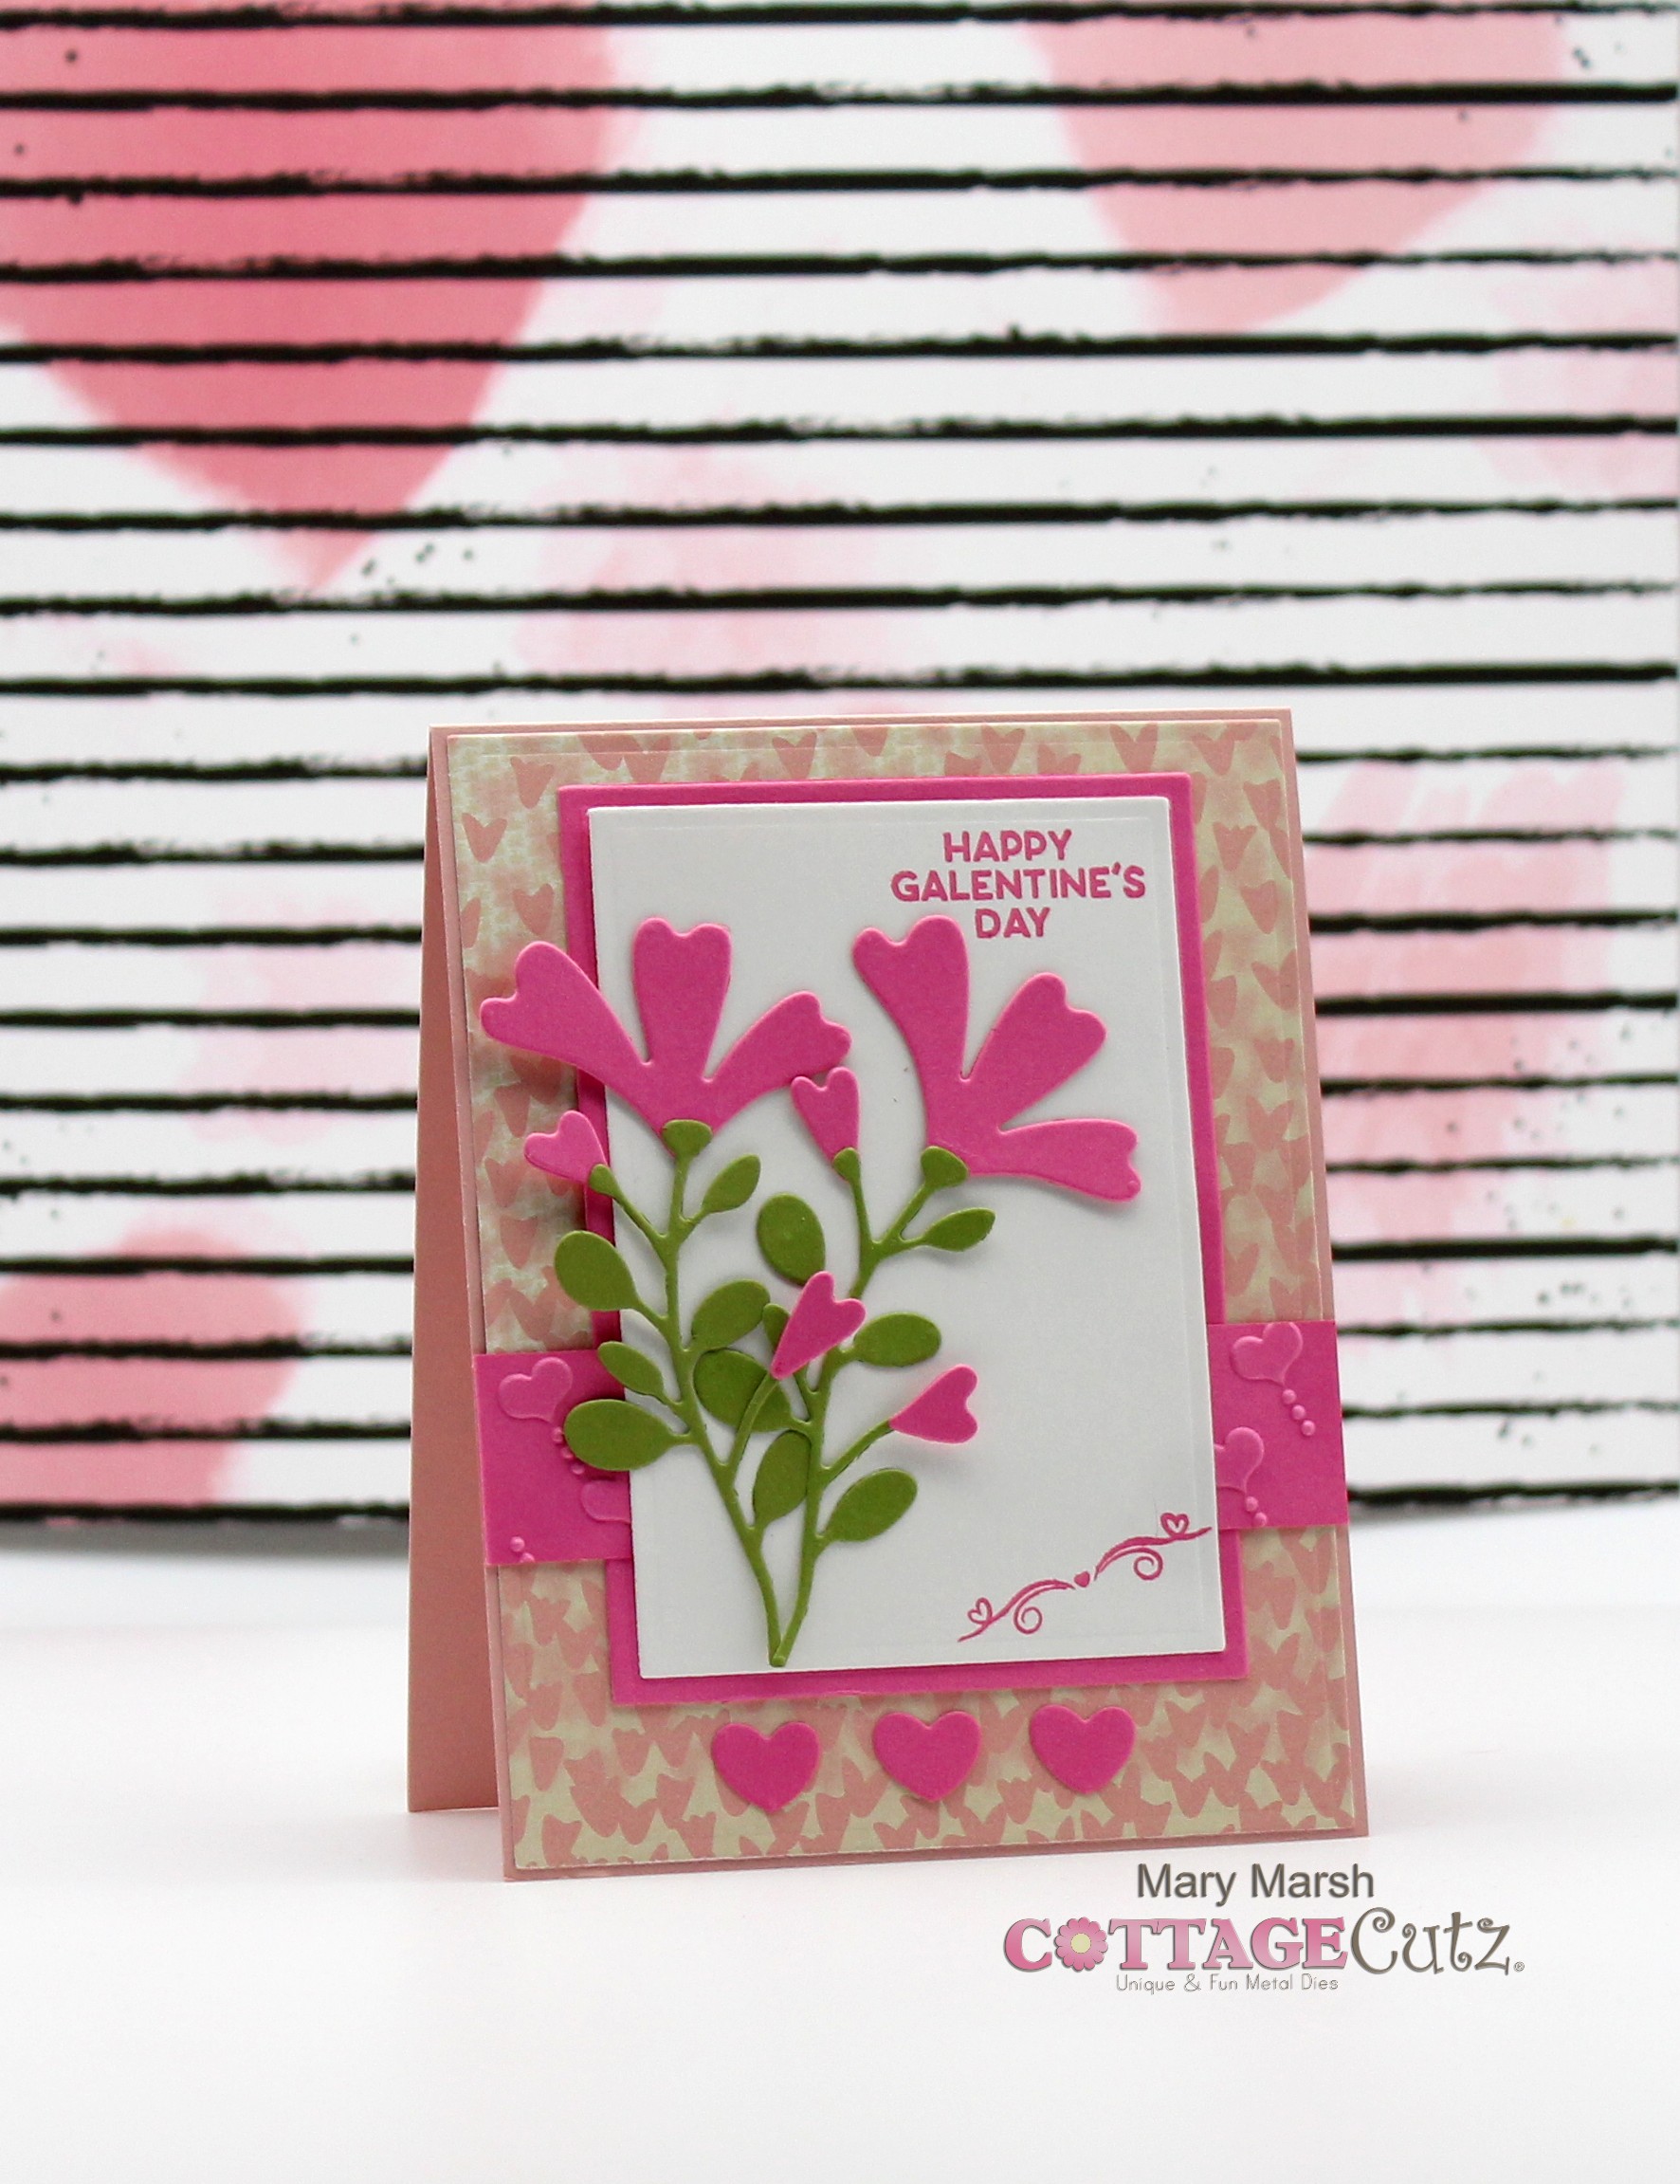
Today for your viewing pleasure, I created a Galentine card that I will send to one of my friends. She doesn't have a hubby so getting a card from a friend will let her know someone is thinking about her. I used the new Flower 1 die. Let's get started on some details of how I created my card.

Design Steps: 
As I have said so many times before, having a layout in mind at the start of my card is always a big boost for me. It jump starts my creative thought process. I love working with the sketches that are out there in the online world. That way I just choose the colors and designer paper and I am good to go.

I liked this older one that I have used before. It's sketch #787 from Splitcoaststampers. 

I chose this soft heart designer paper as the background for my floral card.  

Pink Card Base: 4 1/4" x 5 1/2"
Designer Paper Layer: 4 1/8" x 5 3/8"
Pink Layer #2: 3 1/8" x 4 3/8"
White Image Layer #4: 2 7/8" x 4 1/8"
Next, I cut the floral image. I used colored cardstock. You could always cut everything in white cardstock and use the coloring medium of your choice. I just prefer using the colored cardstock.
I stamped my Galentine sentiment in a bright pink that matches the flowers. 
Now that my panels and images are cut. I am ready to start my card assembly. I started with the image panel. The images are attached with mini glue dots.
For layer 3 of the sketch, I was going to use ribbon and then decided to cut a 1" strip of the bright pink cardstock and embossed it with hearts. This way the image panel would lay flat on top of it. My cards are always a work in progress.
I attached the image panel to the card base with double sided tape. Added 3 hearts to the card bottom for element 5 of the sketch. I thought the right corner of the image panel was a bit bare, so I stamped a flourish there. 
And that's my sample for today. I hope I have given you an idea for a way to use this new flower die. See you next Saturday.

Die I used to create card:

Reminder: Our YouTube Channel has a new video featuring an 8 x 8 layout from Jen Hartsgrove. There is a giveaway for being a subscriber, liking the video and leaving a comment. Click here.


Saturday, February 04, 2023

Special Delivery

Hello CottageCutz friends! Thanks for taking the time to stop and visit with us today. It's Mary Marsh here bringing you the Saturday edition of the Blog.

We have a brand new release of dies in the online store. It's our Flowers & More release. For a limited time, you can get the entire bundle for 50% off. The individual dies are 30% off. This release has what we are calling "simple cuts". Meaning not as many pieces to put together so they assemble quickly. 

The team has started to make samples so if you have missed any, check back on the Blog. I will have a sample for tomorrow's post. But for today, I am featuring a die from the Christmas Part 2 collection. Which, by the way, you can still pick up for 30% off

I used the Sweet Treats Truck and created a Valentine card. 

I started the card with my colors. I used the colors from the current Splitcoaststampers color challenge #933. We are to use coastal cabana, crumb cake and poppy parade for the color trio. 
coastal cabana, crumb cake, poppy parade

I went with a Valentine design for my card. I had this idea for the truck carrying lots of hearts. And I thought the colors were somewhat non-traditional for a Valentine card. 

The truck had Santa and Christmas treats in the truck bed. I just eliminated Santa and his treats and added hearts. I cut the truck in poppy parade cardstock and added the hubcaps in crumb cake. Stamped the special delivery phrase in black ink.

The hearts in the back of the truck came from various older dies. The ones with the wavy lines are from the Lovebug Bee & Ladybug die. 
Used acetate for the windshield and headlight but it didn't show up very well in the photo. In retrospect I maybe should have shaded it with gray ink?

I cut the Valentine phrase from the Valentine Phrase & More die in poppy parade and stamped the love word in black ink.

That's my card for today. See you back here tomorrow with a sample from the new release. 

Die I used to create card: