Thursday, June 23, 2022

Baked with Love!

 Hello Friends

Happy Thursday! It is Pam sharing with you today!

I have recently been on a baking kick!  But in order to keep it off my waistline and the hubby's I am giving a lot of it away!  So I thought this card would make a perfect companion to the baked goods.  I used the adorable Cake Shoppe die to create this sweet little card.


Design Steps:

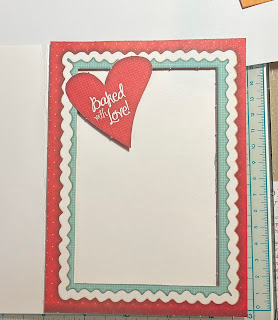
1.  The white card base is 4 3/4 x 6 3/4, the frame and heart is from Pine Cone Papers.  I used dimension tape to attach the frame to the card base.  I also used a dimension dot behind the heart 
2.  Use the Cake Shoppe die and cut out the following paper: DP red checked, DP brown, DP dotted turquoise, white, vellum and DP dotted mustard
3.  Using the Clouds Horizontal Slimline die cut out some clouds in DP checked turquoise 

4.  Finish decorating the little cake shop and add the clouds to the sky.  I added 3 rhinestones: two to the banner and one on the flower on the cake shoppe sign.  Your card is complete


CottageCutz Products


We have more inspiration on our YouTube Channel check it out HERE
Thanks so much for stopping by!  And I will see you next Thursday.

Blessings and Take Care


Wednesday, June 22, 2022

Here's Your Sign


Marla here with another CottageCutz YouTube Video Tutorial.  My card today features the "Easel Sign w/ Flowers" from the "Sweet Treats" release and the 'Botanical Garden 2" die.  This cute sign has recently been paired perfectly with the "Cake Shop" and the "Candy Cart" dies. For my card, I wanted to move it from the store front to the center of attention on my floral birthday slimline card.

You can see how this card came together over on the CottageCutz YouTube Channel and enter the GIVEAWAY for a chance to win this die.  I hope you'll join me. In the meantime, here are the CottageCutz products I used on my card today.  Until next time.....


Tuesday, June 21, 2022

Cupcake Slimline Birthday Card

Hello Scrapping Cottage friends!  
Melinda here with you on this Sweet Summer TuesDIE!  Today I am sharing another cheerful and fun birthday card. It features some more of the delightful cupcakes from the New Sweet Treats Release! Here is my slimline card.
I started by creating my base with some white cardstock. I then cut out a piece of yellow cardstock for the base mat. I used the cute scallop stitched slimline die for the next layer. To that I added a mat of some sweet yellow gingham patterned paper. Then the fun really began as I cut out my cupcakes and started coloring them in.

Here is the sweet little puppy dog die I used. I colored her in with some light brown marker. I gave her a pink nose and then added a couple of bows to her ears. The bows are part of her pieces in her die.

I nestled my sweet puppy by a couple of cupcakes. I decorated them with some stickles for a little extra pizazz. kind of hard to tell in the photo but there is some extra sparkle.

I added the happy birthday shadow sentiment and one more luscious cupcake. I then scattered some dew drops for one final decorative touch. Oh I did use some stickles to "glue" them to the base. This actually gives them a little sparkle underneath. The sparkle kind of shines through them when the light hits them. Subtle but a nice extra touch.


Here is the new sweet treats release.

Sweet Treats Release


The Dies I used to create this project:


Make sure you head over to the CottageCutz YouTube channel and check out all of the amazing projects on there. Our video team is doing a wonderful job of filling the channel with all sorts of creative content! You don't want to miss it!

Well that about covers it for today! Until the next time, have a wonderfully craft-die day!
Melinda Beltran


Monday, June 20, 2022

Trio of Cupcake


Hi everyone Happy Juneteenth although I have to go in to work today 🤨.  So not much fun in that but fun is sharing cards perfect for any ocassion.
My card today is fun and bright full of a cupcake trio. I actually made cupcakes like these to bring in to work today so I am sharing them with everyone.

I almost left them all white so that it wouldnt blend in too much with the color in the papers but added a touch of color

I used bright striped paper so I didnt use too much color to over power the diecuts.  SoU sponged on distress ink on the cherry and the cupcake holder.

I hope everyone enjoyed my card and Happy Holiday! ❤️❤️

Product Used


Sunday, June 19, 2022

You Sweet Thing - Gumball Shaker


Happy Sunday ~ it's Kris here with a "sweet" gumball shaker card!  I set out to make simpler card this week but I just couldn't help myself when I pulled out this Candy & Gumballs die - I just HAD to make it into a shaker card, so I hope you'll shake it up with me! ☺   

Products used on my card:
Other:
acetate
patterned paper
shaker elements
foam Tape
glue

*NOTE:  You can swap out some of the circle or cloud dies for other CottageCutz dies you have on hand!  I just used what I had. 

Design Steps:

1.  Cut a card base from thick white cardstock at 4-1/4 x 11"
      -  score at 5-1/2"
      -  round bottom corners (I used envelope punch board)

2.  Cut a patterned paper at 4" x 5-1/4" (I used some from Queen & Co. called Candy Land)
      -  round bottom corners
      -  attach to card front

3.  Cut (2) coordinating pieces of patterned paper at 2" x 4"
      -  cut each piece with one of the Clouds Slimline dies.
      -  attach to card front so that one is slightly longer than the other.


4.  Die-cut pieces of your gumball machine.  (I originally cut mine from pink foiled cardstock, then switched it out for a solid pink.)

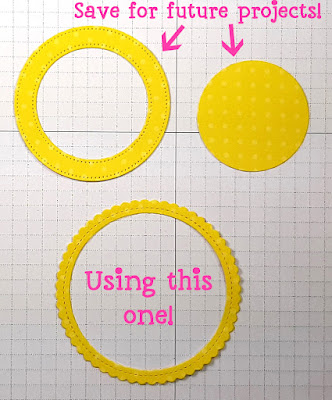
5.  Lay out your dies onto a piece of white cardstock as shown below with the smallest of the Pierced Wide Circle Frame Set, and the 2nd from the largest of the Nested Wacky Stitched Circle Set so that the gumball machine is centered (not the circle!)


6.  Tape the dies in place with a low-tac tape and remove the gumball machine pieces.
      -  run through die-cut machine


7.  I used that first doughnut as a template to create 6 or 7 more (can do less if you're using a thicker cardstock) by placing that doughnut onto another white cardstock and lightly trace inside of smaller circle with pencil and place a dot in the middle.  
      -  remove that doughnut and place your small circle in place & tape with low-tac tape. 

8.  Set aside ONE of your doughnuts.  

9.  Working with 2 doughnuts at a time, place one on top of the other and move them around in a circle motion using your thumbs to feel when the small holes are lined up exactly.  
      -  tape the 2 together with low-tac tape in just one spot  
      -  lift up the open end and glue together.  Remove tape and and add glue so it's all adhered
      -  repeat using all doughnuts except the one you put aside.
      -  run your bone folder over it to flatten any glue bumps after adding each doughnut


9.  Cut a small piece of acetate a li'l larger than the small circle opening and glue it to the top of your doughnut stack.

10.  Glue your last doughnut to the top of your stack to cover up the edges of acetate
      -  be sure to line up the small circles!
      -  be sure to not get glue on your acetate! 

11.  Turn your stack upside down and add your shaker elements in the center.  If your stack isn't tall enough to let your elements "shake", you can cut more doughnuts and add to the bottom of your stack.

12.  Die-cut a white circle using the same size (2nd from largest) of the Nested Wacky Stitched Circles set ---- but don't cut the smaller circle from the middle!

13.  With your stack still upside-down. add glue to all the white area and add your solid circle centered to the top and set aside to dry a little. 


14.  Next, cut a scalloped frame for the front by placing the 2nd from the largest of the Nested Stitched Scalloped Circle set  on a piece of patterned and place the middle die from the Pierced Wide Circle Frame set evenly in the middle and taped both with low-tac tape.
      - run through die-cut machine


15.  Glue frame onto the front of your doughnut.

16.  Glue your gumball machine die-cut pieces to the front as shown:


17.  Attach your shaker to card front and finish off with a sentiment and embellies!  
      *Note:  the bow in top corner is from this Candy & Gumballs die!


Here are the products I used on my card today:


Thanks so much for taking a peek!  
I hope you'll SHAKE IT UP with your next card!  

Have a Blessed Sunday!
~Kristine

Saturday, June 18, 2022

Birthday Cupcakes on Pedestal

Hello CottageCutz friends! Thanks for taking the time to stop and visit with us today. It's Mary Marsh here bringing you the Saturday edition of the Blog.

Our Sweet Treats dies with 13 new designs are still available in the online store. They are so perfect for any card making occasion you may have. The individual dies are currently 30% off.

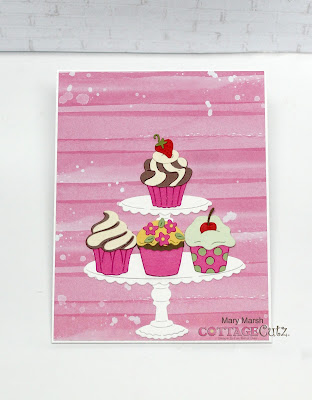
Today for your viewing pleasure, I have created a Birthday card using the Pedestal w/Cupcakes die. This one will be going to my good friend who celebrates a summer birthday.  So, let's get started with some details on how I created my card. 

Design Steps:

Since I knew the die, I was going to use, I decided to use papers and colors that I think are more on the feminine side. I went with a magenta cardstock and designer paper for the card base and layering panel.

Magenta Card Base: 4 1/4" x 5 1/2"
White Layering Panel: 4 1/8" x 5 3/8"
Magenta Designer Paper: 4" x 5 1/4"
Next, I cut my cupcakes in complementary colors. I kept the pedestal white to have it stand out against the designer paper. 
I cut the happy birthday phrase from an older CottageCutz die. The "festive birthday greeting" is from the 2019 Birthday release. I cut in white and did an offset with the magenta cardstock just for a bit of variation. 
Now that my card elements are prepared, I am ready to start card assembly. I attached the designer paper to the white layering panel with double sided tape. Then I added my pedestal and cupcakes using a combo of art glitter glue (dries clear) and double sided tape. 
The happy birthday phrase is attached with art glitter glue. 
To finish off the card front I secured the image panel to the card base. 
I had an extra cupcake so I used it on the inside of my card. I stamped my sentiment, added a piece of the leftover designer paper and the cupcake. And this card is ready to get mailed out in a couple of weeks.
Well, that's it for me for this post. I hope I have given you an idea for a way to use this new die.

Reminder: Our YouTube Channel has a new video from Jen Hartsgrove. There is a giveaway for being a subscriber, liking the video and leaving a comment.  Click here

dies I used to create card: