Thursday, February 10, 2022

Easter Peekers

 Hello Friends

It is Pam sharing with you on this fine Thursday.  I hope you all are doing well.  I am continuing with making my Easter cards using our New Spring release.  Today I am using Spring Windows w/Peekers.  Stacey,  a friend,  that teaches card classes at a local store made a really cute card using this sketch.  I loved it so much I thought I would give it a try.  Thanks for the inspiration Stacey.


Design Steps:

1.  Use a mini slimline base measuring 6 1/2 x 6 1/4 folded in half.  Cut a piece of Flower DP, Checked DP and pink card stock 6 x 3.  In the flower DP use the 4th from the largest Pierced Circle to cut the hole. In the pink card stock cut the hole using the 5th from the largest Pierced Circle making sure they line up

2.  Glue the pink behind the flower DP and then glue the checked DP behind the pink card stock (make sure not to glue to closely to the hole so you can slip in the bunny and chicks)

3.  Using the Spring Windows w/Peekers cut out the bunny and chick on: grey, yellow, orange, black, pink and blue card stock.  Color in the eyes with a fine tip black maker and add the white dots to the bunny's eyes with a white gel pen.  Assemble the pieces with a fine tip glue
4.  Glue in the chick on the right first then add the bunny and finally the chick on the left.  Add the little paws and chick feet
5.  To decorate the top left of the circle cut out blue flowers and greenery using the Spring Gnome Cottage die.  Glue them to the card as shown below and then add your sentiment

CottageCutz Products


Don't forget to check out the new Spring Release.  These sweet dies won't last long!
We have more inspiration on our YouTube Channel check it out HERE
Thanks so much for stopping by!  And I will see you next Thursday.

Blessings and Take Care
Pam


Wednesday, February 09, 2022

"Spring Showers Mouse"


When I saw the "Spring Showers Mouse" die, it brought my back to some of my favorite things about spring.  I don't know about you, but I love spring rain.  The smell of wet grass and flowers is always refreshing.  Especially after a long winter.

Today, I am sharing this slimline card over on the CottageCutz YouTube Channel.  The Scrapping Cottage is generously giving this "Spring Showers Mouse" die away.  Head over and watch the video to see how to enter to win.  I will also be announcing the winner of the "Bottoms Up Bunny Baker" die I was giving away in my last video.  Could it be you?  

Until next time..... Marla


Tuesday, February 08, 2022

Easter Sunday

Hello Friends

It is Pam filling in for Wendy today.  I am starting to make a few of my Easter cards to get a little ahead.  The New Release die I am using is Baptism.  It has several really nice pieces that can be used in a number of different cards such as Easter, Weddings, Baptism and Sympathy.


Design Steps:

1.  I am using a mini white slimline for a base 6 1/4 x 6 1/2 folded in half.  Using the second from the largest Stitched Rectangle Slimline die I was able to make the cuts work using yellow DP.  Cut orange flowered DP 5 1/2 x 2 3/4.  Last cut a piece of orange dotted DP 5 1/2 x 1 3/4 and use a border punch on the bottom of it
2.  Ink all of the edges of the white card base and the DP before you glue together.  Glue down the yellow to card base next the flowered DP and last the dotted DP as shown above
3.  Using the Baptism die cut out the pieces in brown wood DP, white, yellow DP, and black (black Bible and little orange flowers not pictured). Cut the squares from yellow DP with the 4th from the smallest Pierced Square die
4.  Glue the squares at a diagonal as shown above.  Pop up the church in the middle, glue down the Bibles and the Cross flat.  Add the little orange flowers cut with Sending Hugs Bear add little pearls to the inside of the flowers and glue down your sentiment

CottageCutz Dies


Don't forget to check out the new Spring Release.  It is perfect for a number of different projects!
We have more inspiration on our YouTube Channel check it out HERE
Thanks so much for stopping by!  And I will see you Thursday.

Blessings and Take Care
Pam


Monday, February 07, 2022

Farmhouse Easter


Welcome back today I am here to share my latest slimline card using Spring Bunny wGiant Carrot and Christmas on the Farm slimline die. 
To make the background slimline die follow along with the theme of Easte I added fun bright colors to go along with Easter.  I cut the Christmas from the back of the truck and made the pickup blue. 

I used a fun patterned piece of paper with some light flowers because we all think Easter and flowers right?!!
I hope everyone enjoyed my card and 

In case you didn't hear, The CottageCutz YouTube channel is up and running.  Head over and check out the latest video! There is a giveaway for subscribing too!

This is the entire release amazing right?!!


Sunday, February 06, 2022

Jesus Is Risen Card

Happy Sunday Scrapping Cottage friends!
Melinda here with you today. It's another Sunday Funday and I hope you are enjoying some crafting! I am sharing a card created with dies from the new SPRING RELEASE! Here's my card.
I created a top folding A2 size card. I used some white cardstock for my base. I then used some pretty floral paper for the base mat from my stash.

I used the beautiful Cross die the Easter Cross with Flowers Die. I cut them out in white and decided to leave them all in white. I thought it would look elegant that way. I used a little foam tape to give the flowers some additional lift. I also used some tiny pearls from my stash. I mounted the cross onto a mat using some more patterned paper from my stash. I  mounted that onto some scallop stitched nested rectangles.


For the bottom border and sentiment, I used words from the Faith Sentiments die set.


For the "is" sentiment, I cut it out of the word Christening from the Baptism Die.


I added some Pearl Nuvo drops for the "i's" in each letter as well as the eye for the sweet little dove.

Here is a closer look at the cross.


Here is one last look at my card.


The Dies I used to create this project:


Faith Sentiments Die Set.

Nested Scallop Rectangle Set
I used the Stitched version but it is currently not available. Here is a great alternative!


In case you didn't hear, The CottageCutz YouTube channel is up and running.  Head over and check out the latest video! There is a giveaway for subscribing too!


Well that about covers it for today! Until the next time, have a wonderfully crafty day!
Melinda Beltran

Saturday, February 05, 2022

Bunny Birthday Hugs & Kisses (new die)

Hello CottageCutz friends! Thanks for taking the time to stop and visit with us today. It's Mary Marsh here bringing you the Saturday edition of the Blog.

IT'S NEW RELEASE TIME! The Spring Release with 20 new designs is in the online store. The individual dies are currently at 30% off.

There is a nice combination of both religious and whimsical designs. So perfect for all card makers out there. And the dies don't have to be used strictly for Spring or Easter. Today I have a birthday card using the new 
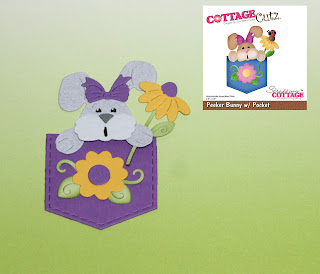
Peeker Bunny w/Pocket die and the Spring Sentiments die. So, let's get started with some details of how I created my card. 

Design Steps:

This week I started with the card colors. I used the colors from the Splitcoaststampers color challenge #881. We were to use gorgeous grape, smoky slate and crushed curry for the color trio. Optional was to use our favorite green. 
gorgeous grape, smokey slate, crushed curry
Next, I chose my designer paper and card base. I have many green shades that I like but for this card I chose pear pizzazz because of this heart designer paper. 

pear pizzazz card base: 4 1/4' x 5 1/2"
designer paper layer: 4 1/8" x 5 3/8"
Then I cut the peeker bunny and pocket in the challenge colors. This sweet little bunny is just too sweet. I love the expression on her sweet face and how she peeks up over the pocket holding a flower. I thought the image was just right for my friend's summer birthday.
The bunny sentiment is from the Spring Sentiments die. Notice the bunny ears on the phrase. How cute is that? 
For the stamped sentiment, I cut a banner from a light green designer paper and stamped the phrase in the gorgeous grape ink. I used my MISTI for placement and because I thought it might need a double ink. And turns out it needed a triple inking.  
Now that all my card elements are prepared, I am ready to start card assembly. I attached the designer paper to the card base and the bunny & pocket with double sided tape. 
I attached the bunny phrase with Art Glitter Glue. A great adhesive that dries clear. The banner is attached with double sided tape. And that's my card for this week. I hope I have given you an idea for a way to use this new die. See you next Saturday!

dies I used to create card: