Friday, January 07, 2022

Happy New Year Winter Easel Card


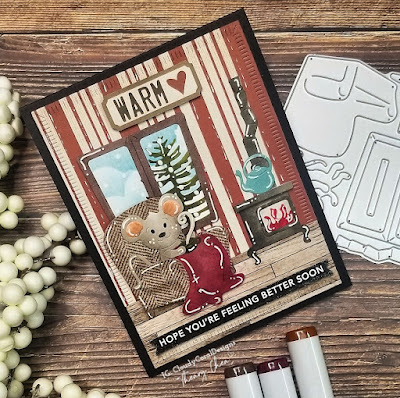
Good afternoon Cottagecutz Fans, I hope you’ve had a wonderful week. Happy Friday! It’s Wendy bringing you the blog today and i am suer excited to bring you a card using the new winter dies. They are just adorable and I struggled to choose which one to use so I used quite a few :-)

I thought I’d make an easel card to mix things up a bit. Cut a Piece of 12’ x 5’ and score in half so 6”. Score again on the card at 3”. Cut another piece of card 6” x 5” and attach the bottom of the card to the folded design again at the bottom


To create the main part of the card I took the ‘Clouds Slimline’ die to create a background. I find it easier to start part way up the card with my clouds and build it up to the top

Next I cut the line for the cable cars, then the cable cars in different colours. I added them onto the card with 1mm foam pads

I then  cut out the mountain from the same die (Winter Ski Trip) and added part way down the card


The next part of the card was to cut some snow using the ‘Hills Slimline’. I cut the snow out twice and layered it on top of each other with 1mm foam pads. Next I cut the ‘Winter Chalet’ and assembled. I just used the chalet and the fire from this die. I then cut some trees from the ‘Winter Whimsical Village’ to add to either side of the card


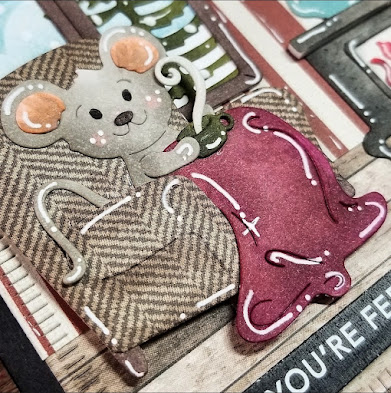
To finish I cut out the ‘Winter Moose’. How cute is he. I added some pink chalk for his cheeks as it would be cold out in the snow


To ensure my easel card stood up I used the Snowboard from the ‘Winter Penguin Snowboarding’ die and attached it to the card with 2mm foam pads. So the card folds completely flat which is great to pop in an envelope

I really hope you have enjoyed the card and are looking forward to a crafty weekend.
Enjoy, hugs
Wendy


Dies I used:


Don’t  forget to check out our YouTube Channel for more crafty fun:


Thursday, January 06, 2022

Valentine Bicycle

 Hello Scrapping Cottage Friends

I hope all of you had a great time celebrating the New Year!  Last year went by so incredibly fast.  

Believe it or not I am starting my Valentines cards.  I am repurposing a Christmas die for this card.  I am using the Festive Holiday Bike.  As you can see I changed up just a few things to make it a Valentine.


Design Steps:

1.  Using the Festive Holiday Bike die cut out the pieces using, deep red, pink, white, and mint green


2.  Assemble the bike with a fine tip, clear drying glue
3.  For the card base I used a 6 x 4 1/4 white card stock, 5 3/4 x 4 pink card stock, 5 1/2 x 3 3/4 Bike DP and a white rectangle cut with the Scallop Nested Rectangle die the second for the largest 
4.  Run the scalloped rectangle through a heart embossing folder.  Then using dimensional dots pop the bicycle onto the rectangle

5.  Glue the pink card stock to the white card base, then glue down the bike DP and finally glue the rectangle with the bike.  Stamp your sentiment and add a few tiny pearls and your card is complete

CottageCutz Products


I am so excited about getting a head start on my Valentines!  I hope to see you back next Thursday! And don't forget to check out our YouTube Channel! Lots of fun ideas!

Take Care and Blessings
Pam

Wednesday, January 05, 2022

Feel Better Card Featuring Winter Mouse

Hello friends! It's Theary here; first of all, I want to wish each one of you a Happy New Year! I hope you all had a wonderful holiday season. 

For my first blog post of the year, I wanted to share a video tutorial over on the CottageCutz YouTube Channel featuring some fabulous dies from the new Winter Release


This card gives me all the feel! With it being flu season, many of us feel under the weather. This card is perfect for sending to someone you love.


For this card, I used Winter Mouse by Woodstove die along with Winter Pine & Birch Tress die. Added some patterned paper, ink blending, and Copic coloring made the card come to life. 

 Please join me here to see how this "Feel Better" card came together and find out who won the last giveaway! 

I hope to see you there!
 Theary


SUPPLIES USED


Tuesday, January 04, 2022

Birthday Badges


Happy Tuesday Cottagecutz fans. I hope you had a wonderful new year. I can’t believe how quickly Christmas went. What I do know is that come June I’ll be working on Christmas for next year.

Anyway it’s Wendy bringing you the blog today and I thought I’d use the Black Friday release to make some birthday badges. I think it’s really cute for youngsters to have a name badge at a birthday party. So this is how I made them

Firstly I cut out 3 of the ‘Nested Stiyched Scalloped Circles’ in a bronze brown colour. I have also cut out 3 of the ‘Stitched Rounded Rectangles’ as we’ll need these shortly


I use 38m broach bars to make my badges and secure wit a hot gun. I then use the small rectangle as cut above to extra secure the broach bar in place


Next I printed some names on this beautiful cream pearlescent card and cut out with the ‘Stitched Circle Set’


I wanted to add a little background to the badges so I cut out some green circles in the same size


Next I used the ‘Grass Slimelime’ to cut some hills from the circles


I then attached the grass to the bottom of the badges and they are a perfect fit


Next I added the names to the brown badges 


To finish off, I used some of the designs from the ‘Black Friday’ release, which I will list below and you have your badges


I really hope you like the badges as much as I did making them. 
Have a wonderful week and I will see you on Friday with another project

Dies I used:


Don’t forget to check out our YouTube channel for new fancy designs


Monday, January 03, 2022

New Year

Hi everyone and welcome 2022 and it has been an fun yet tough year. So 2022 is going to be my year for sure and I am looking forward to what crafty fun comes my way. So my cards for today close out the year and brings in the new with a smile. 

I made my first card with Winter Penguin Snowboarding but he stands in front of the shop window. 
My next card I used the Safari Watering Hole because for me it symbolizes a new beginning and appreciating something so simple as having a drink of water with friends. 

I made them by die cutting a coloring the pieces with my copics and using patterned background papers.


I hope everyone enjoyed my post and be sure to check out our latest video on YouTube here 

In case you didn't hear, The CottageCutz YouTube channel is up and running. We are featuring videos every Wednesday. Drop by and subscribe so you don't miss one and give us a thumbs up on our videos
We are having an amazing sale you don’t want to miss