Friday, September 17, 2021

Congratulations on a New Home

Happy Friday!  It's Jeanne with Friday's edition of the blog.  I have a card that would be perfect for welcoming a new neighbor or giving to a friend who just purchased a home.  It features the Home Sweet Home stampsand dies from Lil' Bluebird Designs, the Circles Windows Slimline and the Congratulations w/Shadow die.

To begin this card I colored and die cut several house and trees.  I actually did more but these are the ones I decided to use.

I used Spectrum Noir Tri-Blend markers to color them.


 My next step was to create the card base.

I cut a panel from white cardstock using the largest of the Nested Rectangle Slimline dies and the one from the Circles Windows Slimline die. 

I then cut 2 1/2 inch squares from three colors of the patterned paper and the coordinating solid colors.

I also cut the sentiment from coordinating cardstock.  Because the die cuts the shadow and script with one pass, I had two sentiments to choose from. I'll keep the extra with the die for future use.


To get the curved ground, I used washi tape to secure the solid color squares to my die cutting plate.  Then I taped my curved die to the plate so it would not move while I cut it.

This gave me a nice continuous curve across all three colors!

Then I adhered my squares behind the circle windows.  To make sure they were even I drew a pencil line 1/2 inch up from the bottom on back of the window panel and marked the center point and sides of the middle square.

When aligning objects, it is best to start in the middle and adjust from the center as you can always adjust side to side. 

 I added my houses....

 ...and the sentiment.  Perfect for a new homeowner or new neighbor!  I hope you've enjoyed my card today.  Be sure to visit the online store where the Lil' Bluebird Stamps are on sale for a limited time.

Products used:


Thanks for visiting today!  I hope you have a fun and creative weekend!


Thursday, September 16, 2021

Coffee Gift Card

Hello Scrapping Cottage Friends

It is Pam creating on the blog with you today!

I have a good number of friends and family who just love coffee!  So I am making a little coffee gift card for a few birthday presents.  I am using several of the Sentiments with Shadows and the Coffee Time Stamp set.  I found this darling card design by Dawn Griffth so I decided to give it a try.  I posted her video tutorial link below.


 Design Steps:

1.  There are two cards involved in create this gift card.  The larger kraft card stock card is 4 1/4 x 11 folded in half and then the bottom flap folded in half again as shown above.  The smaller kraft card stock card is 3 1/2 x 9 folded in half
2.  We are first going to decorate the inside of the larger card.  Cut 2 pieces 4 x 2 1/2 one in cream and one in Coffee DP.   Then cut 2 pieces of black 4 1/8 x 2 5/8.  Glue the cream and the Coffee DP to the black layers.  Also cut a piece of black 4 1/8 x 5 3/8.  Using the Happy Birthday w/Shadow cut the shadow in black and the words in kraft 
3.  With the card open and vertical glue the coffee piece to the bottom, the cream piece with Happy Birthday glued to the center in the middle and the large black piece to the top (all shown above).  Set the big card aside
 
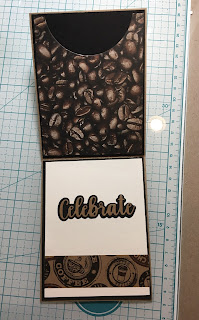
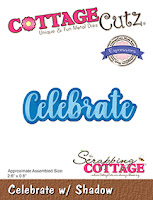
4.  Open up the smaller card and working on the inside of it.  Cut two pieces of black card stock 3 3/8 x 4 3/8, cut a cream piece 3 1/4 x 4 1/4 and a coffee bean DP 3 1/4 x 4 1/4 (I used a 4th from the largest Pierced Circle die to create the cut out in the coffee bean DP). That is going to be my opening for the gift card.  Using the Celebrate w/Shadow die cut out the words in kraft and the shadown in black.  Also cut a piece of strip of coffee DP 1 x 3 1/4
5.  Glue down both pieces of black card stock to the inside of the small card one to the top and one on the bottom.  Put glue just the edges of the coffee bean DP and glue it to the top flap on the inside of the smaller card.  This is the holder for the gift card.  On the bottom glue down the cream card stock on top of the black and add the sentiment and the decorative strip

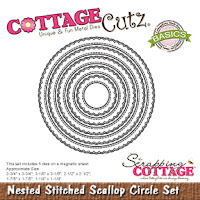
6.  Cut a piece of black card stock 3 1/2 x 1 1/8, cut a piece of cream card stock 3 1/4 x 1.  Stamp your sentiment on the bottom right of the cream card stock.  Using the Smile w/Shadow die cut out the shadow in black and the words in kraft. Glue them together and then glue to cream strip as shown.  Using the 2nd from the smallest Scalloped Stitched Circle die cut out a black circle,  using the 3rd from the smallest Pierced Circle die cut out a piece of kraft card stock and last using the 2nd from the smallest Pierced Circle die cut out a piece of the Coffee DP as shown above.  Glue the circles together.  Close the smaller card and glue the Smile strip in the middle of the card.


7.  With the small card closed open the larger card vertical and open put glue on the back of the smaller card to the top of the larger card onto the black card stock.  Next fold the larger card up tucking it under the smaller cards front flap.  Glue down your little coffee medallion making sure you only glue down the bottom half of the medallion so the smaller cards front flap can tuck into it.  Below is a picture of the card completely opened


8.  To add a little decoration I used the Coffee Time Stamp set and coordinating dies to add the 2 coffee cups and coffee pot.  I used my copics to color the stamped images.  Glue the images as shown above and your gift card is complete

I found Dawn's wonderful video tutorial that really helped me along since I am a very visual learner.  Click HERE for her video.


CottageCutz and Lil' Bluebird Products


 Thanks so much for stopping by today and I hope you give this gift card a try.  It is really not a hard card to make and it turns out so cute!

Blessings and Take Care
Pam


Tuesday, September 14, 2021

Happy Birthday from the Safari Gang


Hello wonderful Cottagecutz friends, thank you for taking the time to visit us today. It's Wendy bringing you not only the blog, but my first blog with Scrapping Cottage. Today's slimline card is made with a birthday in mind but could be used for a birth announcement and many more occasions.


To begin with, I cut out a long strip from the 'Clouds Slimline' die onto white card to use as a stencil. What I really love about the slimline dies is that they are long enough to cover the whole of your card and then some. This means that you don't have to be so uniform with your positioning of the stencil. I used a distress ink and a brush to get the desired effect. Start approx. half way down the card and then move the stencil up to achieve a  perfect cloud formation


For the next part of my design I used the 'Grass Slimline' die. I cut it out twice. One approx. 8cm high at the tallest point and one approx. 4cm high. The tallest grass I adhered straight onto the card using an acrylic glue. The 2nd level I used 1mm foam pads but I only popped these on the bottom as I wanted to imbed some of the animals into the grass


Next I cut the remaining dies I needed for my project. I will list these at the end as I have used quite a few. I'm a fan of textured and pearlescent card and this will be a running theme for me through most of my posts


Once assembled, here is the basic card. It needs a few little touches to bring it to life though which I will show a couple of photos down


In anticipation of the final card, I just wanted to give you a top tip when gluing the sentiment to its shadow. Cut the desired word and pick up it up with low tack tape, that way you can add the glue exactly where need it and once you turn it over it is easy to transfer to the shadow or even directly onto the card


So, some finishing touches for the complete card. I have used some chalks to bring the tree to life as well as the water pool for the hippo. I also using flat backed pearls for the animals eyes as I think they look super cute and realistic. 


I really hope you like the card as I have had such fun making it

Dies I used to create the cards: