Sunday, August 02, 2020

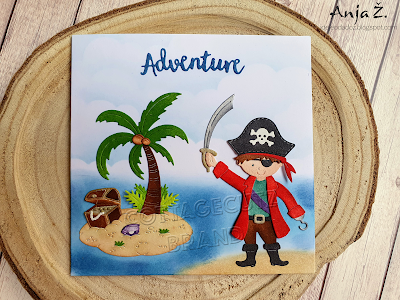
Pirate Adventure

Hi!

It's Anja here. My third card using the new dies is this one with a pirate on a treasure hunt. So much fun combining this cute dies.


For this card I used:
- Cottage Cutz dies (Pirate, Treasure Chest Island, Camping Phrases),
- Distress Inks,
- white card base (15x15 cm),
- white card stock for die cuts,
- black pen,
- white pen,
- silver pigment ink,
- gold pigment ink,
- plastic stencil (clouds),
- pencil,
- brush,
- Wink of Stella glitter brush,
- paper glue.

 First I cut and colored the pirate. I used black and white pen for the eyes.


Next I cut and colored the island. I used Wink of Sella glitter brush for the necklace and the pearl.


I also cut the adventure phrase and colored it.

Then I did the background. I used a pencil to sketch the coloring lines. I did the clouds using a plastic stencil and a brush.


When all the pieces were ready I put the card together. And below is the final result.


Thank you for stopping by. See you again next Sunday.


Anja Z.


Cottage Cutz dies I used for this card:


Saturday, August 01, 2020

Flamingo w/ Hibiscus (new die)

Hello Scrapping Cottage friends! Thanks for taking the time to stop and visit with us today. It's Mary Marsh here bringing you the Saturday edition of the Blog.

We have a brand new release of Beach & Tropical dies in the online store. We have 14 new designs in this release and they are currently on sale for a limited time at 25% off. They are so perfect for creating beach themed birthday cards, thanks you, thinking of you etc. Let your imagination soar! The Design Team will be giving you many ideas in the coming weeks to help spark your creativity. 

For today I am using the Flamingo w/ Hibiscus and Tropical Bouquet dies and created a birthday card. I have plenty of friends who love the beach so one of them will be receiving this card.  Let's get started on some details of how I created my card. 

Design Steps:
I decided to start with my die cuts this week because I wasn't sure of where I was going with my background. This was a work in progress. I cut my Flamingo in a medium shade of pink for her body and a darker shade for her legs. 
Then I cut some flowers in magenta and grape and the leaves in a couple of shades of green. I used the packaging photo as a guide. 
I thought I might do some ink blending and make a sky, water and sand background and then that changed direction. I decided to use this soft seafoam designer paper as the background. I cut a frame in the same shade of cardstock and the card base in a magenta shade that coordinates with the hibiscus flowers. 

Magenta card base: 4 1/4" x 5 1/2"
Soft Seafoam Frame Exterior: 4 1/8" x 5 3/8"
Frame Interior: 4" 3/8" x 4 5/8"
Designer Paper: 4" x 5 1/4"

Attached the designer paper to my frame with double sided tape. Before I stamped the sentiment I attached the leaves and flowers to the corners. I needed those in place so I could get a good placement for my sentiment. I used double sided tape and Ranger multi matte medium. 
The sentiment is stamped in a moss green ink. This shade matched the darker colors of my leaves. I also used my MISTI tool for placement and in case I needed to do a double inking. And in this case it did require 2 inkings.

I attached the flamingo image with dimensional adhesive. I wanted her lifted slightly off the background. 

To finish off my card, I scattered a few magenta enamel dots and attached the image frame to the card base. And, that's it for me for this week. I hope I have given you an idea for a fun way to use these new dies. See you next Saturday!

dies I used to create card:


Friday, July 31, 2020

Oceans of Love

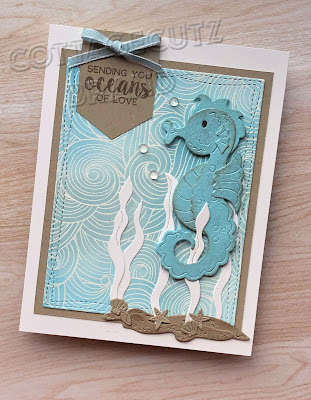
Happy Friday!  It's Jeanne today with a soft, seashore inspired card.  This card uses dies from the Pirates & Sea Creatures release as well as a die from the new Beach & Tropical release.  I was originally inspired by a card I saw on Pinterest.  And as often happens, that was just a jumping off point for my final design.  I was also inspired by the sand/blue/white color combination we so often see in ocean and beach decor.  I kept my color palette very simple for this card
I'll start with the background of the card.  I used my Misti to stamp a large (6 x 6 inch) background stamp in Versamark ink and then I heat embossed it in white.
Next I used three colors of blue Distress Oxide inks to blend an ocean backdrop.
Using the largest of the Wacky Stitched Rectangle dies I cut a panel from the embossed sheet and adhered this to a piece of Crumb Cake cardstock.
I have a tool which allows me to cut a mat from 1/16 to about 1/2 or 3/4 inches.  Here I used the 1/8 inch mark to get a nice border.
I adhered this to a white A2 card base.

Next I worked on the seahorse and ocean bed.  I cut the seahorse from Cool Caribbean cardstock and used Crumb Cake ink to shade the edges.
After assembling him I used a Nuvo Shimmer pen (similar to Wink of Stella) to add sparkle.  I covered him two times.
I used the Tropical Fish and Sandcastle dies to cut the seaweed, sand and shells.
I glued down the sand and seaweed leaving one piece glued just at the bottom so that it could be entwined with the seahorse.  I used foam dots to pop him up off the card.
The sentiment was stamped in Crumb Cake ink and I cut the point with scissors.  I decided to add a small bow at the top.
I added a few crystal drops as "bubbles".  In this photo you can see the detail of the die and the shimmer on the seahorse.

I hope you enjoyed the card today be sure to stop by the online store where the Pirates & Sea Creatures and the new Beach & Tropical releases are on sale for a limited time.

Dies used:


Thanks for stopping by today.  I hope you have a fun and creative weekend!

Thursday, July 30, 2020

Jaws!
Hello My Scrapping Cottage Friends

It is Pam on the blog today!

When I lived in South Carolina near the beach there were multiple shark sightings!  Needless to say when that happened the beaches cleared out very quickly!  The card I am sharing today reminds me of those days on the beaches in Hilton Head.  As a matter of fact this is going to one of my friends on the East Coast.

And don't forget to check out this release of dies in the online store.  This selection of dies features Pirates and Sea Creatures! There are 14 awesome designs in the collection and you are going to want each and everyone of them.   And there is more!! There is another brand new set of dies out called Beach and Tropical Release.  Be watching for our team to create some card designs with this awesome collection.

Background Photo by 

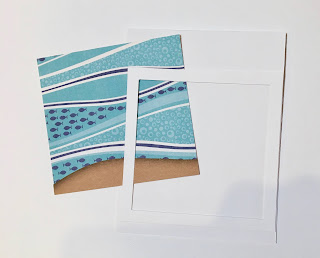
 1.  Cut a piece of white card stock 4 1/8 x 4 1/8 then using the largest Pierced Square die cut a square out of the middle of the 4 1/8 x 4 1/8 piece.  This will create a white frame.  Use a white A2 piece of card stock as the card base.  Cut out a 4 x 4 piece of ocean DP and a 1 x 4 piece of brown card stock cut with a slight hill for the ocean floor
2.  Using the Shark die cut out grey and white card stock.  Use the Mermaid die to cut out the seaweed in two shades of green.  Last use the Paddle and Rope Ladder die to cut out the rope and starfish
3.  Glue the Ocean DP flat to the center of the card front and add the ocean floor.  Place dimension tape to the back of the white frame and attach it around the ocean
4.  Shade all of the die cut pieces and using a fine tip glue applicator assemble the pieces
5.  Glue down the seaweed and add the rope.  Next finish by added additional seaweed, starfish and the shark
6.  I also used some additional tiny fish from the Paddle and Rope Ladder cut.  I cut them in navy and added them above the shark.  Stamp your sentiment and layer onto green and your card is complete

CottageCutz Products


Don't forget to check out the BRAND NEW RELEASE just perfect for those long hot summer days!

Blessings
Pam