Wednesday, June 10, 2020

Happy Father's Day!

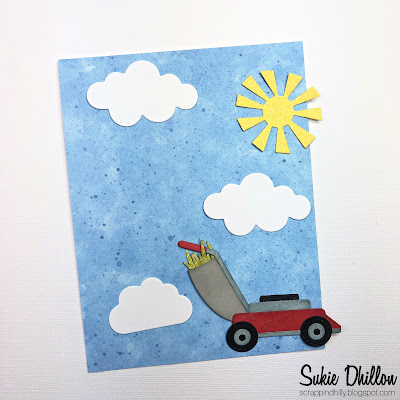
Hello!  This is Sukie and today I'm sharing a Father's Day card for my design team post. I went with a simple look for this masculine card.
The paper I selected is from my stash and is the perfect compliment to the outdoor scene.  The die cuts are from the Cottage Cutz Lawnmower and Clouds & Sun die sets.
The grass mound on my card was fussy cut out of patterned paper and adhered onto the card base.  The clouds were floated above.
The sun was tucked into the upper right hand corner of my card.  The lawnmower was then added as the focal point.
The "Happy Father's Day" sentiment was stamped on a hand cut flag and adhered on the grass mound.
Here are the die sets used on my card, available in the store:

Tuesday, June 09, 2020

Herb Garden

Hi Janja here. Welcome to the blog today.
I don’t know about you, but I adore fresh kitchen herbs myself. I combined some dies and made a card with herb garden.


- CottageCutz dies: Planter Box & Seeds, Flower Power Tomte, Gardening Cat (basket), Square Set, Cross-Stitched Square Set
- blank card: 5 5/16 x 5 5/16" (13,5 x 13,5 cm), folded
- patterned paper: 5 1/8 x 5 1/8" (13 x 13 cm)
- kraft cardstock: 5 1/8 x 5 1/8 " (13 x 13 cm)
- different colors of cardstock
- different colors of ink pads
- glue, double-sided adhesive tape, self-adhesive foam pads

First die-cut all the pieces for main image out from different colors of cardstock. Shade all cutouts with ink pads.


Later, I stamped the names of the kitchen herbs on the sign and added a birdhouse to the top.


Trim three squares. Using two square dies, cut out two frames. Glue both frames together. Paste a small square to the back of the frame.


Start assembling the card. 


Thank you for stopping by. 
Janja


Sunday, June 07, 2020

Welcome To The Tomte Garden

Hi!

It's Anja here. For today's post I made a lovely scene, using the new Tomte dies. I combined both and this is the final result.


For this card I used:
- Cottage Cutz dies (Flower Power Tomte, Gardening Tomte, Hollow Tree w/ Forest Friends),
- Distress Inks,
- white card base (10,5x15 cm),
- silver pigment ink,
- black pen,
- white pen,
- plastic stencil (clouds),
- brush,
- paper glue.

First I cut and colored both tomtes and all the other accessories.


Next I colored the tree and the mushrooms. I used white pen for the mushrooms.


I didn't have a sentiment stamp to fit the wooden sign. So I wrote on it with a black pen.


Last I did the background. I used the technique I like the most. Clouds with a plastic stencil and green Distress Ink for the grassy ground.


Then I just added tomtes, the tree and all the other small pieces and my card was done.


That's all from me for today. Have a nice Sunday and see you again next week.

Anja Z.


Cottage Cutz dies I used for this card:


Saturday, June 06, 2020

Plant A Garden


Hello Scrapping Cottage friends! Thanks for taking the time to stop and visit with us today. It's Mary Marsh here bringing you the Saturday edition of the Blog.

We have a brand new release of dies in the online store. This one is garden themed and has 19 new designs. These new dies are perfect for Father's Day, birthdays, thank you, or even a thinking of you card for the person who loves to garden.

For my card today, I am featuring the new Gardening Cat die and created a thinking of you card for a friend who loves to garden. I am trying to send cards that have a message of hope with all that's going on in our world. So let's get started with some details on how I created my card. 

Design Steps:
I started this card with my sketch. I had one saved on my computer that I thought would work well with this die image. It's an older one from Splitcoaststampers #696. I used this sketch a couple of years ago and created this card. I linked it just to give you an idea of how you can get a different look from a sketch just by changing up the images.
Before I chose the card colors, I cut the images from various colors of cardstock. The cat is cut from smoky slate cardstock and I used the same color ink to sponge around for depth. I lightly sponged pink on her ears and cheeks. I also used the garden plot from the Gardening Mouse die. 

Next, I looked through my designer papers and found this floral one. It caught my eye almost immediately. I liked the flowers and soft pink background. 

Sweet Sugarplum card base: 4 1/4" x 5 1/2" 
Olive layer 2 + White layer 3 of sketch:  used largest Pierced Rectangle die (4 1/4 x 3 1/4")
For the background layer instead of stenciling clouds, I decided to use a sun rays stencil and sponge the corner with wild honey distress ink. It helped to fill in the white space on the card. 

The sentiment was the next to be completed. I recently bought some garden sentiment stamps and thought this one would work well with the Gardening Cat image. I didn't intend to stamp who the quote was from, but I forgot to tape it off when I inked the stamp. Audrey Hepburn was an actress in the 50's & 60's. It's stamped in chocolate chip ink. 
Now that all the elements of the sketch are cut, stamped and sponged, I am ready for card assembly. 
I attached the images to the white panel with double sided tape.

I did take some liberties with the sketch. I moved element 4 of the sketch to the bottom of the image panel. My garden plot is covering that part of the sketch. 
I finished off my card by attaching the remaining panels to the designer paper and then the card base. Added a couple of heart enamel dots and my card is finished.  
Well that's it for me for this week. I hope I have given you an idea for a way to use this new die. See you next Saturday!

dies I used to create card:


Friday, June 05, 2020

I Dig You

Happy Friday!  It's Jeanne today with a card featuring the adorable tomte from the new Gardening release.  I learned a few things this week. To me the new tomtes look a lot like gnomes. So I wondered - what is the difference? I found that Tomte is a Swedish word for a sprite that is pretty much the same as a gnome.  In Norwegian he would be called a nisse.  Very interesting!
Now, on to my card.

As I often do, I started by choosing my colors which I got from the patterned paper I decided to use.  This paper is one of my favorites and features a combination of coral, light grey and light blue/green.
I cut the pieces from Calypso Coral, Pool Party and Smoky Slate cardstock along with white.  The tomte and accessories use the Flower Power Tomte die and I used the Hat Box w/Flowers die for the foliage.
I edged the beard and mustache in just a bit of Distress Oxide Pumice Stone.  I used Distress Oxide inks in Antique Linen, Tea Dye, Tattered Rose, and Vintage Photo to color his face, shoes and shovel handle.
I cut a panel 4 1/4 x 5 1/2 inches from the grey/white floral.  Using the largest of the wide stitched circle frames I cut three from Calypso Coral cardstock and one from the zig zag patterned paper.  The third largest of the Stitched Circles fits perfectly inside the frame and I used that as I like the sticthing around the edges.  You could also just use the negative from the frame.

The sentiment is heat embossed in white on a half inch strip.
To give some height to the frame I used three corals frame underneath  the patterned one.  I glued that to the panel and then inset the white circle.
I added my tomte, bird and flower to the circle.  I trimmed the strip and glued it directly to the card, adding the foliage.  The whole panel is adhered to an A2 card base.

Dies:
http://www.scrappingcottage.com/
http://www.scrappingcottage.com/cottagecutzhatboxwflowers.aspx
http://www.scrappingcottage.com/cottagecutzstitchedwidecircleframesetbasics.aspx
http://www.scrappingcottage.com/cottagecutzstitchedcirclesetbasics.aspx

I hope you enjoyed my post today and that you have a fun and creative weekend!