Thursday, June 21, 2018

Route 66!

Hello Cottage Cutz Fans!

It is Pam sharing with you today on the blog!

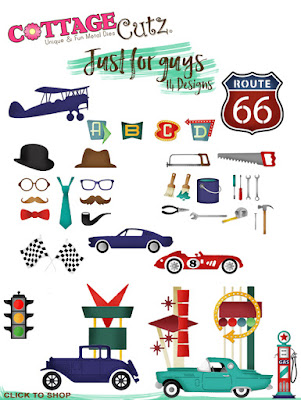
We have a number of sales going on in the store today!  Including the new release which is Just for Guys!!! It has 14 wonderful dies for the awesome men in our lives! Can you believe they are on sale for 25% off!  So please check out the online sales!


The other sale we have going on is our ANNIVERSARY SALE WITH UP TO 50% off most of the dies in the store!

Now onto the project for today!  I used some fun designer paper and our new Route 66 Road Sign die!
Designer Steps:
 1.  Cut all of the pieces out of white card stock using the Route 66 Road Sign die
 2.  Color the pieces using your markers
 3.  Cut a white Double Stitched Rectangle and pop the Route 66 sign on top of it.  Cut to 1/4 x 5 1/4 inch red strips
4. Use an A2 white card base cut a slightly smaller piece of red card stock and then a piece of DP 5 1/4 x 4.  Glue all of the piece to the front of the white card base

 5.  Add the red strips and the Route 66 panel


6.  Color the additional road signs with your markers. Stamp the arrow with Roadtrip
Cottage Cutz Products


Thanks so much for stopping by and the sales end soon so don't miss out on these fabulous discounts!
Blessings
Pam

Tuesday, June 19, 2018

Cars here ... cars there ... cars everywhere

Hi, Janja here!

For today, I prepared two cards. Both are made with a new release - Just for Guys.


For the first card I used:
- CottageCutz dies: Vintage T-Bird, Vintage Gas Pump
- white card base: 5.5 x 5.5" (14 x 14 cm), folded
- patterned paper: 4.25 x 4.25" (10,8 x 10,8 cm)
- patterned paper: 5 x 5" (12,7 x 12,7cm)
- red cardstock: 5.1 x 5.1" (13 x 13 cm)
- colored cardstock
- colored ink pads
- double-sided adhesive tape, self-adhesive pads, glue

Cut out a vintage car and a gas pump in different colors of cardstock.


On the selected patterned paper stamp the trace of car tires and an inscription.


Cut the remaining paper, and white card base.
Complete the card.


For the second card I used:
- CottageCutz dies: Racecars & Flags, Traffic Light, Stitched Wide Square Frame Set
- white card base: 5.3 x 5.3" (13,5 x 13,5 cm), folded
- patterned paper for the frame
- white cardstock: 4.5 x 4.5" (11,3 x 11,3 cm)
- black cardstock: 4.7 x 4.7" (12 x 12 cm)
- colored cardstock
- colored ink pads
- double-sided adhesive tape, self-adhesive pads, glue

Cut out all the elements from colored cardstock, and put them together.


Spray gray and black spots on a white cardstock with a brush. Stamp the traces of car tires, and shadow edges of a white cardstock.
Cut the frame from a patterned paper with the larges die from the set. Attach the frame to the ready background.


Complete the card as shown.


I would like to invite you to the online store, where is a new release - Just for Guys on sale for 25% off. Also, take a look at Anniversary sale and discount. 

Have a nice day.


Monday, June 18, 2018

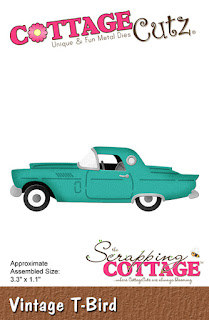
Vintage T-Bird

Hi, Lois here with another example of a masculine card using the new CottageCutz "Just for Guys" dies.  Be sure to check them out in the store.


And, while you're in the store, be sure to take advantage of the Anniversary Sale going on right now.  You can save up to 50% on select dies.

I've been having lots of fun with these new "Just for Guys" dies.  Making masculine cards is sometimes a challenge, but these dies make it so easy.  Again, I've gone back into the past for the layout of my card -- Sketch Challenge 80 from Splitcoaststampers.


For my purposes, I rotated the layout to horizontal rather than vertical.


To start my card, I cut the die pieces from white cardstock, using the Vintage T-Bird and Vintage Gas Pump dies.  I had to chuckle a bit by the names of these dies.  They may be "vintage" images, but they were "new" when I was a teen-ager!  I guess that makes me "vintage," too!!!


Normally the first time I color these CottageCutz die-cuts, I use the images on the packaging as my guide.


Aside from the card base, I was able to use scraps of cardstock and patterned paper for this layout.

White - 8 1/2" x 4 1/4", scored at 4 1/4"
Dark Blue - 4 1/4" x 3 1/4" and 5 1/2" x 2 1/4"
Light Blue - 4 1/8" x 3 1/8"
Patterned Paper - 5 3/8" x 2 1/8"

I didn't have a piece of the roadmap paper the correct size; but, because the middle of the strip would be behind the focal panel, I was able to cut two smaller pieces.


I stamped the sentiment on the light blue piece of cardstock, leaving plenty of space for the gas pump and car.


I then constructed my card.  I decided that I needed something to ground the images, so I glued a strip of gray cardstock along the bottom of the panel.   The gas pump is glued directly to the background, and the car is popped up on foam dots.

CottageCutz dies used on this card are:

http://www.scrappingcottage.com/cottagecutzvintagegaspump.aspx

http://www.scrappingcottage.com/cottagecutzvintaget-bird.aspx


Sunday, June 17, 2018

Father's Day Card

Hi!

It's Anja here. Hope you're having a great day celebrating Father's day. This new Cottage Cutz dies are great to make different cards for your dads and men in general. Not just for Father's day, but also for other occasions. I got mine a few days ago and I look forward to using it in my future crafting projects.

For today's card I found inspiration in Lois's card. I really liked what she did with background and I thought all the small icons and pieces would be so great to use. And this is what I did.


For this card I used:
- Cottage Cutz dies (Happy Father's Day Phrase, Automotive Icons, Classic Car, Hats, Glasses & Mustaches),
- black card base, made from black card stock (21x15 cm),
- patterned paper (10x14,5 cm),
- black and white card stock for die cuts,
- Vesafine Black Onyx Ink pad,
- sentiment stamp,
- stamping platform,
- paper glue,
- scissors,
- Fiskars cutting machine,
- white pen.

Making this card was easy and quite fast. First I made the card base and cut the patterned paper.


Then I die cut all the small pieces from black card stock.


I glued the small pieces on the patterned paper.


I cut the Happy Father's Day phrase from white card stock.


Then I stamped the sentiment with black ink on the white paper and cut it out with the scissors.


And then I just glued both phrases on the background. And my card was finished.


Before I go, I would like to invite you to the Scrapping Cottage store, to check out Anniversary sale and discounts. It's definitely worth the look.

And now I'm off to my craft room. I have some projects to finish and some football to watch. Enjoy your Sunday.

Anja Z.


Cottage Cutz dies I used: