Friday, January 12, 2018

Bouquet of Hugs

Happy Friday! It's Jeanne posting today.  I wanted to bring some sunshine to winter so I thought a bouquet of flowers would be nice.
Like many of my cards, I have a general idea of what I want to do but pick colors based upon one element.  In this case I knew I wanted to use this paper, so I picked the flower colors based on that.
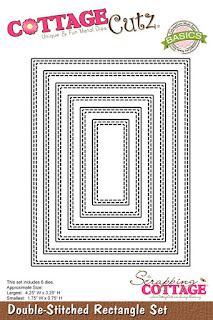
The card base is A2 in size and I cut a panel of the floral paper to 4 1/4 x 5 1/2 inches.  I used the largest of the Double Stitched Rectangle dies for my top panel.
I measured the washi tape for the side (it was 1/2 inch) and trimmed almost that much from the floral panel.  I stuck the washi tape down to the side of the card and then glued the floral panel on top.  I overlapped the washi tape just a very little bit.
Next I die cut the flowers, foliage and vase out of various colors  of card stock and vellum.
I used Distress Oxide inks to color the edges and centers of the greenery and flowers.  I also used the Antique Linen on the sides of the stitched panel.
I used washi tape to temporarily hold down the vase while I glued the stems underneath.  Then I used Ranger Multi Medium Matte to glue down the vellum over the stems.  I used a VERY small amount.  This is the only glue I have found that doesn't show through the vellum.
I removed the washi tape and added the foliage and flowers.  I used an adhesive sheet on the back of the gold card stock before I cut it with the sentiment.  When I placed the sentiment on the card I overlapped the vellum vase and this helped hold that down.  The flowers on the top did the same thing to the top of the vase.

I adhered all layers together and used a few sequins for a bit of sparkle.
http://www.scrappingcottage.com/cottagecutzflowerbouquetjar4x4.aspx

http://www.scrappingcottage.com/cottagecutzdouble-stitchedrectanglesetbasics.aspx

http://www.scrappingcottage.com/cottagecutzexpressionsplushugsphrase.aspx

Thanks for stopping by - I hope you find time to do something creative this weekend!


Thursday, January 11, 2018

Valentine Pup!

Hi Scrapping Cottage Family!

It is Pam creating with you today!  I am making Valentine's for friends and family and the Cottage Cutz dies are so much fun to use!  Plus they are so darling!!
Design Steps:
 1.  Use an A2 white card base and cut a slightly smaller piece of red then run it through a heart embossing folder. Glue to the card front

 2.  I had a set of pink 3 x 3 cards with matching envelops I decided to use.  Glue the small envelope to the card front at an angle as shown.  Then cut a 2 7/8 x 2 7/8 piece of heart DP and glue to the front of the 3 x 3 little card
 3.  Decorate the inside of the card by cutting a 2 1/2 x 2 1/2 white Nested Stitched Scallop Square and gluing it to the inside.  Next cut out the words Hugs & Kisses and glue it to the white square.  Complete the inside by cutting a stitched heart from the Stitched Cupcake die


4.  Slide the little card inside the envelope

5.  Cut out your little pup using the Nurse Pup.  I used light brown and dark brown card stock.  I colored the nose and eyes with a black marker

6.  Attach the pup to the little white envelope add a red bow and some additional hearts cut from the Stitched Cupcake die and then finally stamp your sentiment


Cottage Cutz Products


I hope you have a great time using these adorable dies!  They make just such sweet Valentines!

Blessings


Pam

Wednesday, January 10, 2018

Winter Loaded Envelope


Hello everyone! It's Janet here for my first post of the new year. January has certainly started with a cold slap in the face for many. It's been rough but I don't mind having an extra excuse for hibernating in my craft nook! How about you?

I'm detouring from my normal video tutorial to show you a loaded envelope I created using a winter theme. I have long admired the beautiful and complex looking loaded envelopes that many in the crafting world have shown off. I finally took the plunge and made one myself and I really had fun with it. I honestly was skeptical when people said they found making loaded envelopes relaxing but I have to admit that I found it therapeutic. I created as I went with little more than the basics planned before I started. First I picked a theme (winter) and then chose dies I thought fit the theme. I picked a color scheme and made the empty envelope with paper stock that worked. Then I set about cutting pieces for the project, coloring and putting them together. Finally, I looked at all the die cuts I had completed and started creating the elements that would ultimately load the envelope. Many of the items I made are featured in the photos below.


In the end I created cards, flowers, snowflakes, various clips with snowflakes and deer, rosette wands, gift card holders and several pockets and tags for my loaded envelope. I have a few extra pieces left over but I will be able to use them in future projects. I'm not sure how others approach making the items that will go into their envelopes but this method worked great for me. I had a lot of fun letting the pieces tell me what to do with them. I certainly encourage you to give it a try!

To see all the parts and pieces and learn what dies I used, please click on the video thumbnail below.


Thanks for visiting today. Stay warm and safe!
- Janet

Dies used in this project:


Monday, January 08, 2018

Heartbeats

Hi, Lois here today.  Crafters are always working months in advance, so today I'm bringing you a relatively simple Valentine's Day card, using some CottageCutz dies (an old one and a newer one).  I'm a fan of the Sketch Challenge on Splitcoaststampers, so I used last week's layout and varied it just a bit.


This is my card.  I stretched out the three images further across the center and added a sentiment.


When I started my card, I did not have plans for the extra panel (the black one), so I cut the cardstock I thought I would need.

Red - 5 1/2" x 8 1/2", scored at 4 1/4"
White - 4" x 5 1/4"
Red/White gingham - 1 1/2" x 5 1/4"


After lining the back of a piece of red cardstock with a section of Scor-Tape two-sided adhesive sheet, I cut the die-cuts.  Because of the adhesive back, the die-cuts were a bit wonky when I took them out of the dies, but I knew they would straighten out once I added them to my card.


I then constructed my card . . .


. . . and added the die cuts.


At this point I didn't think there was enough contrast on my card, so I pulled up the white panel, cut it down by 1/8" on both sides and added a black layer, which I had cut at 4" x 5 1/4".  I then added some small black sequins.


I was much happier with this version.  CottageCutz dies used on this card are:

http://www.scrappingcottage.com/cottagecutzhappyvalentinesdayphrase.aspx

http://www.scrappingcottage.com/cottagecutzheartbeats.aspx