Monday, September 11, 2017

Pop-Up Pumpkin . . . and Toad

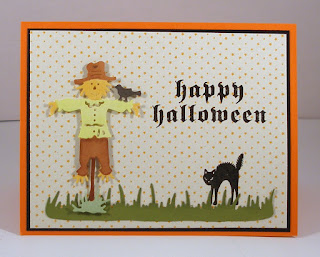
Hi, Lois here in the throes of Hurricane Irma.  But I do have a card for you today.  Halloween  is right around the corner, and I've got another card made with a new CottageCutz Halloween die.  This was a fun card to make.  When you look at the front, it's not very exciting, BUT . . .


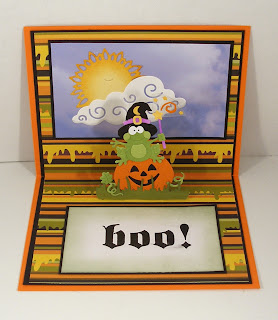
. . . all the fun is on the inside!


To start my base card, I cut cardstock as follows:

Orange - 8 1/2" x 5 1/2"
Black - (1) 4" x 5 1/4", (1) 5 1/4" x 8 1/4", cut in half
Patterned Paper - (1) 3 7/8" x 5 1/8", (1) 5 1/8" x 8 1/8", folded in half


After folding  the orange base in half, I glued down the black mat piece and the smaller patterned paper piece on the front.

I cut all the die cuts from white, orange, black, or green cardstock . . . 


. . . and colored them with either ink or markers.  Then I constructed the frog/pumpkin piece.  Note that the small stars and curly-cue are glued to a small piece of acetate, which was then glued to the large star on the wand with a glue dot.


On the front I stamped the sentiment and the cat in Versafine Black Onyx ink and embossed them with clear embossing powder . . .

. . . and added the scarecrow and strip of grass.


Now came the fun part!  To make my pop-up support on the inside, I cut two 2" slits 1" apart on the patterned paper across the scored center and scored at each end of the strips.


I glued the two pieces of black cardstock to the inside of the card, getting them close to the fold line, but not touching.  This allows the card to close without bending up the edges.  I didn't want to adhere one large piece of black cardstock to the inside because that would tend to "bind" when the card was closed.  Then I added the patterned paper, being careful not to apply glue to the support section in the center.  This section will fold OUT when the card is closed -- with the pumpkin/frog glued to the front of it.


Because the paper is very "busy," I wanted to tone it down a bit by putting a panel on each side of the card.  I cut two pieces of black cardstock, one piece of white, and one piece of "sky" paper.  (These could be any size you wanted.)


I stamped the sentiment on the white piece and sponged a bit of green ink around the edges.


I then cut out the sun and cloud, sponged on some darker color to the sun, and (using a Copic gray marker) added some shading to the under side of the cloud.


I put the pieces together and adhered them to the upper and lower panels of the card.


This photo shows how the frog sits on the pop-up support piece.


CottageCutz dies used on this card are:

http://www.scrappingcottage.com/cottagecutzharvestscarecrowelites.aspx


http://www.scrappingcottage.com/cottagecutzsunandcloud.aspx


The new Halloween die (Happy Toad Wizard), as well as several new series of Christmas dies, will be available for purchase in the CottageCutz store starting September 20th.  Because of the support of their wonderful customers, it has become necessary to move into a larger warehouse.  Because of the move, the store is temporarily on hold.  But that gives you lots of time to decide what you want next!  LOL!


Sunday, September 10, 2017

Rose Bouquets

Hi!

This is Anja again. I hope you are all doing well on this rainy Sunday. My thoughts and prayers go to all who are battling for safety and protection during the hurricanes. 

I made two cards today that can be used on variety of occasions. The rose die from the new wedding collection is one of my favourite new dies. You can use it in so many different ways. Today I made two bouquets. I combined it with wheat sticks, but you could also use some other greenery. 


For this card I used:
- Cottage Cutz dies (Rose with Wedding Rings, Sweet Spring Kitty, Wheat Stalks, Nested Wacky Stitched Square Set),
- Distress Oxides (Candied Apple, Fossilized Amber, Peeled Paint, Vintage Photo, Walnut Stain, Wild Honey, Fired Brick),
- white card base (13x13 cm),
- patterned paper (12,6x12,6 cm)
- white card stock for die cuts,
- paper glue.

I cut the background from patterned and white paper. I used nested dies. This wacky ones add such a nice border to the square. I colored all the edges with Distress Oxide Fired Brick.


I die cut all the other pieces from white card stock. I use 300 g paper for the die cuts becuase it is easier to color. I colored everything with Distress Oxides.


Then I added some 3 effect to the roses and the wheat sitcks.


And then I just arranged the bouquets and glued it together.


And just a reminder for the end. New Halloween and Christmas dies will be available September 20th. No products will ship during this time beacuse we are moving to a larger warehouse. 

Have a nice Sunday.
Anja Z. 


Cottage Cutz dies I used:


Saturday, September 09, 2017

Puppy Trick or Treat

Hello Scrapping Cottage friends! Thanks for taking the time to stop and visit today. It's Mary Marsh here bringing you the Saturday edition of the Blog.

Well we are into the 9th day of September. I hope you have made a smooth transition from the hot, humid summer months. Our temperatures have cooled off somewhat rapidly here in Pittsburgh. So fall is coming- maybe a bit sooner than we want (LOL)! With fall comes thoughts of harvest time, pumpkins, hay rides and of course Halloween.

CottageCutz has a new release of Halloween & Christmas dies coming on September 20th. Online ordering is not available right now because of a move to a larger warehouse. But, the DT will be giving you sneak peeks of what's coming until then.

My card today is using some of the new dies: Halloween Pup, Halloween Phrases & More and Halloween Candy Jar. So let's get started with some details on how I created my card.

Step 1: This week I started my card with my layout. Splitcoaststampers had a good one posted for their Wednesday Sketch Challenge #661. I thought it would work great as my card layout. A layout always helps me to jump start my creativity.
Step 2: I looked through my cardstock and patterned papers to see what colors would work best for a fall card. I chose a pumpkin, olive green and purple for the main card colors. I decided to use the patterned paper for the larger part of the background (#2 in above sketch). Embossed the solid colored cardstock with a pumpkin embossing folder.
Background measurements:
patterned paper: 2 1/2" x 5 3/8"
Embossed Pumpkin Cardstock: 1 3/4" x 5 3/8"
I didn't want a seam showing, so I used some ribbon that matched the puppy's hat and my trick or treat words  to cover the seam and also as an accent piece.
Step 3: Time to start the die cutting. I decided to use more bright festive colors for the puppy's hat. He is such a little cutie and I wanted that carried over with the hat as well as the rest of the card. I believe I accomplished that look.
The trick or treat word I wanted placed in the circle element of the sketch. I used the 4th largest die in the CottageCutz circle set. It's approximately 2 1/2" round. This size was a perfect fit.
Step 4: I am ready to start assembly of my card parts. I cut a rectangle (#3) on the sketch. I layered that over a purple panel. It defined the panel a little more. Used the largest pierced rectangle die.
I added a few pumpkin enamel dots on this panel and a spider to the circle panel. The spider is from the new Halloween Candy Jar set. Layered  onto a white cardstock base (4 1/4" x 5 1/2") and my card is complete.
I hope I have given you some inspiration for a cute Halloween card. Remember all the dies will be available on September 20th. So there will be plenty of time to get cards made for Halloween giving.

A couple of our Design Team members are in the path of Hurricane Irma. Sending thoughts and prayers their way for safety and protection. I will see you next Saturday.

Dies I used to create card:

 
http://www.scrappingcottage.com/cottagecutzpiercedrectanglesetbasics.aspx
http://www.scrappingcottage.com/cottagecutzcirclesetbasics.aspx


Friday, September 08, 2017

Stop and Smell the Roses!

It's Jeanne here today sharing a card featuring some of my favorite things - hummingbirds, roses and Prismacolor pencils!  This beautiful stamp and die set is part of the new release set to be available September 20.

This is an A2 side fold card.  The base is 11 x 8 1/2 inches, scored at the 5 1/2 inch mark.  I cut a piece of patterned paper 5 1/2 x 4 1/4 to completely cover front.
I first picked out the patterned paper and then matched the colors for the rose to it.  I used Copic markers under the colored pencils.
Next I die cut the foliage from the Fancy Doves with Vine die set and glued it directly to the card.  I then die cut the bird and roses.
I tied the ribbon on the bottom of the die cut and popped it off the card using foam dots.
My last step was to add the sentiment and some sequins. I decided to rip the edge of the sentiment strip to give it a more organic feel.

Dies used:

I hope you enjoyed today's card.  This is such a pretty stamp and die set - I had so much fun coloring it and creating this card!

Remember - the new dies will be available September 20 and the website ordering will be down until that date due to Cottage Cutz big move to a larger space.  Keep that wish list going!

See you next Friday!