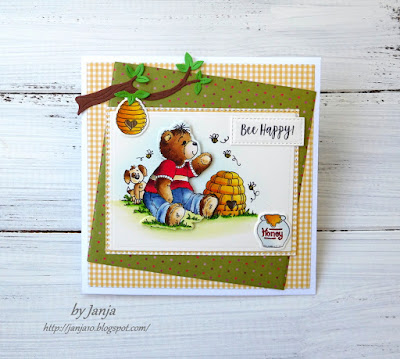
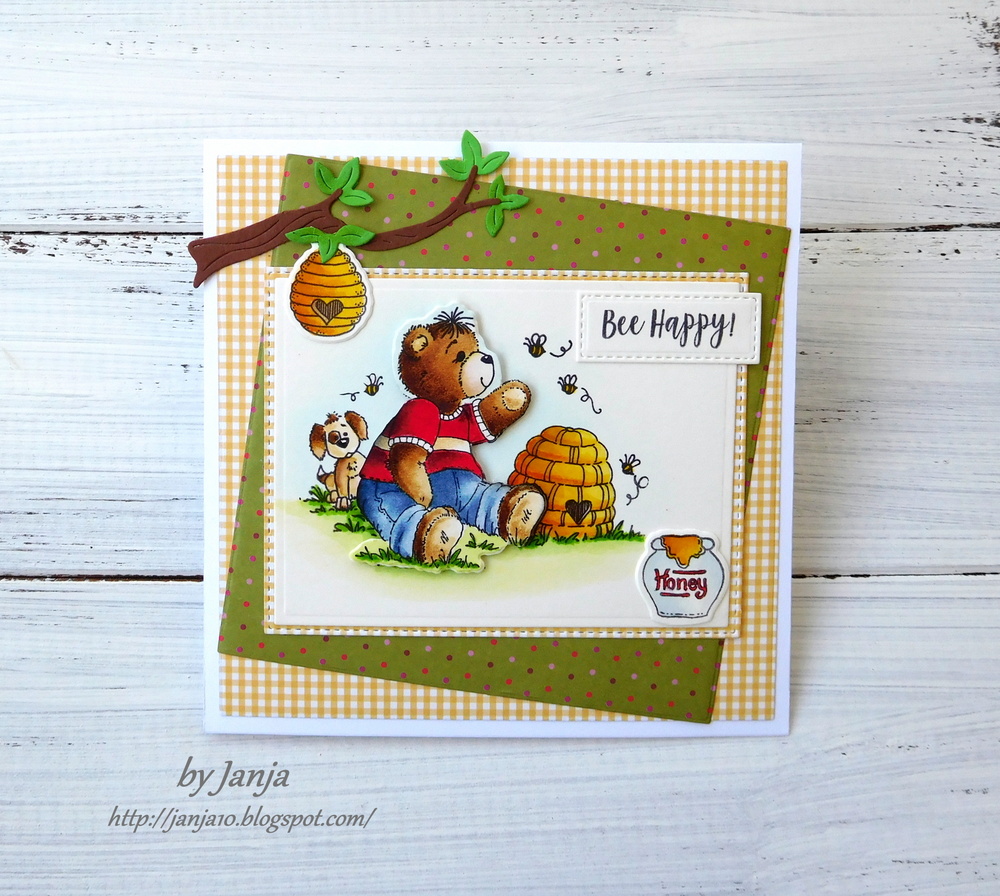
Tuesday, April 11, 2017

Bee Happy

Hi, Janja here!

Today I would like to share with you another card with a bear.


Supplies:
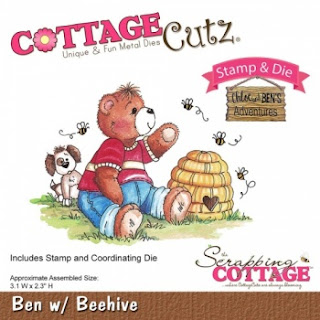
- CottageCutz stamps and dies: Ben with Beehive, Sweet Valentines (beehive, honey pot, sentiment), Beehives (branch), Rectangle Set, Stitched Rectangle Set
- white card base: 5.3 x 5.3" (13,5 x 13,5 cm)
- patterned paper: 5 x 5" (12,7 x 12,7 cm)
- patterned paper: 4.25 x 4.25" (10,8 x 10,8 cm)
- colored cardstock
- Distress inks: Festive Berries, Mowed Lawn, Twisted Citron, Faded Jeans, Broken China, Antique Linen, Vintage Photo, Mustard Seed, Spiced Marmalade, Rusty Hinge, Black Soot
- watercolor paper

Trim selected patterned papers. Cut out watercolor paper with the largest rectangle die from the set, and stamp on it the bear with black Archival ink.


First, color the entire motif with Distress inks. Later stamp one more time only the bear, beehive and honey pot. After coloring cut them out with the matching dies.


We will attach one beehive to a branch with leaves. Cut them out from brown and green cardstock.
 

Stamp sentiment in black and assemble the card.


If you have not yet managed to see the new CottageCutz dies - Baby, I kindly invite you to the store. 

That's all for today. I hope you like it and thank you for stopping by.


Monday, April 10, 2017

Framed Plumeria

Hi, Lois here with my Monday post.  Before I tell you about my card for today, I want to let you know that CottageCutz has some brand-new baby dies in the store.  Be sure to check them out -- they're on sale at 25% off the regular price.  Today I've made a card using some more new-to-me CottageCutz dies. I love making shaped flowers, and the Plumeria die allowed me to have a bit of fun.  I thought I was unfamiliar with the plumeria, so I Googled it.  As it turns out, the frangipani is a common variety of plumeria -- and I actually had a frangipani in my yard at a house in which I lived many years ago.  Here's my card:


Supplies used on this card are:

Orchid cardstock - 5 1/2" x 8 1/2" folded in half, scrap for circle
Pale orchid cardstock - approximately 3 1/2" x 4 1/2"
Patterned paper - 4" x 5 1/4"
White cardstock - approximately 4" x 5 1/2" to cut frame, scrap for circle, larger piece to cut flowers
Green cardstock - large enough to cut leaves
Scrap of yellow cardstock
Sentiment stamp
Copic markers - Y02, Y04, Y21, RV00, RV63, E71
Green ink
Embossing folder
Micro glue dots
Circle punches
Foam tape
CottageCutz dies - Plumeria and Leaves, Leafy Foliage, Pierced Wide Rectangle Frame Set

I must admit  that, when I start a card, I do NOT meticulously plan out what it is going to look like.  I usually have half an idea in my head and sort of roll with it, and I wasn't sure just how many flowers and leaves I was going to need to complete my card.  So I cut several sets of the Plumeria and Leaves, plus one set of the Leafy Foliage.


As I mentioned before, I didn't think I knew anything about the plumeria; so, in order to color the petals, I Googled "plumeria" and found this photo.


Using several shades of red-violet and yellow, I colored all my die-cut flowers.


Using a sponge, I gave the leaves some shadowing; and I colored the branches and the flower centers with Copic markers.


As you can see on the photo of the plumeria flowers, the petals are slightly layered over each other.  So I snipped between the petals and, using micro glue dots, layered the petals over each other so they looked a bit more realistic.


Then I cut the pieces to make the card base . . .


. . .  and constructed my card.  Before adhering the background inside the frame with foam tape, I embossed the pale orchid piece of cardstock.  Here is a close-up showing all the dimension created by layering the leaves, flowers, and frame.


I then stamped the sentiment, punched it out, layered it on a punched orchid circle and adhered the circle on the side of the frame.  By the way, I still have some already-colored blossoms left that I can use for another card!


CottageCutz dies used on this card are:


http://www.scrappingcottage.com/cottagecutzplumeriaandleaves4x4pre-order.aspx


http://www.scrappingcottage.com/cottagecutzleafyfoliage4x6pre-order.aspx


http://www.scrappingcottage.com/cottagecutzpiercedwiderectangleframesetbasics.aspx


Sunday, April 09, 2017

Easter Eggs

Hi! 

It's Anja here. We're one week away from Easter and it's time to make some Easter decorations. I decided to decorate some plastic eggs.


I used:
- Cottage Cutz Dies (Spring Butterfly 1, 3D Flower #7, Spring Greenery),
- colored card stock,
- Distress Inks (Seedless Preserves, Peeled Paint, Forest Moss),
- tools for making 3d flowers,
- flower stamens,
- plastic eggs,
- glue,
- purple acrylic paint,
- brush,
- purple ribbon,
- glitter

First I colored plastic eggs with acrylic paint and sprinkled them with glitter while they were still wet. I let them dry.


I die cut some greenery from green card stock and butterflies and flowers from light violet card stock. I cut only the tree smallest flowers from the flowers die. I used Distress Inks to color the edges of the die cuts.


Then I used tools to make 3d effects and assembled the flowers and butterflies. I put stamens in the middle of the flowers.


When the eggs were dry I hanged it with some purple ribbon. Then I put all the leaves around the top of the eggs. In the end I added the butterfly on one egg and two flowers on the other egg. 


Have a nice Sunday.
Anja Z.

Cottage Cutz dies I used:


Saturday, April 08, 2017

Bumblebee Ben Framed Card

Hello Scrapping Cottage friends! Thanks for taking the time to stop and visit today. It's Mary Marsh here bringing you the Saturday edition of the Blog.

A couple of months ago there was a new release of the cutest little bear stamps & coordinating die sets. Adventures of Chloe & Ben have been featured by many of the Design Team. If you haven't seen them before take a look back on the Blog. I made this card last Saturday.

Today for your viewing pleasure, I am showcasing another one of those dies.  I present Bumblebee Ben. He will be the star of my framed card. So without further delay, let's get started on how I created my card.
Vanilla Card Base: 4 1/4" x 5 1/2"
Honey Frame: largest wide stitched rectangle frame die 4 3/4" x 3 3/4"
Image Panel: 4 1/8" x 5 3/8"

Step 1: I used Tuxedo Black (Memento) ink on  X-Press It Blending cardstock to stamp the image. I always stamp 2 just in case I make a mistake in coloring.

Today, I am using both Prismacolor Pencils + Gamsol and Blendabilities Alcohol Markers.
Gamsol is an odorless mineral spirits that helps to move the wax around in the pencils.
Blendabilities used: Melon Mambo (light & medium), old olive (light and medium), navy (light, med and dark )
Prismacolor Pencils: PC1082, PC947 (brown), PC928, PC993 (pinks), PC1060 (gray), Black & White

After coloring I cut Ben out with the coordinating die. It's included in the set.

Step 2: Cut the frame with the pierced wide rectangle frame set in a honey cardstock.  I wanted a honeycomb stencil as the background for the beehive and bee. Used distress ink, stencil and a stencil brush.
Step 3:   With stenciling complete, I cut my background elements. Used an older die set "Beehives" that includes the beehive, bee and tree limb. I thought it worked well with Bumblebee Ben. Used the same honey cardstock for the beehive. Used vellum for the bee's wings and sponged lightly with honey distress ink.
Step 4:  Stamped my sentiment. This is a card of encouragement so I thought this stamp would work well. I used a stamp-a-ma-jig for placement. I laid the card pieces on the background and added the frame to make sure I got the proper placement.
Step 5:  I assembled my card on this step. I used mounting tape to lift the frame from the background. It adds interest to your card. Since the frame was popped up, I didn't need to do that with Ben. Here is a close up shot of the dies. Really a lot of detail in the beehive and bee and in the stitched frame. All of the CottageCutz dies have such great detail.
 
Well, that's it for me for this post. I hope I have given you some ideas on another way to use the Bumblebee Ben die. There is also another stamp and die set in the store that you could use to re-create this card. Maybe you already own it. It's the Sweet Valentines stamp & die combo.
 
See you next Saturday. Until then.........keep on crafting!
 
Dies I used to Create Card:
http://www.scrappingcottage.com/cottagecutzbumblebeebenstampanddie.aspx

http://www.scrappingcottage.com/cottagecutzbeehives4x4.aspx

http://www.scrappingcottage.com/cottagecutzstitchedwiderectangleframesetbasics.aspx