Tuesday, May 23, 2017

Sweet dreams

Hi, Janja here!

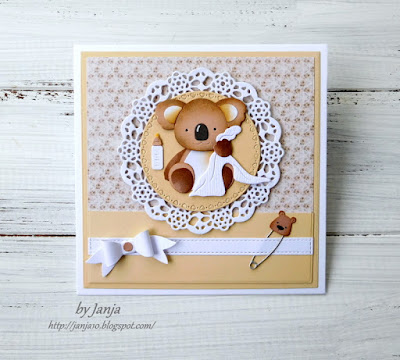
I have a lovely baby koala card, for you today. My card was made by using dies from the Baby release and the new Expressions plus release.


Supplies:
- CottageCutz dies: Baby Koala w/Blanket, Baby Diaper Pins, Baby Booties mini, Diaper mini, Sweet Phrase, Dream Phrase, Sweetheart Doilies, Tea Time Doily, Build-a-Bow, Stitched Wide Rectangle Frame Set, Stitched Wide Circle Drame Set, Circle Set
- white card base: 5.3 x 5.3" (13,5 x 13,5 cm), folded
- yellow cardstock: 5 x 5" (12,7 x 12,7 cm) and 4.76 x 1.57" (12,1 x 4 cm)
- patterned paper: 4.76 x 4.76" (12,1 x 12,1 cm)
- white and colored cardstock
- glue, double-sided adhesive tape, white fun foam

Koala's coat is in shades of ashen-gray, sometimes also in red-brown color. I gave it a brown color, combined with yellow background.
Cut out all the elements of baby koala and assemble them into a whole.


Find a patterned paper that you like, and choose a coordinating color of cardstock. Trim them to the appropriate size.


For the remaining elements use a white cardstock.


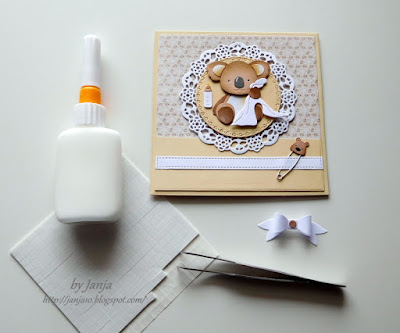
To keep the small hearts in openings, attach the self-adhesive foil on the backside. Glue both round cutouts, and add a circle from fun foam. If you prefer use self-adhesive foam tape.

Now it's time to assemble the card. 


Mount all the elements as shown on white card base. Use glue and self-adhesive foam pads.


For special occasions such as birth, it is nice to see a card that has also decorated the interior.


I added the small letter S at the end. I cut it out from the thanks phrase.
Attach a bow when the card is completed. 


Janet, our video artist has created a video showcasing some of the new Expressions Phrases. 


Have a lovely day!


Monday, May 22, 2017

Hello, Fishies!

Hi, Lois here with a clean and simple card today.  Clean and simple cards are not my usual style, but every once in a while I go outside my comfort zone.  Today is one of those days.  CottageCutz has a new line of Expressions Plus dies, which are very nice, script words.  My CAS card today has one of them.


Supplies used on this card are:

Heavyweight white cardstock 8 1/2" x 5 1/2", scored at 4 1/4"
Lightweight white cardstock for masking
Scraps of orange and blue cardstock for fish and sentiment
Sponge daubers
Fine-tip glue dispenser
Black marker
Foam pop dots
Ranger Distress ink - Tumbled Glass, Salty Ocean, Spiced Marmalade

Janet, our video artist, has created a video showcasing many of the Expressions Plus word dies.

https://www.youtube.com/watch?v=QSLcthpx5W0&feature=youtu.be


I cut and scored my heavyweight white cardstock and centered the mask piece slightly below center.  This mask was actually the negative piece left from when I had cut a circle for a previous card.  I anchored it with a couple of Post-It notes and then sponged on  the Tumbled Glass ink using a sponge dauber.


Using the same sponge dauber, I added some areas of Salty Ocean ink to give some depth to the water area.  As you can see in the photo, after inking up the dauber I sponged off a bit of the color onto the Post-It note.  Better to have to add color to the circle area than to try to remove it!


Then I cut my fish and sentiment from the scraps of orange and blue cardstock.


Once again using the sponge daubers, I added some texture to the two fish around their fins and gills.


Using the fine-tip glue applicator, I carefully added glue to the back of the sentiment.


Similarly, I added glue to the back of the blue fish.  I also adhered a small foam pop-dot on the back one of the fins. 


I repeated  the process on the orange fish and adhered both of the fish and the sentiment to the card.  I added a few drops of glue to make the bubbles coming from their mouths and drew in their eyes with a black marker.


This close up shows how the fins with the foam dots stand out from the card.


Here again is my card, which I thoroughly enjoyed creating!


CottageCutz dies used on this card are;


http://www.scrappingcottage.com/search.aspx?find=double+stitched+circle

http://www.scrappingcottage.com/cottagecutzexpressionsplushellophrase.aspx

http://www.scrappingcottage.com/cottagecutzhappyfish1elites.aspx

http://www.scrappingcottage.com/cottagecutzhappyfish2elites.aspx


I would invite you to step outside your comfort zone and create a different kind of card today.


Sunday, May 21, 2017

Slider & shaker card

Hello!

It's Anja here. Today I'm sharing a card where I used two popular card designs. I combined a shaker and a slider card. I used mini toys dies that are perfect for these kind of interactive cards.


I used:
- Cottage Cutz dies (Toy Airplane Mini, Toy Submarine Mini, Toy Tugboat Mini, Stitched Rounded Square Set),
- Distress Oxides (Fired Brick, Spiced Marmalade, Peeled Pint, Fossilized Amber, Broken China, Faded Jeans),
- white card base (12,5x12,5 cm),
- watercolor paper (9,5x9,5 cm and 12x12 cm),
- white foam,
- clear acetate,
- shaker filler material (seed beads),
- foam adhesive pads,
- pennies,
- spin&slide discs,
- glue.


 I die cut all the toys and colored them with the Distress Oxides. I glued little pieces of paper on the backside to make the windows.


Then I made the background. I took 9,5x9,5 cm watercolor cardstock. I used blue shades of Oxides and blended them together. Then splashed some water drops on top and dried them with a heat gun.


Then I used the biggest square die for the 12x12 cm paper and the 3rd and 5th biggest for the 9,5x9,5 cm paper. I also cut another square from white cardstock that was the same size as the small blue frame (not pictured).


Next I made the shaker part of the card. I used the second biggest square die to cut the acetate and 3rd and 5th biggest die to cut foam. I adhered the acetate on the colored frame first and added the foam. I let it dry before continuing. I glued the other two pieces as shown on the picture below. Bigger blue frame on the card base and the smallest blue square on the bigger white square. When all was dried I put shaker fillers inside and closed it. I let it all dry again. I used liquid glue but could also used double side adhesive tape and made it a little quicker.


I used foam adhesive foam pads to glue the shaker part and white frame on the card base.


Before I adhered the white frame I made the slider mechanism. I used pennies and discs for that and inserted them on. Then I glued the frame.


In the end I added the toys. I glued the boat directly on the acetate.


And this is the finished card.


Thanks for stopping by. Have a beautiful Sunday.
Anja Z.