Wednesday, March 15, 2017

CottageCutz Wildflowers


Hello, friends, and welcome to the Scrapping Cottage blog!  This is Beverly from Guneaux Designs, and I am so excited to be a guest designer today for the Scrapping Cottage.

I have for you a beautiful card featuring the CottageCutz Wildflowers 3 Die.  The card also features a Marbled and Ghost Stamping Technique.


Directions for creating the card:

Step 1.  Cut out the flowers from white card stock using the CottageCutz Wildflowers 3 Die.

Step 2.  Cut the largest rectangle from a piece of white card stock using the CottageCutz Double-Stitched Rectangle Set Dies.

Step 3.  Scrunch up a piece of saran wrap.

Step 4.  Put a drop or two of white (e.g., Frost White) All-Purpose Ink onto a non-stick craft sheet.

Step 5.  Dab the saran wrap repeatedly into the ink to ensure all of the saran wrap folds are covered with ink.

Step 6.  Transfer the ink by dabbing the inked saran wrap onto the CottageCutz double-stitched rectangle, leaving some white space.


Step 7.   After that dries, sponge on two or three different colors of distress ink (aqua and purple used for this card).

Step 8.  Choose a stencil of your liking and place it over the colored panel.

Step 9.  With a water spritzer, spritz three to four times a small amount of water onto the panel and over the stencil.

Step 10.  Remove the stencil right away and lay a dry piece of paper towel across the panel to remove excess water (no rubbing).

Step 11.  Watch a "ghost" of the stencil appear while allowing the panel to dry completely.

Step 12.  While that is drying, cut a 3-3/4" x 4-3/4" piece of white card stock.

Step 13.  Using a temporary adhesive to attach the back side of the piece of white card stock to a craft sheet or grid paper.

Step 14.  Lay the stencil (the one used in Steps 8 and 9) over this piece of white card stock and use temporary tape to attach it to your coloring surface.

Step 15.  Sponge the lightest ink used in Step 7 over the stencil and onto the paper.
Step 16.  Remove the stencil and let the ink dry.
Step 17.  Using the saran wrap and ink process, dab the white All-Purpose Ink onto the sponged card stock.  Let it dry and this is the result.

Step 18.  Select a piece of card stock that closely matches the lightest ink color used and cut out a rectangle frame using the two largest dies from the CottageCutz Double-Stitched Rectangle Set. This creates the following frame.
Step 19.  Turn over the frame and with an adhesive, attach the white wildflowers to the bottom of the frame.
Step 20.  Add a double layer of double-sided foam tape around the frame and where needed on the flowers.
Step 21.  Remove the paper from the tape and attach the frame to the rectangle completed in Step 11.

Step 22.  Attach the above frame to the panel created in Steps 12 - 17, and adhere to the card base.


Step 23.   Add a sentiment and embellishments as desired.


Cottage Cutz Dies Used:


Before you leave, check out the new CottageCutz Dies on the Scrapping Cottage.  I am sure you will find one or more dies that you must have in your crafting toolbox.    

Also, we love hearing from you, so leave us a comment on this or other projects!  Come back tomorrow to see the beautiful project that Pam MacKay will have for you!  Have a great day!

Tuesday, March 14, 2017

Notepad with Chloe

Hi, Janja here!

Small notepads are always useful for writing or drawing. They can also be a nice gift.
I prepared one today and decorated it with lovely bear Chloe.


Supplies:
- CottageCutz stamp & die sets: Chloe with Kitty, Garden Gnomes 2 (butterfly and flowers), Victorian Fence, Square set, Stitched Square set
- white cardstock (2x): 5.3 x 5.1" (13,5 x 13 cm)
- patterned paper: 4.9 x 4.9" (12,5 x 12,5 cm)
- white cardstock: 4.7 x 4.7" (12 x 12 cm)
- white blank sheets: 5.1 x 5.1" (13 x 13 cm)
- Distress ink: Worn Lipstick, Mustard Seed, Tumbled Glass, Twisted Citron, Antique Linen, Vintage Photo
- watercolor brushes
- clouds mask
- stencil brushes

Stamp Chloe with black Archival ink on watercolor paper, and color her.


Cut out all the elements with dies.


Fasten masking tape on white front page, and shadow background.


Trim white and patterned paper. Cut out square in the middle of both with a dies. Use the largest dies from both sets.


Cut off the lower corners on both cardstock and frame with a corner puncher. Glue both frames to each other.


Fasten frame to the front page and decorate it partially.


Bind the sheets with a spiral, and complete the front page of notepad.


Thank you for joining me today. See you again at next Tuesday. 


Monday, March 13, 2017

Ben and Chloe in the Garden

Hi, Lois here today with another fun-fold card -- a Z Box Fold.  Janja had a card on the CottageCutz blog a couple of weeks ago using both Ben and Chloe, and I thought it was so cute that I knew I wanted to make a card using both of them too.


Supplies used on this card are:

White cardstock - 4 1/4" x 5 1/2" plus some scraps for Ben and Chloe
Red cardstock - 4" x 9 3/4"
Black cardstock - 2 7/8" x 2 7/8", 2 7/8" x 4 3/8", 7/8" x 5 1/8", two pieces 7/8" x 2 1/8"
Patterned paper - 2 3/4" x 2 3/4", 2 3/4" x 4 1/4", 3/4" x 5", two pieces 3/4" x 2"
Ink - Memento Tuxedo Black
Copic markers
White gel pen
Clear Wink of Stella brush
Scor-tape, adhesive runner, foam pop dots
CottageCutz stamp/die sets - Ben w/Wheelbarrow of Love, Chloe w/ Flowerpot, Wreath, Flowers

I stamped the images of Ben and Chloe onto a piece of white cardstock and colored them with Copic markers, adding some highlights on Chloe's hearts with a white gel pen.  I also brushed some clear Wink of Stella on the bees flitting around her flowers.  Then I cut them out with the matching dies.


To construct the card, after cutting the 4 1/4" x 5 1/2" white piece of cardstock, I cut the red panel 4" x 9 3/4".    I placed the panel longways in my paper cutter, with the long end at the 1" mark; and, starting at the 3" mark, I cut a slit down to the 7 1/2" mark. 


Then I placed the panel on my scoring board; and, with the long edge along the top, I scored as follows:  I scored at the 5 1/4" mark;  at the 3" mark, I scored down from the top to the slit; and at the 7 1/2" mark, I scored up from the bottom to the slit.


When folded, this is what the card looked like.


I placed some Scor-tape on the back of the right-hand side of the card, as shown below . . .


 . . . and then adhered it to the white panel.

I then cut the black cardstock and patterned paper to the measurements shown above . . .


. . . and adhered them to the card base.


All that was left now was to place Ben and Chloe on their respective panels and stamp the sentiment.


I hope you'd like to make a similar card.  It was lots of fun.

CottageCutz sets used on this card are:


Sunday, March 12, 2017

Baking in the Kitchen Tutorial Part 2


Hello Scrapping Cottage friends! Thanks for taking the time to stop and visit today. It's Mary Marsh here bringing you the Sunday edition of the Blog. This is the 2nd part of the post from yesterday. In that post I made recipe cards and decorated them with stamped images from the "Baking in the Kitchen" stamp & die combo.

For today's segment, I am featuring a mini file folder that will hold the recipe cards. I saw a video on YouTube for completing the inside of this folder. I didn't add all the layering and the 2nd pocket. Wanted mine a bit simpler  It's made with the Envelope Punch Board.

If you missed yesterday's post, here is the link to take a look.

So let's get started on today's tutorial.
Step 1.   I used black cardstock that was cut to 8 1/8" x 5" and using my scoring board, scored it at 4" and then 4 1/8". 


Step 2: Place cardstock on the Envelope Punch Board in portrait mode. The 5" side is against the board. The first punch is at 2 1/2". Then move it over to the opening where the score guide arrow is and punch. 

 
Step 3: To make this look like a file folder, I cut the section of cardstock to the right of my 2nd punch. You could put it in your trimmer but I had more control using my craft knife and a ruler. 


Step 4: Turn the cardstock 180° and repeat the above steps. Then I rounded the corners using the corner rounder that is on the back of the Envelope Punch Board. I now have what looks like a file folder.

Step 5: Since I used black cardstock as the base for the file folder I decided to use patterned paper to fancy up the front of the folder. The paper is cut to 3 7/8" x 4 7/8".
Now it's back to the Punch Board. Place the patterned paper on the Board with the 4 7/8" side against the Board and make the first punch at 2 3/8". Then move it over to the opening where the score guide arrow is and punch. Making sure the left corner is lined up in the opening. As in the photo from Step 2.
Place the paper in the back of the Board to round the corner as in Step 4. This is the cut piece and is ready to be adhered to the folder front.
 
 
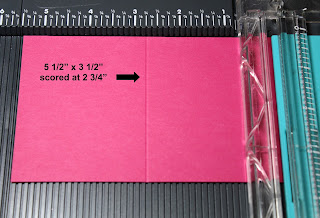
Step 6: Now I am ready to move to the inside of the folder. This step will create a fold down flap for the recipe cards to sit inside. Cut a piece of cardstock 3 1/2" x 5 1/2". Place it on Score board on 5 1/2" side and score at 2 3/4".

Step 7: Back once again to the Punch Board. The 3 1/2" side should be against the Board. Line up the left corner to the score guide arrow and punch. Flip cardstock over and punch the opposite corner. Rotate cardstock 180° and punch the corners.
 

Step 8:  I wanted a patterned paper layering panel on the front flap. It is cut at 3 3/8" x 2 5/8". Punch the top corners and attach.


Cut another piece of cardstock at 3 7/8" x 4 7/8". This is another layering panel. This piece will get attached to the inside of the folder.  Place it on Punch Board with the 4 7/8" against the board and punch at 2 3/8". Slide cardstock over and punch the left corner. Then cut away the extra section and round the corner like we did in Step 3.

And, finally attach this panel and the flap to the inside file folder. I used double sided adhesive.

Step 9: The recipe cards get placed inside this flap. The top part of the flap opens so the recipe cards can easily be removed. They were about a 1/4" too long so I cut them on the opposite side of the stamped image. It was no problem at all. I just had to re-round the corner.
To keep the folder closed. I created a belly band. It's 11" long by 1" wide. I wrapped it around the folder and adhered in the back. Left it a bit loose so it could slide off the folder easily. On the front of the band, I added a stitched circle and another stamped image from the Baking in the Kitchen stamp & die set.
 
 
 Whew, I have finally come to the end of this post. Thanks for hanging in there with me. See you next week. Also, some of our new designers will be starting this week. So check back in all week to see what the DT has in the way of projects.
 
http://www.scrappingcottage.com/cottagecutzbakinginthekitchenstampanddie.aspx