Saturday, November 19, 2016

Mistletoe Christmas Card

Hello Scrapping Cottage friends! Thanks for taking the time to stop and visit today. It's Mary Marsh here bringing you the Saturday edition of the Blog.

This upcoming week we are celebrating Thanksgiving here in the USA and then comes the frantic Christmas rush (lol)!!! Card making, gift buying and wrapping, baking and decorating will be in the forefront for the month of December.

So if you haven't started your cards as yet, I am showing one today that could very easily be mass produced. You could change it up by simply using a different patterned paper.

So let's get started on some details of how I created my "Mistletoe Christmas" card. My mistletoe is from the Holiday Greenery die. It was part of the Christmas 2 release.

Green Card Base: 4 1/4" x 5 1/2" (A2 size)
Red Layer: 4 1/8" x 5 3/8"
Patterned Paper Layer: 3 7/8" x 5 1/8"
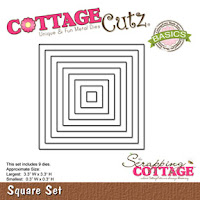
Image Panel: 2 1/2" x 2 1/2"
Black layering Panel: 2 3/4" x 2 3/4"

Step 1: I started my card this week by choosing my patterned paper. Once I did that, I just matched my cardstock to the colors used on the patterned paper.
Step 2: Cut my first 3 layers of cardstock to the above sizes and assembled using double sided tape. I decided to add some red seam binding just for added card interest.  No bow because I want to keep the card flat for mailing.
 
Step 3: I cut my image panel using the basic square in vanilla and the stitched square in black. There is black in this patterned paper so I used that cardstock to help accent my card. I stamped my sentiment and added some dots cut from the holiday greenery die. I used dimensional tape on this panel to lift it away from the patterned panel.
 
That completes my card for this week. As I said, this one could be mass produced easily. And, that would free you up to do other Christmas tasks. Here is another look at the completed card.
Well Blogger friends, that's it for me fo this week so until next time.......inky hugs.
 
http://www.scrappingcottage.com/search.aspx?find=square+set
http://www.scrappingcottage.com/cottagecutzstitchedsquaresetbasics.aspx
 
http://www.scrappingcottage.com/cottagecutzholidaygreenery.aspx


Thursday, November 17, 2016

Pink Cockatoo

Hi, Lois here with a happy card today.  It is almost Thanksgiving, and the weather here in Florida is still quite warm -- which is fine by me.  I thought I would make a tropical-looking card to brighten the day, using one of the In the Forest dies from CottageCutz -- Forest Bird.


Supplies needed for this card:

Blue cardstock cut 8 1/2" x 5 1/2" folded in half, and 3 1/4" square
White cardstock cut 4" x 5 1/4" plus another piece approximately 3 1/2" square to be die cut
Scraps of cardstock - pink, gray, green, wood grain patterned paper
Wood grain patterned paper strip 1 1/8" x 3"
Cloud embossing folder
Pastel chalks - light blue
Distress inks - Worn Lipstick, Weathered Wood
Sequins
Dies - CottageCutz Forest Bird and Double-stitched Square

I Googled "cockatoo" and really liked the pink/gray one, which is called a Galah and can be found in open country in most parts of Australia.  There's your geography lesson for the day. 

Meanwhile, back in the craft room, to start your card you should cut your pieces out in the various colors.


Sponge with distress ink as desired.


Cut the card base and layering pieces.


Emboss the large white piece with the cloud embossing folder.  Sorry that it is a little hard to see the embossing.


Using the pastels, color in the sky on the embossed piece.


Then construct your card as shown, adding the three sequins to the background.  Here again is my finished card.  I attached the small pieces in two ways.  The bird, wings and tail, and branch I ran through a Xyron X sticker maker.  The other small pieces are attached using Glue Dots micro dots, as are the sequins.


Dies used on this card is:


Tuesday, November 15, 2016

Christmas ornaments with winter faces

Hi, Janja here!

Today I share with you another holiday card. I joined CottageCutz Christmas ornaments dies and Peachy Keen winter faces stamps.


For the card we need:
- white scalloped edge card base: 5.3 x 5.3" (13,5 x 13,5 cm), folded
- patterned paper: 5 x 5" (12,7 x 12,7 cm)
- golden paper
- embossing folder
- Distress ink: Tumbled Glass, Broken China, Tattered Rose, Rusty Hinge
- Memento ink: Dandelion, London Fog

Trim patterned paper in appropriate size. With the 2nd bulb ornament die cut out two ornaments and two golden tops of ornaments. Cut out golden bows with the holiday mason jar die.


Also cut two ornaments from a golden paper, slightly smaller than the size of holes in the patterned paper. First cut half ornament, slightly move the die and then cut out the other half.
Use only negatives. Glue them to the back side of patterned paper.
Stamp "Believe in the magic" and with an embossing folder create snow background.


On watercolor paper draw the edges of ornaments with a pencil and stamp cute faces. Use Peachy Keen face stamps 1 5/8th inch sets: ornament and candy cane.


Paint faces. I used Distress and Memento inks.
After completion of painting, erase pencil silhouette and attach watercolor paper to the back of patterned paper.


Add golden pieces and the card is completed.


Use remained ornaments for tags. We can decorate gifts under the Christmas tree with them.


 Thank you for coming over and have a great day.


Monday, November 14, 2016

Center-Step Mushrooms

Hi, Lois here today.  If you have followed my blog at all, you know that I love making fun-fold cards. One of my favorite fun-folds is a center-step card, one of which I have for you today.  I'm using more of the In the Forest 2016 release from CottageCutz dies.


Supplies for this card are:

Green cardstock cut 10 1/2" x 5 1/4"
Chocolate cardstock cut 3 1/2" x 4" and 3/4" x 5"
Cream cardstock cut 3 3/8" x 3 7/8" and 5/8" x 4 7/8"
Scraps of green, red, gray, and brown cardstock
Distress ink - Bundled Sage, Tea Dye, Walnut Stain, Fired Brick, Weathered Wood
Sponge applicators
Polka-dot patterned paper

To create the card base, lay the green card base into a paper trimmer longways at 3/4".  Cut a slit from the 1" mark to the 6 1/4" mark.  Move the card base to the other side and repeat.  Score outside the slits at the 1", 2" and 6 1/4" mark.  Score between the slits at the 5 1/4" mark.


Fold at the score lines with a mountain fold at the 1" mark, valley fold at the 2" mark, mountain fold at the 5 1/4" mark, and mountain fold at the 6 1/4" mark, creating the stepped base of the card.


Cut the various small pieces using the dies, using adhesive sheets behind the delicate greenery and sentiment for ease of attaching to the card.  I did not need the cattails on the grass pieces, so I trimmed them off.


Sponge the lower edge of the cream panels with green ink.   Layer the cream panels to the chocolate panels and adhere to the card base.  Color the die cut pieces with distress ink as you desire and adhere the large mushroom, one of the small mushrooms, snails, and greenery to the cream panel as shown on the photo.  Adhere the grass pieces, other two mushroom, mouse and hedgehog to the small cream strip, as shown.  Place the sentiment in the upper right-hand corner.

Cut two strips of patterned paper 1/2" x 4" and adhere to the side panels as shown.  You can place a piece of cream cardstock on the inside if you wish.

Completed card.


Dies used on this card are:


Sunday, November 13, 2016

Merry Christmas

Hello everyone!

It's Donna here again with CottageCutz  and Peachy Keen Stamps to celebrate their new release of face stamps that work well with the CottageCutz Christmas ornament dies. TWO NEW SIZES of Face Stamps have been added to their release, 1 5/8" and 1 7/8" to fit the super fun ornaments by CottageCutz. Please stop over at Peachy Keen Stamps because Kathy is offering some promotional pricing on her new stamps sets that will go perfectly with the CottageCutz dies.

Here is my card using the Peachy Keen stamp sets Ornament 1 1/8" Face Set.  I am using the Cottagecutz Nested Ornaments: Star.  I am using the smallest star of the set.


Here is how I put my card together:
  1. The card is an A2 card 4 1/4 x 5 1/2,
  2. The black layer is 4 x 5,
  3. The next layer is 3 7/8 x 4 7/8, I embossed the branches and added some wink of stella to give it some dimension,
  4. The star ornament is die cut from the smallest die in the Nested Ornaments: Star set, 
  5. I colored the  face with copics. I used YG13 for the eyes, YR68 for the nose, and R29 for the mouth.  The cheeks I used R00,  
  6.  finished my card off by adding the sentiment by CottageCutz "Merry Christmas".

Closer look at the star ornament, I added some clear wink o stella around the edges.

 Closer look at the Merry Christmas sentiment.

Dies used: