Tuesday, September 08, 2015

Happy Birthday Wreath & Giveaway

Hi, all! Vladka here today!
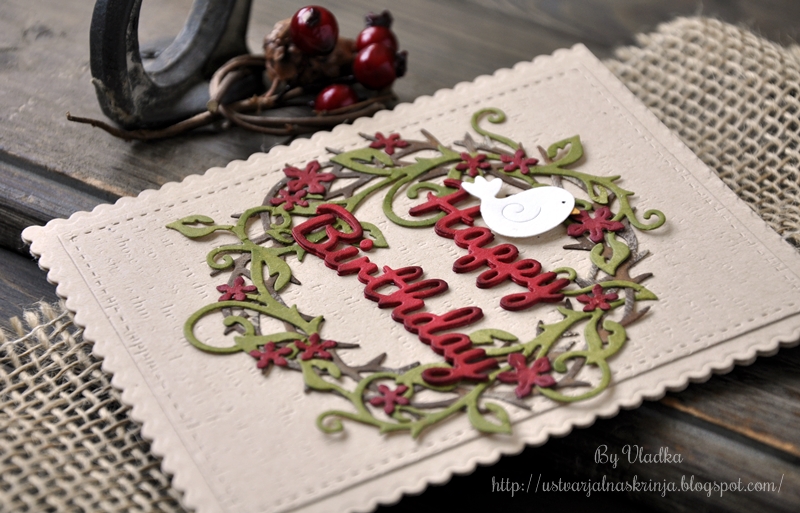
Wreaths are one of my favorite motives and so, Build-A-Grapevine Wreath is one of my favorite die. I used it together with Flourish Vine and Hula Owl die. With the last one I cut out just little flowers. All pieces were cut out of kraft paper and colored with Distress Inks, displayed also on this photo.
First I colored the wreath and started with Walnut Stain and continue with Vintage Photo. For this kind of coloring I'm always using Ink Blending Tool. This is my favorite way of coloring. Flourish vine and little flowers were colored the same way.
From red cardstock, I cut out words Happy and Birthday, three times each and glue them on top of each other. This way I get thicker and more interesant die cut. 
For finished touch I also added little bird. Card base is cut out with die and background is made with impression plate.
This is it for today! Have fun!
 
Be sure to leave a comment on all of our post from 9/8/15- 9/23/15 on the CottageCutz BLOG as we are doing a GIVEAWAY to 1 lucky person! You can WIN 2 of the NEW Halloween dies shown below.
 
 
Have fun and Good Luck to all!!!

Monday, September 07, 2015

CottageCutz Giveaway!

Hello CottageCutz Fans, and Happy Labor Day to all!
Today we have a super FUN Giveaway to announce to all CottageCutz Fans!

We will be giving away CottageCuz Ghost Owl, and Halloween Tag Topper to one lucky person, who leaves a comment on each post over the next 2 weeks, super fun huh??!! All you have to do, is leave a comment, on each post and you will be entered to win these 2 DARLING CottageCutz Dies from the NEW CottageCutz Halloween Release!! Have fun, and good luck to all!!!


Winner will be announced on September 30th, have fun to all!!!

Hugs from the CottageCutz Design Team!!!

Thursday, September 03, 2015

Celebrate the Season card


Hello Everyone!!!  Olena here today!
Today I'm showing you my new Fall card I created with beautiful  "Harvest Vine" die.
To make card, start by cutting white card stock using the "Harvest Vine border" die. So, we have beautiful white leave vine border.

The next step is background on card. For this I used white, yellow, orange and green pieces of card stock. I think these three colors the best combination for fall card.
I used a 5.5" x 3.75" white base card. Then, I cut yellow, orange and green colors in different sizes. 
The yellow piece of card stock 5.25" x 3.25" I pierced the edges using special tool with needle, with orange piece 3" x 5"  I embossed using embossing folder. On green piece of card stock 5" x 1" I stamped sentiment. You can stamp any fall sentiment, but I like this one.

Assembled all layers and adhered to the card base. Then adhered the white vine between orange and green panels. Embellished embossed panel with white small pearls.
Finished card size 5.5" x 3.75".

For this project I used:

Card Supplies:
CottageCutz dies: "Harvest Vine".
Card stock: white, yellow, green and orange.
Inks: red and white.
Stamps: Celebrate the season sentiment.
Other: Wire Fance embossing folder,  scissors, paper trimmer, scor-buddy, craft glue, pierce tool and self adhesive white pearls.
 
Thanks for visiting, I hope your day is wonderful!


Saturday, August 29, 2015

CottageCutz Sea Otter W/Fish Tag

Just a little something to share today with you friends and crafters.  It's Carol here today with a little tag made with the gorgeous CottageCutz dies.  For this tag I used the Sea Otter w/Fish, Grass with Cattails, Elegant Frame, and Hello Expression Die
The tag is corrugated paper that I cut into a tag.  The Sea Otter was cut on brown cardstock and the fish on blue cardstock.  I hand drew the eyes.  the Grass with Cattails were cut one on light green cardstock and dark green cardstock and layered.  The frame was cut on white cardstock and attahed to two different pieces of designer paper.  The lace trim is a Martha Stewart punch.  Just at a seam binding bow, a paper flower and a crystal bling and your project is finish.  Thanks for stopping by today.  Sure do appreciate it.  Until next time, Happy Crafting.  See you soon.  Here are the dies used:


Friday, August 28, 2015

Happy Dolphin

Hi all! Vladka here today!
Just one more day and I will be on my way to the coast. I can't wait to jump in the sea and be free for awhile like this cute Happy Dolphin. This is quick and easy card to make. Here are the supplies I used: copic markers for coloring the Happy Dolphin (R20, C1 and C3), two Distress Inks for background (Tumbled Glass and Peacock Feathers), Ink Foam Blending Tool, White cardstock and three Wave Border die cuts, cut out of two different blue cardstock.
To get more interesting background, I gently colored it with circle motion: first with Tumbled Glass and then with Peacock Feathers Distress Ink. For this I used Ink Foam Blending Tool.
Then I put all my die cuts on the surface to see how it will be the best way to combine them.
At the end, I stamp the sentiment and decided to put also sun behind the waves like sunset.
This is it for today, I hope you like my card. Have a great weekend!

Wednesday, August 26, 2015

CottageCutz Fashion Pumps in Paris

Hello CottageCutz Lover's!  Today it's Carol here with a little creation using the CottageCutz pumps mini.   To achieve the two tone effect of the shoes, cut out the shoe on designer paper of your choice and paper piece in black the heel, toe, in shoe insert.  Mount the shoes on a 1-1/2 inch round circle and apply to a 2" rosette.  The box was created with cardstock, a doily, Recollection Bling Swirls and a couple images from the Tres Chic DCWV paper stack.  The rolled roses are made from an old book and distressed with Victorian Velvet distress ink. 
This is just a little image tease on what is inside the box.  The treasure is wrapped in this pretty pink lace.  To create the box you will need to cut designer paper for the lid at 6-3/8" x 7-5/8" and score around all 4 sides at 1 inches.  For the bottom of the box you will need to cut designer paper at 8-1/4" x 7-1/2" and scored at 2 inches on all 4 sides.  Follow basic construction assembly for this type of box to complete your project.
Here's a close up of the little tag  that was created from a wood tag .  These tags were sold at Michael's last year in the unfinished wood section.  It is covered with designer paper and stamped with prima stamps.  The little pink daisy is a button and, of course, more matching bling!  Thank so much for taking a look.  Sure do appreciate it.  Until next time, Happy Crafting!  Here is the die used:


Tuesday, August 25, 2015

CottageCutz Butterfly Greetings


Hello everyone, and Happy Tuesday to all!
Cheryl here today and I'm sharing 3 mini greeting cards I designed using CottageCutz Dies for today's Splitcoaststampers Color Challenge. We were to use Gold and Cream, and the dessert option was to use a butterfly on our card.
For my 3 Mini cards(Measure 3 1/2" x 3 1/2") I  chose to used CottageCutz Butterfly and Flowers die and cut it out in white, then distressed it with antique linen, and some gold ink around the edges.I left off the vine, as I didn't want to add any other color to these cards. The darker edge is vintage photo. I also added some Viva Pearl Pen dots in cream color to the center of the butterfly.


For the Frame in the center I used CottageCutz Elegant frame die. I then layered the circles on top of it, and stamped the Sentiments on top. I distressed the circles using gold ink
 
The back layer was done using MS Punch around the page punches. For the Gold Vellum I used it on the background for my cards.
 
I kept my cards pretty simple, as there is no embellishments, ribbon, or sewing on any of these. These came together quickly!
 
Supplies Used:
CottageCutz Butterfly and Flowers
CottageCutz Elegant Frame Die
Sentiments/Black Memento Ink/Distress inks, and gold ink
Gold Vellum, Cream Card Stock
Card Measures 3 1/2" x 3 1/2"
Viva Pearl Pen,Circle, and Scallop circle


Thank you for looking and have a lovely day!
Hugs to all,

Sunday, August 23, 2015

May all your Wishes come true! card

Hi there and welcome to CottageCutz Blog.

 I love making handmade greeting cards and today I'm showing you my new card I created with beautiful dies.

 
Today I have a new card using die images from a new Summer 2015 release and an older. I used "Clown Fish", "Greenery" and "Vine" dies.


To make card, start by cutting orange and white card stock using the "Clown Fish" die. So, we have orange and white fishes. Don't trough away white pieces from cutting, we need these pieces late.
Adhere the orange fishes on black piece of card stock. One fish is normal way to adhere, the other one is reverse side. After all, place white pieces of fish in missing spots on orange fish. You can see details if you click on image. 
Then, cut fishes around with scissors. We have beautiful Clown fishes with orange, white and black colors. Add clear shimmer on fishes for sparkling.


The next step is seaweed. Start by cutting green card stock using the Vine and Greenery dies.

To create a background, cut white cardstock using Circle die template and sponge ocean green, yellow and blue craft inks. Make the center area a bit lighter then edges by sponging yellow ink, then green and around circle with lt.blue craft inks. Next, stamp seaweed and corals using Md.brown ink. 

The next step is putting all cut pieces to ocean circle using foam tape and craft glue.

Prepare a 3 3/4 by 5 1/2 inch white card base. Layer the ocean background with Tiny Bubbles embossed card stock and adhere to the card base with craft glue. 

The final step, stamp sentiment in the bottom of card base using orange craft ink. You can use different sentiment, but I like this on. Embellish card with Clear Dew Drops and self adhesive small pearls.

For this project I used:

 Card Supplies:

CottageCutz dies: "Clown fish", "Greenery" and "Vine",
Card stock: white, black, green and orange,
Inks: yellow, lt.green and lt.blue,
Stamps: Seaweed, Coral and sentiment,
Other: Tiny Bubbles embossing folder,  scissors, paper trimmer, scor-buddy, foam tape, Clear Dew Drops and self adhesive white pearls.