Sunday, July 19, 2015

CottageCutz-The Three Mermaids

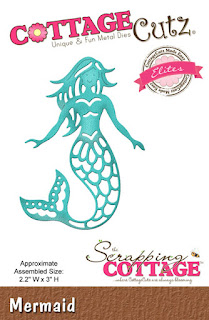
 Greetings everyone and welcome to another addition of CottageCutz.  Today it's Carol with a post featuring the beautiful Mermaid die from the Tropical Release.  What a beautiful set for the summer.  You will love creating with these.
 To create the mermaids I die cut them from watercolor paper.  I then used Adirondack ink in Meadow and Steam to color these beautiful ladies.  They were then glittered with "Lagoon" Stickles.  Don't these colors sound so tropical!!!  Perfect right!!!!
It's the perfect summertime card.   Oh, did you notice the burlap......yes, it's back again in my cards.  But this time it's in a beautiful tropical color.  I just love the texture.  Thanks so muck for stopping by today to take a peek.  Until next time, Happy Crafting!  See you again soon.  This was the die used:
http://www.scrappingcottage.com/cottagecutzmermaidelites.aspx


Saturday, July 18, 2015

Fishbowl

Hi all!  Vladka here!
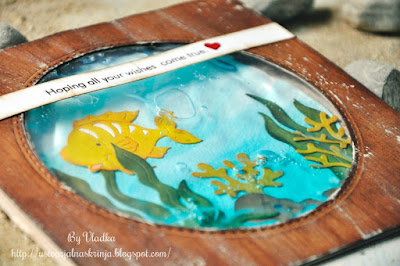
Today I have special card for you because I made this window which looks like water. I found instruction on internet, but I used thicker shower gel instead of hair gel and put it into small plastic bag. I sealed it with scotch tape and put it between card base and front cardstock which looks like wood. 
Inside of the card I put with distress inks colored circle and following die cuts: Happy Fish 1 and Under the Sea. It really looks like fishbowl and it was really fun project. 
But After I finished it and I was pushing gel around to get smaller bubbles, bag burst a little bit and my gel started to coming out. I've tried to save the card with scotch tape but it was to late. I had to cut off the front part of the card. So, my advice is to use thicker plastic bag and don't send such card with regular mail. But it can work and it looks fantastic, so I think I will give it another try. I was a little sad for a moment but because project itself was so fun, my sadness got away quickly. 
Have fun and have great weekend!

Monday, July 13, 2015

It's time to party....

Hello Everyone!!!

  Today I am sharing with you my new summer party project I created with beautiful 
NEW Tropical Release.


 For this project I used super cute images from new Tropical Release: Happy Fish 1, Happy Fish 2 and Happy Dolphin. I think this is good idea put cut image on your straw. 


Very simple project.
I cut all pieces out, sponge with different colors of inks. Then, I punched circle using craft punch and glued each image on circle and on straw. Super cute images.....


Friday, July 10, 2015

Love you more than all the fish in the sea

Hello everyone,
Today's card was designed for SCS Sketch challenge, using CottageCutz Tropical Release. On my card for today, 
I used CottageCutz Tropical Release listed below
Under the Sea
Wave Border
Moon Shell
Sea Otter
Scallop Shell
Happy Dolphin
Happy Whale

I airbrushed everything on this card using
copics 
BG18,BG09,BG72,BG15,BG000,G28,G24,YG05,RV19,BV08,E 93,E55,E59,C5,C3,E57,E25,Y08

I love the way everything turned out on my card for today. I truly love airbrushing, and all this pieces were super fun to airbrush.

Dp is from Echo Park and is called "for the Record 2" I also added some Viva Pearl Pen for the eyes. Lastly I added a Button and some ribbon for my bow!

Thank you for looking and have a lovely day!
Hugs to all,

Thursday, July 09, 2015

CottageCutz Flamingo

Greetings friends and crafters from Florida The Sunshine State.  Have you been to Florida and seen the beautiful Flamingos.  Nothing says tropical paradise like Flamingos and Palm Trees.   How cute is this Flamingo die from CottageCutz!  The Tropical Frame die was used for the Greetings sign.  I love the rustic tropical feel of the frame.  It reminds me of the decor at the Polynesian Resort at Disney World.
 What's a tropical vacation without your flipflops.  That is such a super cute die from CottageCutz.  A Martha Stewart punch around the page was used for the white square.   The palm tree was cut free hand out of a printed green cardstock and a plain green cardstock with the trunk of the tree with brown cardstock.
 The sign was printed and cut out from my computer.  The word Florida was cut with a Cricut.  The beaks on the Flamigos were colored with a Black Copic Marker and their bodies were painted with glue and glittered with Martha Stewart Pink Glitter.
Thank you for stopping by to take a peek at this creation.  It's such a fun project to create.  Until next time, happy crafting.  See you soon!  These were the dies used:


Wednesday, July 08, 2015

Place worth going

Hi, all! Vladka Here today!
I have another summer holiday card which will take you to a special place worth going. I made open window with view on this Happy Whale between the Waves under the Clouds
Around the window I put life preserver, which I made  with circle dies. Background which looks like wood, I made out of kraft paper, Walnut Stain and Vintage Photo Distress Inks and wooden stamp. This is it for today. 
Enjoy the summer. Here is really hot outside.

Friday, July 03, 2015

Just Saying Hello card

Hello Everyone from Olena!!!
  Today I am sharing with you my new summer "Just Saying Hello" card I created with beautiful 

 
For this project I used "Surfboard 1", "Surfboard 2", "Filigree Clouds" and "Wave border" dies.

First, I cut all pieces out, sponge with different colors of inks. Then, I made sand background using craft paper and stamped sentiment. After all, I put all cut pieces on card using glue and double tape.

 For this project I used:


Tuesday, June 30, 2015

Summer gift tag set

Hello Everyone from Olena!!!

  Today I am sharing with you my new summer gift tags I created with beautiful 
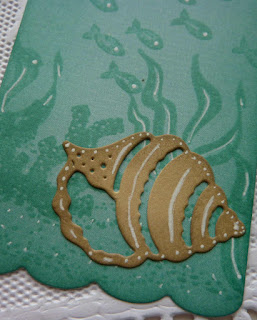
 First, I cut Scallop insert card/tag  out couple times using green-blue cardstock. Then, I created undersea background using different stamps. 

 Next, I cut "Moon shell" and "Conch sell" out using lt.brown cardstock and sponge with md.brown ink the edges. All shells I glued on gift tags.


Decorated gift tags with white ribbon.

For this project I used:


Monday, June 29, 2015

CottageCutz Paris Tea Party Pocket Letter

 
Greetings friends and crafters!  First let me warn you ahead of time that this is a photo heavy post.  Sorry, I just had to do it!!!  There are so many beautiful CottageCutz dies on this Pocket Letter that they just beg to be shown.    Let's begin with the who, what, and where!   For the who, this pocket letter was created for a swap.  This went to Maya-hence you will see her name on the sign on the Lamp Post.  For the what, the theme for our Pocket Letter was "Paris Teaparty".  For the where, the swap was held at Creating the Crafty Life.  I knew I had the perfect pairing of CottageCutz dies to pull this theme off.
This is the Sweet Teacups die.  I used black and pink as a base for all my images.  The tiny butterflies are a Martha Stewart Punch and this image is accented with tiny pearls.
Ok, so when I was creating this poodle, I was laughing like a giddy school girl.  How could this not tickle you to pieces, right!  I created the pink fur with some pom poms.  They were not the right size.  To create the foot pieces I cut and rolled the fur in my fingers that I had placed some tacky glue on. !   Not bad, huh!  You can lay glue down on the parts on the poodle you want fluffed and place the cut pieces of pom pom for this result.  The dies used for this pocket were Eiffel Tower, Lamp, & Poodle, Vintage Street Lamp, and Eiffel Tower Mini.
This is the Victorian Teapot.  The teapot is backed with pink cardstock.  All these tiny roses are from the Michael's $1.50 bins.  Don't forget to use stamps from your collection to stamp your backgrounds.
 Those of you that  have a collection of CottageCutz dies should review your collection to see all the possibilities you have for pocket letters.  They are the perfect size.  Here is the Vintage Clock.
  For the center focal point the Fancy Victorian Frame is the perfect die not only for this Pocket Letter but future ones as well.  It's very versatile.
What's a teaparty without some goodies!  This is the Sweet Filigree Cupcake Die.  It was backed with white, cut on black, and cut a second time for the pink frosting.
 Since this was going to "Maya", we had to create a little sign with her name on it.  This is the Eiffel Tower, Lamp, and Poodle die again. die again.  The little metal Eiffel Tower is something from my Michael's stash.
 What is a beautiful tea party without a Victorian Chandelier!  Here is this beautiful die accented with tiny pearls.
Ha, I see my little crown is crooked...lol  Well they come from Michael's if wish to grab a couple for your crafting.  And here is the tea party.  Yep, you got it, this is the "Tea Party" die from CottageCutz.
So there you have it.  CottageCutz dies are perfect for Pocket Letters.  It was so much fun creating this.  I was in CottageCutz die heaven!!!  Thanks for stopping by today.  Until next time, Happy Crafting.  See you again soon.