Tuesday, April 20, 2010

Up on a Pedestal

As we showcase the different CottageCutz dies we hope you will love them so much that you will want to buy them too. Well, it works on the Design Team too.
Ruth Ellen used this die back in February and when I saw it I knew I had to have it too.
This paper from DCWV goes perfect with this Cake w/Pedestal die which is also on sale right now for $11.95.
There are lots of really cute patterned papers out there that go so well with the CottageCutz dies.

We'll see ya back here tomorrow for Watch for it Wednesday!
Remember to leave your comments.


Saturday, April 17, 2010

We have 3 Winners!

We've chosen 3 winners for leaving comments this past week. They are Dragonlady, Carol and craft_princess! Thanks so much for taking the time to leave us comments, we like to hear from you our followers on what you like to see and how we're doing.
Just email your choice of any in stock Mini Cottage Cutz die to scrappingcottage@cox.net along with your name and address as well as your blog name.
CONGRATULATIONS! Now that was easy wasn't it??

Friday, April 16, 2010

My Little Ladybug

As soon as I saw this new Ladybug die from the Spring Cottage Cutz release, I knew I had to have it because I had these pictures of my youngest daughter just waiting to be scrapped! I love that this little ladybug is so cute and whimsical making it a fun shape to use on a variety of different projects. And once your purchase the Ladybug die for yourself, you can perfectly coordinate your ladybugs with whatever shade of ladybug you need no matter what colors are in your papers! You know I LOVE that!! :)

For this ladybug, I simply cut out the different body parts from different colors of cardstock. There are only two leg pieces to attach (not six different legs!!) so really, this die goes together pretty quickly considering how much detail you see. I used my tip from this week's Watch for it Wednesday post to put the black spots onto the ladybug's back. So much easier than trying to put adhesive on the back of each of these smaller pieces!

Thanks for coming by and have a great weekend!!

Thursday, April 15, 2010

Basket Full of Possibilities

The CottageCutz Easter Build a Basket die really is a basket full of possibilities! The die has so many cutting options that it can be made to fit any Easter layout or project.

This is the CottageCutz die I am showcasing today.


For my layout, I chose to use the eggs plain, I used the grass instead of the doily and finally I used just the bow without the ribbon. I also cut two additional bows to use as accents around my page. The possibilities are endless with this die. It was the perfect die to incorporate into the long title/quote on my page.


Have a great Thursday!
Karen

Wednesday, April 14, 2010

Watch for it Wednesday #55

Today's tip is designed to help when you are piecing together some of the smaller more detailed pieces on your Cottage Cutz dies.

One of my favorite things about the Cottage Cutz shapes is the phenomenal details found in these dies. I feel like this attention to design is one of the biggest things that sets the Cottage Cutz dies apart from all other metal dies on the market today.

Now, that being said, sometimes the intricacies of some of the shapes may be intimidating when you first sit down to begin piecing the smaller accent pieces onto your shape. My tip for today is a technique I have started using that saves me time and headaches!

Let's take for instance the adorable new Ladybug Cottage Cutz shape from the Spring Release. This die really pieces together pretty easily and quickly. However, you do have the small block spots to contend with before your die cut is complete. Rather than try to apply adhesive to the backs of some of these smaller pieces, instead place small dots of adhesive where you want your spots to be placed onto the larger shape.

So you simply need to pick up your glue of choice (I like Zip Dry) and then dot several little dots of glue right where you plan to place the spots. Once you are finished applying glue, just pick up your sticky stick (or whatever you like to use to pick up your smaller pieces of paper) and quickly and easily, place the black spots right onto the dots of glue.

Using this method cuts down the time and energy that would otherwise be spent painstakingly applying adhesive to the backs of each tiny little black spot one at a time and then placing the spots down onto the shape.

I hope this little tip has given you some motivation to get out some of your dies that maybe you haven't tried yet and see what you can come up with yourself!!

Have a great day and be sure to come back tomorrow for another fabulous creation from the very talented Karen!!! And then on Friday, I'll post my layout using an adorable little Ladybug I created using today's tip!

Tuesday, April 13, 2010

What's in Your Basket?

If you've been following this blog regularly you'll know that I post cards I've made with the CottageCutz dies. Since Easter is over and I wasn't through showing you my wonderful Easter dies I thought I'd do a layout this week.
This CottageCutz Build a Basket die is so versatile and goes together quickly. I simply matched the color cardstock to my daughter's Easter basket, added some grass and a couple of eggs.
I took one of the eggs and covered it with a wrapper from a mini Cadbury egg since you can see a bit of one peeking out of her basket. I also made my own Butterfinger candy bar to tuck inside.
This die comes with grass, eggs, a bow, chicks and a doily like cloth so you can customize your basket for whatever you like.
I also used the Mini Daffodil, Daisy and Mini bunny on my layout.


Sunday, April 11, 2010

Post a Comment

We want to hear from you our blog followers. Do you like the project? Do you have this die? Do you have an opinion on what you'd like to see on the CottageBlog? Give us some feedback and leave a genuine comment on the posts this week and we'll reward a few random lucky posters with a Mini CottageCutz die.

Friday, April 09, 2010

Cherish these moments...

My post for today features a layout using the new Cottage Cutz Daisy Shape. This shape is a great little 3x3 die with so many possible combinations making it about 3 or 4 shapes for the price of one. Now that is my kind of die! Just think of all the different ways you can personalize these flowers with different papers, textures, materials, etc.

For my layout, I wanted to use the Daisy Flower shape to create a perfectly coordinated accent. I love being able to match the colors in my patterned papers as closely as possible when choosing my embellishments. For this reason, the Daisy shape was a must have for me because now I can use it to create great looking multi-layered flowers that coordinate perfectly no matter what papers I am using on my projects!


The Cottage Cutz Daisy Shape is a simple die to piece together and it would be easy to make yourself a whole little garden of these pretty little Daisy's to keep on hand when you need an accent.

Thanks for stopping by today and I hope you have a great weekend!!

Thursday, April 08, 2010

Chocolate Bunny Goodness

The CottageCutz Mini Chocolate Bunny is pure goodness! No calories...No Guilt. An adorable addition to any Easter layout or project.

This is the CottageCutz die I am showcasing today.


I added a blue bow to my CottageCutz Mini Chocolate Bunny to go with my "boy" layout. A perfect accent for my Easter photo.


Thanks for taking a look!
Karen

Wednesday, April 07, 2010

Watch For It Wednesday #55

Happy Wednesday Everyone!

How many of you have not-so-good photos to scrap? Maybe blurry or grainy? Too busy or dark? Most of these not-so-good photos are usually from really important events in our lives and need to be scrapped. It can be hard to get motivated or inspired when the photos didn't turn out as we hoped. I wanted to share some tips for scrapping these not-so-good photos. With so many photo editing software programs out there, you can usually fix most photos. Sometimes however, some photos just can't be fixed. Or maybe you don't want to mess with fancy programs. Either way, here are some simple easy tips that have worked for me.

#1-Blurry Photos.
My best tip for blurry photos is to incorporate the blurriness into the page. For example, if the photo is from a sporting event or holiday...focus on the speed at which the child played the sport or how fast the holiday went by. By making the blur the focus, it makes the photo fit the page.

#2-Grainy or Noisy Photos.
My best tip for grainy or noisy photos is to use your photo editing software and change them to black & white or sepia. This really helps to take the focus off the graininess and put it back on the subject of the photo. If you print your photos at a Kiosk, most of them have this simple edit available to you.

#3-Busy or Cluttered Photos.
My best tip for busy or cluttered photos is to crop your photo. Using your photo editing software, crop out as much of the extra clutter as you can. Get as close to the person or main focus of your photo when you crop. Kiosks usually have this edit available too.

#4-Overexposed or Underexposed Photos.
My best tip for over or underexposed photos is to use your photo editing software and change them to black & white or sepia. These two functions seem to even out the exposure. Another option if only part of the photo is overexposed, crop out that area. Again, if you print your photos at a Kiosk, this edit is usually available.

#5-Poorly Framed Photos.
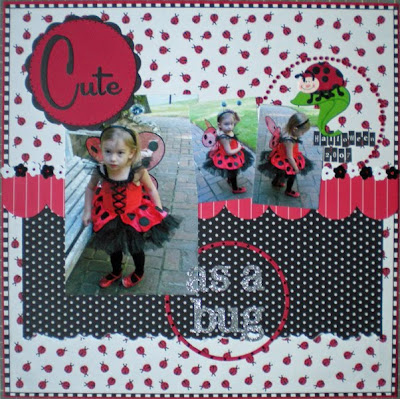
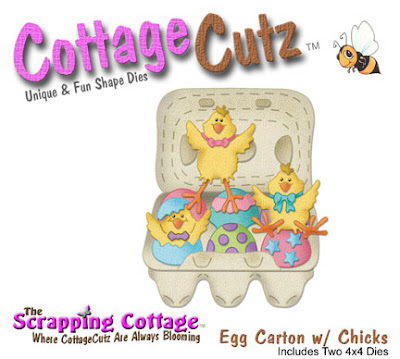
My best tip for poorly framed photos is to crop out the dead space, so the focus is back on the main subject, even if the subject is partially cut off. Another option is to use accents, your CottageCutz dies work great. Place the die cuts over the photo in the appropriate place to draw the eye to the die cut instead of the partially cut off subject or item.

I hope these tips will help to inspire you to scrap those not-so-good photos.
Karen

Tuesday, April 06, 2010

Going 3D with CottageCutz

These Spring CottageCutz dies are wonderful for so many occasions. A friend of mine lost her dear father last week and I wanted to make her a special card showing my sympathy.
The Daisy and Butterflies dies were perfect to create this sympathy card.
As I used this Daisy I was so impressed with how well it was created. It is the closest thing to buying your flowers already made. They can be layered as I've done here or used single with several possibilities for the center. I chose to use the middle sized center and apply a little Glossy Accents. This is one of my top die recommendations because of the versatility and look of these awesome flowers. I made some of these flowers for a layout as well and punched a hole in the center and used velvet brads for the middle.
I also used the stem from the Mini Daisy for greenery, I just simply turned the stem the opposite way.
There is so little effort to make them pop and give this 3D look.
I had to go back and buy the Butterflies Die after seeing Ruth Ellen use them on her layouts.
I cut the butterfly that I wanted with my patterned papers facing up to make the butterfly facing the direction I wanted and applied some Stickles to make it sparkly.
(I used the Basic Grey Green at Heart 6x6 papers)
So whether you're making a spring card or layout, birthday, thank you or sympathy card these dies are perfect for so many occasions.

Friday, April 02, 2010

Egg-straordinary Fun!!

I figure with Easter coming up this weekend, the Cottage Cutz Egg Carton and Chicks is the perfect die to showcase today since many of you will probably be dyeing your Easter Eggs this weekend! This die is part of the Cottage Cutz Easter Release.

This shape was so fun to put together because I felt like I was dyeing Easter Eggs but without all the mess! Plus, this shape is a perfect opportunity to use up scraps of paper as you create your different eggs. Every piece of cardstock I used on this layout came from my scrap drawer.

Here is a close up shot of this adorable Egg Carton Shape. So many fabulous details on this shape! I used my Copic markers to add some details and shading on the chicks and egg carton. I also used some pop dots behind a couple of the chicks to give a 3-D effect.


The March Spring Cottage Cutz release has now started shipping so join us next week as we begin showcasing dies from this release. I don't know about you, but I can't wait to see new projects using these Spring dies! Until then, have a Happy Easter!!

Thursday, April 01, 2010

Bunny Faces

Happy Thursday Everyone!

This is the CottageCutz die I am showcasing today.


This adorable CottageCutz Bunny, Girl die is versatile enough to be made a Boy Bunny. Just omit the flower behind the ear, as I have done on my layout. She/He is a cute addition to any layout or project.


Thanks for taking a look!
Karen

Wednesday, March 31, 2010

Watch for it Wednesday #54

What do these CottageCutz dies have in common?
I used pieces of all these dies to create my Happy Easter Card below.
There are so many possibilities with die cuts, you can certainly use them as shown or mix them up with different dies to create something completely different.

I took the Easter egg die and cut it from patterned paper and then cut another one from limeade Bazzill cardstock. I inked the edges of both and then cut out the mini Daisy and inked that and glued it to the egg. I then took Glossy accents and covered the whole egg with it.
I used the grass from the Picnic table die and the little flowers from the Sheep w/flowers die.

I hope this helps you to think outside each individual die and think of the BIG picture when you create your next project.
Happy Easter everyone!


Tuesday, March 30, 2010

Easter Eggs Anyone?

Have you ever seen diecuts anywhere that are as detailed as CottageCutz? These dies come in so many unique cuts and this Easter Egg Stand is no exception.
I apologize for poor quality picture on this card - it's cloudy here in Utah and hard to get the lighting I need to take a good picture. This 2 die set gives you so many possibilities.
It come with these 3 different basket choices, the option for Easter Eggs title or a blank one so you can create your own as I did with the Happy Easter stamp. There are eggs together and seperate, flowers, bows etc.
I cut this out with white cardstock and colored the pieces in with Copics. I also used a little Stickles on the tulips and some Glossy Accents on the eggs and chocolate rabbit.
Happy Easter!

Monday, March 29, 2010

Easter Eggs

Happy Monday! These is the final pictures of my Easter Mini Book for my parents. They will love seeing these cute pictures of their great grandchildren. . This page is acrylic. I used the eggs and vines from the Cottage Cutz Spring Embellishments. I love the versatility of these dies. (Sorry about the pictures, had camera problems.)To give the eggs a little sparkle, I covered the eggs with Cotton Candy Distress Stickles. I think I will add a few pages to the end of my book for pictures from Easter 2010.
I put the flower and the ribbon from the Watch For It Wednesday on the front of my book. In addition, I added several other pieces of ribbons to the rings.
This will be my last post! It has been a pleasure to work with the wonderful ladies on the Design Team. Thank you to all the awesome Blog Followers who read this Blog. Happy Easter.


Saturday, March 27, 2010

Don't Miss Out!!!

Hurry!! Only three more days left to save with Introductory Pricing on the newest Cottage Cutz "In the Garden" release!! These dies will start shipping mid-April.

All Easter and Spring Cottage Cutz Shapes are in stock and shipping now!

Friday, March 26, 2010

Egg Hunt

For today's post, I chose to create a layout using the adorable Duckling, Just Hatched Cottage Cutz Die from the Easter Release. I am so glad I ordered this little duck! At first I wasn't sure how I was going to use it, but then I realized it is just so perfect for any Easter page I might be working on. I can see this little guy showing up a lot in my albums in the future.


I used my Copic Markers to add some shading to the cracked egg and some outlining to the duck. There are so many great Spring Cottage Cutz dies to choose from right now at The Scrapping Cottage! Be sure you get your orders in early enough to fill your own Easter baskets!!

Thursday, March 25, 2010

The Finishing Touches

With Easter a little over a week away, I wanted to finish up my table decorations. If you remember a few weeks ago I created a center piece for my table using the New CottageCutz Easter dies, see my "Preparing for Easter" post. I only needed to add the finishing touches to my table by making some name place holders.

This is the CottageCutz die I am showcasing today.


I created the name place holders using wooden clothes pins. I painted the clothes pins white to match the wooden crate of the my center piece, then added a bit of brown ink to distress them. The clothes pins stand good with the jaws up, this way they can hold the name cards. I cut the CottageCutz Bunny, Girl die out of chipboard first and then added the colorful cardstock die cuts on top for added strength. I had some left over grass from the center piece, so I added a bit behind each CottageCutz Bunny. The final step was to create the name cards and slip them into the clothes pin jaws.


Here is my Easter table, all the decorations are done using the New CottageCutz Easter dies.


I hope everyone has a blessed Easter!
Karen

Wednesday, March 24, 2010

WATCH FOR IT WEDNESDAY #53

Welcome to Watch for It Wednesday!!! I saw this fun technique with Alcohol Inks and thought I would share it with you. You will need some alcohol inks, a small spray bottle, white flowers, and blending solution. Put some water in your mini mister. Add your favorite color of alcohol ink to make your desired color. Spray the white flower with the ink mixture.
After the flower is completely covered with the ink put the Blending solution in the middle of the flower. This will give your flower a tie-dyed look. My picture really doesn't do this technique justice. You should give it a try.
You can also use this technique on ribbon, glass, bottle caps and the pieces of your die cuts.
Happy Scrapping!!! Have fun.