Friday, January 05, 2024

M - Fold Cat Sympathy

Hi crafters!

Kris here sharing with you a fun fold sympathy card I made for a friend who recently lost her beloved cat after a long battle of health issues.  I've used the Loyal Pets die along with the Love My Dog, Love My Cat die and the hearts are from the Be My Valentine Puppies and the Stitched Heart Set to create this Marvelous Fold card which got its name because it has an "M" shape when displayed.  


*Please pardon my bad lighting and tint of my process photos below.  Using a purple mat is not idea for photos as it changes so much and messes with the colors of my papers etc.  I've used Doodle Bug Designs 6" paper pad called Fairy Garden because I thought the rainbows go with a pet who has "crossed over the rainbow bridge."

CUTTING & SCORING:

White Card Base = 4-1/4" x 10-1/2" scored at 2-1/4", 2-1/2", 5", 5-1/2", 8" and 8-1/4"

Cloud patterned paper = 4" x 2-1/4" (x2)

Rainbow patterned paper = 4"h  x 2"w (x4)

Pink cardstock = 4" x 1/4"


DESIGN STEPS:

1.  Fold and burnish all score lines on card base as follows:

  • the 5" and 5-1/2" score lines are mountain folds and all others are valley folds

2.  Tape or glue the center strip between center score lines.  Adhere the 2-1/4" wide (cloud papers) to the middle panels, and the 2" wide (rainbow papers) to the outside panels. 


3.  Fold the outside panels in (like a gate-fold)  and attach the other 2" wide (rainbow papers) to the front panels


4.  Die cut the decorative elements as shown below and assemble.


5.  Add some foam tape in the center of pink strip and attach the heart.


6.  Top open, bend side panels back until the flaps open and stand up as shown.


A hand written message and/or stamped sentiment can be added to the back of card.


Check out our YouTube channel for more inspiration and giveaways!

Happy Crafting!

~Kristine


Thursday, January 04, 2024

2024 Birthday Cards

Hello Friends

It is Pam sharing with you today!

I have a few birthdays coming up so I thought I would get started on my 2024 birthday cards.  This one is going to my sister who loves gardening, birds and being outdoors.  I am using two Black Friday release dies called Garden Birds and Trellis Background. I am also using an older die from the Easter release Spring Lillies.  All of theses dies are still available in the online store.


Design Steps:


1.  Start with an A2 white card base,  cut a piece of white card stock 4 1/4 x 5 1/2 and cut out the Trellis using the Trellis Background die.  Glue the Trellis to the front of the card
2.  Use the Spring Lillies die and cut out the pieces in white.  Use your inks and dabbers to color the flowers and stems (I used TH's Mowed Lawn, Twisted Citron, Mustard Seed and Spiced Marmalade)
3.  Use the Garden Birds die and cut out the pieces in white.  Use your inks to color the bird. (I used TH's Peacock Feather, Black Soot, Hickory Smoke and Blueprint Sketch.  I also used Pink and Main's Fire Engine) For the eye I used a black Glaze Sakura pen and then a white Sukura Gelly Roll pen for the dot in the eye

4.  Glue the flowers down first making sure you have room for the bird.  Glue the bird in place and then add the sentiment


We have more inspiration on our YouTube Channel check it out HERE

I would like to wish you all a Blessed New Years and thank you so much for stopping by!


Tuesday, January 02, 2024

Love You Card

Hey crafty friends,
Happy New Year! I hope 2024 will be a GREAT year for you. Here is my first project share for 2024!

I started by die cutting the sweet little Jolly Reindeer w sled die cut pieces in...you guessed it. White cardstock. I then colored my pieces in. I also cut the hearts out of the slimeline die and colored those in as well.  I then cut out a scalloped oval mat from some white paper. I sliced it in half. 
In this above photo off to the right, you can also see where I used one of the cute little bow die cut pieces from the little Reindeer w Sled die cut and cut off the long strand or piece from the little bow. It was one of the pieces of the present, but I used it for the little reindeer's collar. I didn't use the bell because I thought it was a little to "christmasy". 

I then created a pink paper mat for my double stitched mat that I was going to be using. Here is a pic of the pink mat.

I attached the two halves of the scalloped white oval to the bottom of the pink mat. You can also see in the photo that I lightly inked the edges with my blue ink.

Here is a view of the attached scalloped die pieces from the back of the pink mat.

Here is a shot of the pink mat with my little "snow mounds" once it was attached to my double stitched rectangle mat. It is always so satisfying to use your die cuts in unconventional ways. It makes you feel like you are getting a little more mileage out of your tools and save a few pennies by not having to by absolutely every crafty tool out there...lol!

Here is a close up of the sweet little reindeer and his sled loaded down with a ton o' love (hearts) to give. I finished off my card by adding the Love You die sentiment to the bottom. I used some cute Doodlebug patterned paper for the background mat.  My finised card is an A2 size, top folding with a "landscape" size.

Dies Used For This Project


Well, that about covers it for today. Be sure to come back real soon. You will want to keep up with my crafty adventures!  Don't forget to find me on social media too! Links are below.
Until the next time, have a wonderfully crafty day!
Melinda

Monday, January 01, 2024

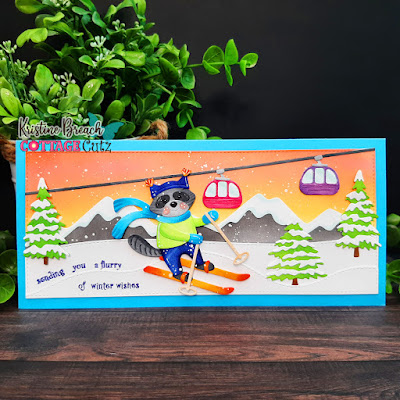
Winter Ski Trip Slimline Card

Happy New Year crafty friends!!

Tomorrow is the LAST DAY of our huge After Christmas Sale where you can save up to 80%!!   If you hurry, you can stock up on your favorites for some crafty fun in the new year!

Kris here with a winter wishes slimline card that I think is fitting for this time of year!  We actually got our first snowfall of the season on Christmas Eve.  While I'm not hoping for a ton of snow this winter, I enjoy creating snowy themed cards like this one.  ☺


I've used the Winter Ski Trip die the cute Winter Raccoon on Skis.  I've also used the Hills Slimline die and the Stitched Rectangles die.

DESIGN STEPS:

I die cut the Winter Ski Trip die 2x and the Winter Raccoon on Skis 1x in white cardstock, then colored with Copic Markers.


I then used the largest of the Stitched Rectangle dies to cut a slimline panel using the extended die method.  I repeated this method for a 2nd panel, then used 2 of the Hills Slimline dies to cut 2 hills from the 2nd panel.  

On the 1st slimline panel, I used Distress Oxide ink pads in Wild Honey, Abandoned Coral and Crackling Campfire and ink blended a sunset to the top half.  I then attached the 2 sets of mountains.

Before adding my decorative elements, I used white acrylic paint mixed with a li'l bit of water to spatter "snow" onto my scene and raccoon.  


Next, I stamped a sentiment onto the snowy hills in Starry Sky ink then attached them to card front, followed by my decorative elements. 

I cut a piece of turquoise cardstock at 7-1/2" x 8-3/4" and scored the 7-1/2" side at 3-3/4" for a top folding slimline card base.  I mounted my card front to the base and done!


Thanks so much for talking a peek today!  I hope you'll take advantage of the huge SALE going on thru Jan 2 (tomorrow night!)  and get your craft on with some of your favorite dies.  

Speaking of favorites, I thought I'd share my 9 favorite cards I've made from 2023 --- super hard to pick just 9, but here's just SOME of my faves ☺


Check out our YouTube channel for more inspiration and giveaways!

Wishing you all a healthy, happy and CRAFT-tastic 2024!

~Kristine

Sunday, December 31, 2023

DT FAves From 2023

Hello CottageCutz friends! Thanks for taking the time to stop and visit with us today. It's Mary Marsh here bringing you the Sunday edition of the Blog.

We have an after Christmas sale going on right now at the online store with savings of up to 80%.  The sale runs through January 2 so stop over and visit to get some dies you may have on your wish list. 

This is the 2nd day of featuring DT favorite cards from 2023. So, let's get started to see what they have chosen. 

Design Team Faves:

Kristine created a beautiful sympathy card using dies from our Flowers & More release as another of her faves from 2023. There is a complete tutorial on this post
Kristine also selected this envelope box card as a fave using dies from the Easter release. The bold and bright colors made it so perfect for Springtime. See this post for a complete tutorial. 
Pam chose this tulip card as another of her faves from 2023. It's a perfect way to send a bouquet of beautiful paper flowers. See her tutorial here
Marla chose this beautiful Folk Art Rooster card as another of her faves from 2023. Distress inks and white gouache really captured the folk-art style in such a unique way. 
Melinda chose this shadow box home decor item as another of her faves from 2023. You can see more of how she created this on her Blog post here. 

I (Mary Marsh) chose this pop-up fun fold birthday card as another of my faves from 2023. You can see the complete tutorial on this post. There is also a video on the post that shows it opening and closing. 

card front
card inside

That's it for today's post. I hope you have enjoyed watching down memory lane with us for the past 2 days. 
Other News: This is my last post as a member of the CottageCutz Design Team. It's been nearly 8 years and I have thoroughly enjoyed my time designing for this incredible company. But in 2024 I will be getting more involved in the political realm in my community and that will take a good amount of my time. So, farewell my friends. It's been a wonderful ride!