Thursday, February 06, 2020

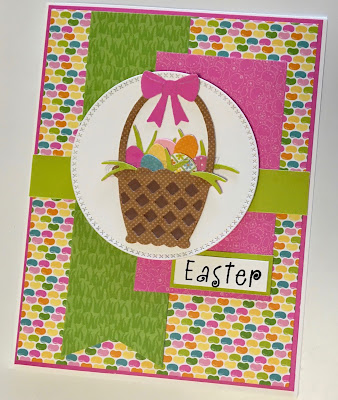
Easter Basket!

Hi Everyone!

I am so excited about our NEW RELEASE!!!  This release features Spring dies and right now they are 25% off for a limited time.  There are 27 different dies and they are just perfect for Easter and Spring cards.  This Spring release has everything from bunnies to baskets and more.  Check them out HERE!

Today, I am featuring the Basket of Eggs die!!


Design Steps:
 1.  Cut out your pieces with a variety of DP and card stock using the Basket of Eggs die
 2.  Use an A2 white card base, 5 1/4 x 4 pink card stock, 5 x 3 3/4 jelly bean DP, 1 1/2 x 3 3/4 green DP cut with a dove tail, 3 x 2 pink DP and 1/2 x 5 1/4 light green strip.  Also cut a white circle using the second from the largest Cross-Stitched Circle die
 3.  Glue the Jelly Bean DP to the pink card stock then add the green dove tail DP and finally the pink DP rectangle
 4.  Last glue the light green strip to the top of all the layers and glue to the white card base
 5.  Use the white Cross Stitched circle as a base assemble and glue the Easter basket to the circle
6.  Add dimension dots to the back of the circle and add to card front.  Last add your sentiment and your card is finished


CottageCutz Products


Thanks so much for stopping by!  The new Spring Dies are a must in your collections so be sure to check them out especially while the sale is on!!
Blessing
Pam

Wednesday, February 05, 2020

Happy Valentine's Day!

Hello!  This is Sukie and I'm excited to share a card created with the new Spring Release dies.  These dies are not only ideal for those Spring and Easter creations but also perfect for Valentine's.
I cut out the newly released Bunny Truck for my card and added some hearts to the back of the truck. The hearts are from the Party Favors die set.  The truck and hearts were inked up with some Oxide Inks.  I used the Nested Stitched Eyelet Rectangle Set for my card panel.
I prepared my panel by stamping it with a sentiment from the Scrappy Moms (retired) Love Notes stamp set.  I also added some Peppermint Icicle Trendy Twine as an embellishment.
I used the colors from the truck as inspiration for the papers on the background of my card.  The center piece was punched with the Fiskars Scalloped Sentiment punch.  The rectangle panel was adhered on top.
To finish off my Valentine's card, the truck was placed in the center of the panel as the focal point.
Here are the dies used on my card, available here:

Tuesday, February 04, 2020

Spring Flowers

Hi! Janja here with you. Spring is not so close yet, but I can hardly expect to enjoy the warmth of sun rays and the smell of fresh spring flowers.
For today's post, I made a birthday card with spring flowers.


- CottageCutz dies: Spring Watering Can, Butterflies, Nested Stitched Scallop Rectangle Set
- blank card: 4.4 x 5.6" (11,2 x 14,2 cm)
- patterned paper: 4.2 x 5.4" (10,7 x 13,8 cm)
- colored cardstock
- colored ink pads
- vellum paper
- embossing powder - white
- clear embossing ink pad
- craft foam (fun foam)
- Distress Collage Medium - matte
- glue, double-sided adhesive tape, self-adhesive foam pads

I started making my card by die-cutting all the pieces for it. I added extra shading on the cutouts with colored ink pads.


I cut out two patterned papers and with foam mounted one on top of the other.
I cut out a strip from vellum paper and heat-embossed the sentiment. After that, I added Distress Collage Medium - matte only to the side edges and attached a vellum strip to the prepared background.


I finished the card by adding a butterfly.


A new Spring release is available at the online store. New dies are 25% off for a limited time.

Have a nice day.
Janja


Sunday, February 02, 2020

Wool Ewe Be Mine?


Hi!

It's Anja here. I have another Valentine's card for you today. This time I used two older dies and made a cute card.


For this card I used:
- Cottage Cutz dies (Flatbed Truck w/Accessories, Nativity Set Animals),
- Die Inks,
- white card base (15x15 cm),
- bristol paper for background (12,5x12,5),
- black card stock for background (12,8x12,8 cm),
- white card stock for die cuts,
- silver pigment ink,
- black pen,
- white pen,
- printer,
- paper glue.

First I cut and colored the truck.


Next I colored the sheep.


Then I printed the sentiment on bristol paper and trimmed both paper for the background.


Then I colored the background.


And when I had all the pieces ready I assembled the card together.


This all form me for today. Before I go I invite you to the online store where you can check out all the new goodies. Can't wait for the package to arrive.

Have a nice Sunday and see you again next week.

Anja Z.


Cottage Cutz dies I used:


Saturday, February 01, 2020

Bee My Valentine (new die)

Hello Scrapping Cottage friends! Thanks for taking the time to stop and visit with us today. It's Mary Marsh here bringing you the Saturday day edition of the Blog. 

We have a new release of Spring dies, and they are in the online store and 25% off for a limited time. There are 27 new dies in the release and each one is cuter than the next. They will be perfect for your Easter and Spring card making. The DT will be showing more samples in the weeks to come.  Today, I am featuring the new Busy Bee die. I made a Valentine card with it.

So let's get started with some details on how I created this card.

Design Steps:

I started off by choosing my designer paper. I decided to stick with traditional Valentine colors for this card and I wanted some heart paper. I found this one in my collection that I thought would work. The hearts are small enough and once I added my die cut hearts it wouldn't overpower the image.

Red Card Base: 4 1/4" x 5 1/2"
Designer Paper Layer: 4 1/8" x 5 3/8"

Next, I cut the bee image in normal bee colors- black and yellow. I used vellum for the wings and sponged them with tumbled glass distress inks.
The large red heart is from the Be My Valentine Puppies and the white heart from the Stitched Heart set.

I wanted a "punny" sentiment for my card. I had this "bee happy" stamp. So I masked off the happy word and with the help of my stamp-a-ma-jig I stamped just the "bee" word in the corner of my heart with black ink. To make it stand out I stamped in black onyx ink and then embossed with a black embossing powder.
To finish off my sentiment, I used just the "my valentine" phrase from the Be My Valentine Puppies die and cut in black cardstock. When I started card assembly I decided to recut this phrase in a shiny black foil to make it stand out like the stamped sentiment.
I also cut a 1 1/2" wide strip of black cardstock and embossed it with a heart folder. Just wanted to get some other color on the card besides the red and white.

I am now ready to start card assembly.  I attached the black embossed strip to the designer paper with double sided tape. For the red heart I used dimensional adhesive and the white heart is attached with double sided tape. This photo shows the strip cut at 1" but it wasn't wide enough when I started card assembly.
Next, I added the bee using dimensional adhesive. The "my valentine" phrase is attached with Ranger multi medium matte. My camera wasn't cooperating on this photo. The "bee" word is embossed but it looks light and faded in this photo. IRL it's a solid black. 
To finish off my card. I added the image panel to the red card base and then scattered a few red hearts for added interest.

Well, that's it for me for this post. See you next Saturday.

dies I used to create card: