Sunday, January 13, 2019

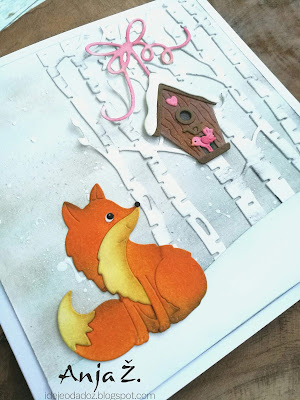
Fox and Bird

Hi!

It's Anja here. Hope you had a good week. I was adjusting back to work after the holidays.
We still have now snow where I live, so I decided to male a winter scene on my card for today's post. I used combination of new and older dies.


For this card I used:
- Cottage Cutz dies (Winter Birdhouses, Sweet Fox, Birch Trees),
- Distress Inks 7Tumbled Glass, Pumice Stone, Black Soot, Spiced Marmalade, Wild Honey, Mustard Seed, Antique Linen, Vintage Photo, Worn Lipstick, Walnut Stain),
- white card base (15x15 cm),
- white card stock for die cuts and background 13,5x13,5 cm),
- white acrylic paint,
- brush,
- black pen,
- black brush pen,
- white pen,
- heat gun,
- scissors,
- paper glue.

First I cut the fox and the little bird. I used Distress Ink for coloring. I used pens for the eyes.


Then I colored the house.


And the the trees.


Next it was the background. I colored it in grey and light blue tones.


I used white acrylic paint for snow. I dried it with the heat gun.


Then I made the snowy ground. I used white card stock and cut it with sccisors.


And when I had all the pieces I assembled the card and glued it together. And my card was finished.


Before I go I just want to invite you to the store to check out new Valentine's day release. You can get all the new dies for lower price.

Have a great Sunday and see you again next week.

Anja Z.


Cottage Cuts dies I used:


Saturday, January 12, 2019

Love Cupcake (new die)

Hello Scrapping Cottage friends! Thanks for taking the time to stop and visit with us today. It's Mary Marsh here bringing you the Saturday edition of the Blog. Not sure what's happening where you are but it's cold and snowy here in Pittsburgh. One of those perfect days to enjoy some hot chocolate and do some crafting. 

We have a new release of Valentine & St Patrick Day dies in the online store. Each one is cuter than the next and they are on sale for a limited time at 25% off. There will be a group post next week and the team will showcase all of the Valentine dies. Today, I have for your viewing pleasure a Valentine card using the Love Cupcake die.

So let's get started with some details and a tutorial on how I created my card.

Step 1: I wanted to stick with the traditional Valentine colors of red & pink with black accents for my card. I chose some heart themed designer paper for my background layer.
Black card base: 5 1/2" x 4 1/4"
Red Layering Panel: 5 3/8" x 4 1/8"
Designer Paper: 5 1/8" x 3 7/8"

Image Panel: 3rd largest stitched square die
Black Layering Panel: 2nd largest square set die

I cut the cupcake from red and pink cardstocks. Love all the detail on the cupcake base as well as the icing. I adhered this with Ranger multi medium matte.
Step 2: Now that all the panels and image are cut, I am ready to start card assembly. I stamped the sentiment in black ink on the image panel before I attached my cupcake. Used my MISTI for placement.
Secured the cupcake to the image panel with double sided tape. I attached the love word after the cupcake was down because I didn't want it to cover the sentiment. I cut a few extra red hearts and added them to the panel just to balance out the layout. 
I attached the designer paper panel to the red base. I wanted something else so I decided to use some black velvet ribbon. I thought it balanced off that side of the card. 
I decided to angle the image panel for added interest. It's attached with double sided tape. 
Completed my card by attaching the black card base. And that completes my card and post for this week. I hope I have given you an idea for a way to use this new die. See you next Saturday!

dies I used to create card:
http://www.scrappingcottage.com/cottagecutzlovecupcake.aspx
http://www.scrappingcottage.com/cottagecutzstitchedsquaresetbasics.aspx
http://www.scrappingcottage.com/cottagecutzsquaresetbasics.aspx


Friday, January 11, 2019

Valentine Blooming Heart

Happy Friday Cottage Cutz fans!  It's Jeanne posting today and I've been in the mood to make Valentine's Day cards this year.  They are so fun to send to friends and family - not just your "sweetheart" (there should be only ONE of those, right?)  So I've been making Valentine's - or "Galentine's" - Day cards.  This one is right up my alley in a clean and simple style.
I started off by watercoloring a background using Real Red and Powder Pink.
Then I cut a square using the largest of the Nested Scallop Squares dies.
Using the second largest square from the Cross Stitched Squares set, I made a frame by centering it and cutting out the middle.  I just eye balled it to get it centered, but I would recommend using Washi tape to hold it down as you run it through your die cutter so it doesn't shift.
I made an A2 card base from white card stock and stamped my sentiment in the Real Red.
I cut my watercolor panel to a size in between the inner and outer dimensions of the frame.  About 3 1/2 inches.  This is adhered to the card base.  Then I used narrow foam tape to pop up the frame from the base and put it on top.
For my main image I used the Blooming Heart die in silver card stock.  Whenever I have an intricate die such as this I like to use an adhesive sheet on the back.  The die will cut through all layers EXCEPT the "wax paper" backing of the adhesive sheet.  However, that works great because the image peels right off like a sticker!
After I attached my frame, I added the main image and some crystal heart embellishments.

I hope you enjoyed this card today.  I had fun designing it and it is one I can easily see sending out to my friends on Valentine's Day to let them know how special they are.

Dies used:
http://www.scrappingcottage.com/cottagecutzbloomingheart.aspx

http://www.scrappingcottage.com/cottagecutznestedscallopsquareset.aspx
http://www.scrappingcottage.com/cottagecutzcross-stitchedsquaresetbasics.aspx

Thanks for stopping by.  I hope you have a fun and creative weekend!


Thursday, January 10, 2019

Mice Love!

Good Morning Scrapping Cottage Friends

It is Pam creating with you today on the blog!

I am continuing to make my Valentine cards.  I don't make as many Valentines as I do Christmas Cards and I usually make a lot of different ones verse the same card.  I used the Christmas Mice die for this darling card.  I love it when you can use our fantastic dies in multiple ways and for different occasion.

Design Steps:
 1.  Cut out all of the pieces using the Christmas Mice die. I used a variety of card stock and designer papers
 2.  Shade the mouse with TH inks and then assemble the boy mouse
 3.  Shade the girl mouse with TH inks and then assemble the girl mouse
 4.  Using gray inks to shade the bench
 5.  Glue the mice to the bench as shown
 6.  Use a white card base and cut red card stock slightly smaller then the base.  And then cut the DP 4 x 5 1/4
 7.  Glue the DP and the red card stock together and then glue down the mice

8.  Using the Hugs & Kisses die cut out of red card stock.  Glue the Hugs & Kisses to the card as shown


CottageCutz Products
We appreciate you stopping by today!  Hope you have a wonderful week of crafty fun and I will see you next Thursday on the blog!

Blessings
Pam

Wednesday, January 09, 2019

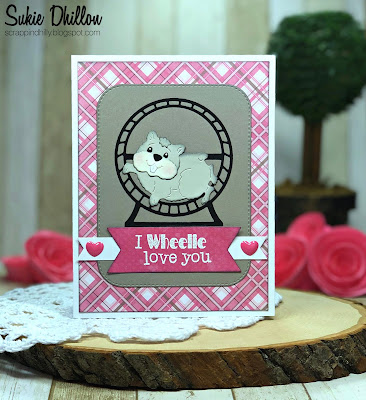
I Wheelie Love You Card

Hello!  This is Sukie and I'm sharing a project for my guest designer post. Today, I'm getting a jump start on a Valentine's Day card created with the Happy Hamster and Stitched Rounded Rectangle die sets.
I kept this card fairly simple since I wanted the hamster and the fun sentiment to be the focal point of my card.  Once I inked the die cuts on the edges, it all came together very quickly.
I found the perfect paper in my stash for the Valentine's theme.  I heat embossed a sentiment from the Scrappy Moms (retired) "Crazy for You" stamp set and hand cut the edges into a banner shape.  An extra banner was cut to layer underneath the sentiment.
I colored in the eyes with a black gel pen and added a tiny white dot to each of the eyes with a white gel pen.  A bit of chalk was brushed on to the cheeks which is a bit hard to see in the pictures.
The sentiment was adhered onto the die cut rectangle and anchored with the sweet hamster wheel. A couple of enamel shaped hearts were placed on the hand cut banner.
Here are the dies I used to create my card, available in the shop: