Friday, January 11, 2019

Valentine Blooming Heart

Happy Friday Cottage Cutz fans!  It's Jeanne posting today and I've been in the mood to make Valentine's Day cards this year.  They are so fun to send to friends and family - not just your "sweetheart" (there should be only ONE of those, right?)  So I've been making Valentine's - or "Galentine's" - Day cards.  This one is right up my alley in a clean and simple style.
I started off by watercoloring a background using Real Red and Powder Pink.
Then I cut a square using the largest of the Nested Scallop Squares dies.
Using the second largest square from the Cross Stitched Squares set, I made a frame by centering it and cutting out the middle.  I just eye balled it to get it centered, but I would recommend using Washi tape to hold it down as you run it through your die cutter so it doesn't shift.
I made an A2 card base from white card stock and stamped my sentiment in the Real Red.
I cut my watercolor panel to a size in between the inner and outer dimensions of the frame.  About 3 1/2 inches.  This is adhered to the card base.  Then I used narrow foam tape to pop up the frame from the base and put it on top.
For my main image I used the Blooming Heart die in silver card stock.  Whenever I have an intricate die such as this I like to use an adhesive sheet on the back.  The die will cut through all layers EXCEPT the "wax paper" backing of the adhesive sheet.  However, that works great because the image peels right off like a sticker!
After I attached my frame, I added the main image and some crystal heart embellishments.

I hope you enjoyed this card today.  I had fun designing it and it is one I can easily see sending out to my friends on Valentine's Day to let them know how special they are.

Dies used:
http://www.scrappingcottage.com/cottagecutzbloomingheart.aspx

http://www.scrappingcottage.com/cottagecutznestedscallopsquareset.aspx
http://www.scrappingcottage.com/cottagecutzcross-stitchedsquaresetbasics.aspx

Thanks for stopping by.  I hope you have a fun and creative weekend!


Thursday, January 10, 2019

Mice Love!

Good Morning Scrapping Cottage Friends

It is Pam creating with you today on the blog!

I am continuing to make my Valentine cards.  I don't make as many Valentines as I do Christmas Cards and I usually make a lot of different ones verse the same card.  I used the Christmas Mice die for this darling card.  I love it when you can use our fantastic dies in multiple ways and for different occasion.

Design Steps:
 1.  Cut out all of the pieces using the Christmas Mice die. I used a variety of card stock and designer papers
 2.  Shade the mouse with TH inks and then assemble the boy mouse
 3.  Shade the girl mouse with TH inks and then assemble the girl mouse
 4.  Using gray inks to shade the bench
 5.  Glue the mice to the bench as shown
 6.  Use a white card base and cut red card stock slightly smaller then the base.  And then cut the DP 4 x 5 1/4
 7.  Glue the DP and the red card stock together and then glue down the mice

8.  Using the Hugs & Kisses die cut out of red card stock.  Glue the Hugs & Kisses to the card as shown


CottageCutz Products
We appreciate you stopping by today!  Hope you have a wonderful week of crafty fun and I will see you next Thursday on the blog!

Blessings
Pam

Wednesday, January 09, 2019

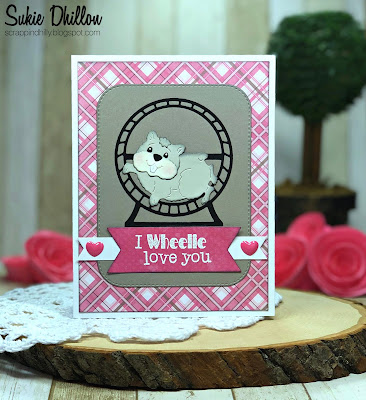
I Wheelie Love You Card

Hello!  This is Sukie and I'm sharing a project for my guest designer post. Today, I'm getting a jump start on a Valentine's Day card created with the Happy Hamster and Stitched Rounded Rectangle die sets.
I kept this card fairly simple since I wanted the hamster and the fun sentiment to be the focal point of my card.  Once I inked the die cuts on the edges, it all came together very quickly.
I found the perfect paper in my stash for the Valentine's theme.  I heat embossed a sentiment from the Scrappy Moms (retired) "Crazy for You" stamp set and hand cut the edges into a banner shape.  An extra banner was cut to layer underneath the sentiment.
I colored in the eyes with a black gel pen and added a tiny white dot to each of the eyes with a white gel pen.  A bit of chalk was brushed on to the cheeks which is a bit hard to see in the pictures.
The sentiment was adhered onto the die cut rectangle and anchored with the sweet hamster wheel. A couple of enamel shaped hearts were placed on the hand cut banner.
Here are the dies I used to create my card, available in the shop:

Tuesday, January 08, 2019

Love is in the air

Hi, Janja is here with you. Happy New Year to everyone!
For today I prepared a simple wedding card. New year, a new beginning.
I decided to use only two colors. Let's see how it's made.


Supplies:
- CottageCutz dies: Dapper Dachshund, Balloons variety
- white card base: 5.3 x 5.3" (13,5 x 13,5 cm), folded
- brown card stock: 4.6 x 4.6" (11,7 x 11,7 cm)
- patterned paper: 4.5 x 4.5" (11,4 x 11,4 cm)
- white, brown and black card stock for die cuts
- Distress ink pads: Vintage Photo, Walnut Stain
- glue, double-sided adhesive tape, self adhesive foam pads 

With the Dapper Dachshund die cut out all the elements and put them together.


Cut out two balloons. 


Prepare a white card base. Cut two squares. 
Stamp a sentiment in black on a patterned paper.


Complete the card.


Have a nice day.


Sunday, January 06, 2019

Winter Wreath

Hi!

It's Anja. Hope the new year started good for you. I've been sick the last two weeks, hoping to feel better soon. I managed to craft a bit and made a new card for you. A simple winter card.


For this card I used:
- Cottage Cutz dies (Ice Skates & Mittens, Build-A-Grapevine Wreath, Cocoa & Sweet Treats),
- Distress Inks (Antique Linen, Worn Lipstick),
- Caretake Spray (Fudge Brown, Trunk Brown, Rusty Orange),
- white and craft card stock for die cuts,
- craft card base (18x13 cm),
- pink card stock for background (16,8x11,8 cm),
- patterned paper (16,5x11,5 cm),
- silver pigment ink,
- silver string,
- glossy accent,
- white glitter,
- tape,
- adhesive foam pads,
- paper glue,
- heat gun.

First I cut two wreaths from craft paper.


The I used spray colors to color it.


Then I cut and colored the mittens and the skate. I used silver pigment ink for the metal part of the skate. I used a bit of silver string to finish the skate. I used tape to adhere string on the back.


For the background I cut two papers.


Then I glued everything together. I used adhesive foam pads to adhere the skate. In the end I put some glossy accent on the snowflakes and sprinkled it with glitter to add some shine. And my card was done.


And this all from me for today.

Have a great week and see you again net Sunday.

Anja Z.


Cottage Cutz dies I used: