Saturday, February 13, 2010

Back from Disney!!

Yep, that's right! I have finally made it back home from the happiest place on earth. Disney World has to be one of my favorite places in the whole world. I have just as much fun now as an adult as I did when I was a child. You never get too old to enjoy the magic of Disney! However, the older you get, the longer it takes you to "recover" from all that fun!! Honestly, I can truly say I have never been this tired in my whole life. I was even too tired to scrapbook!

Fortunately, I have rallied a bit today and was able to finish up my Blog project that I started before I left. Since Valentines Day is fast approaching, I thought a Valentines card would be appropriate for my post this week (one day late - sorry about that!!!). There are so many darling new Cottage Cutz Valentines Dies to choose from when it comes to making your Valentines cards and layouts this month that it is hard to decide which one to use first!

For my Valentines card, I chose to use the Beaver shape from last month's release and the Limited edition Heart Doily shape from the Valentines Release. I am still enjoying all the adorable little animals from the camping release. And they make the cutest additions to cards, too! I used a bit of pink paper when creating my little beaver to give him a bit of a Valentines look. I thought about swapping out the wooden stick for a little heart, but I decided to keep the stick since it goes so well with my sentiment :)

Be sure to check out the newest Cottage Cutz Easter/Spring Release!!
There are some absolutely adorable new shapes for Easter and St. Patrick's Day as well as great Spring embellishments to go along with all of your upcoming projects. Definitely some "must-haves" in this newest release to be sure!!

Thursday, February 11, 2010

Valentine Treat Basket

Happy Thursday Everyone! With Valentines only a few days away, I wanted to share a quick and easy idea for a Valentine Treat Basket. See end of post for info on template.

These are the CottageCutz dies that I am showcasing today.


I used the CottageCutz Valentine Puppy on one side and cut a few more of his hearts as accents.


I used the arrow from the CottageCutz mini(bow&arrow) to accent my punched heart.


This Valentine Treat Basket is a perfect way to showcase those adorable CottageCutz Valentine dies. Embellish your basket with your favorite dies and fill with goodies. Remember this would work great with the new CottageCutz Easter dies too.

I found the template for this cute basket online. It was very small, printed out on half a 8.5x11 sheet of paper. I scanned it back in and re sized it to print on a 12x12 sheet of paper. It is now a good size to fill with Valentine treats. If you are interested in the template, please email me at karenhelmka@aol.com. If you have a large format printer, print it on a 12x12 sheet of paper. If you have a standard printer, print it in halves, cut out and tape together and you are ready to go.


Have a wonderful day!
Karen

Wednesday, February 10, 2010

Watch for it Wednesdays!! #47

Today I would like to give you a tip I discovered last week while working on my Gingerbread House shape. Since my "so-called" scrappy friends have gotten me hooked into these Copic markers (like I need another scrapping addition!!) I have started using them more and more in my die-cutting. Before when I wanted to add more layers and colors to my die cuts, I cut the shapes out over and over in different shades of paper. Now, I just cut out the shape once in white, and then color in the smaller detailed pieces in whatever colors I need.

Since I have started using this alternative technique some, I have found I only need to tend to cut out my shapes in one or two colors of cardstock. For the Gingerbread House, for example, I ran all three die plates through my cutter using both brown and then white cardstock. In the past, I have always laid one 4x4 die onto my plate at a time and then placed one piece of 4x4 cardstock on top and rolled it through. Well this time, I laid all three die plates from the Gingerbread House shape onto my cutting plate at once and then I placed a 12x4 piece of cardstock on top and rolled the whole thing through at once. By doing this, I only had to make two cuts - one for each color of cardstock I was using. But, the coolest thing I discovered, was how much easier it was to locate and keep up with all my shape pieces because I only had to pieces of paper to handle instead of 12 little 4x4 pieces of paper

I encourage you the next time you are working with one of your Cottage Cutz Shapes that come as 2 or even 3 plates, try this method and see if you like it as much as I do!

Come back tomorrow for our fabulous Guest Designer, Karen's Thursday post!

Tuesday, February 09, 2010

I "Woof" You

About a year ago I bought this CottageCutz Dog because he was so cute and made this card.
I loved how it turned out so I emailed it to The Scrapping Cottage and told them how much I liked this die. Little did I know at the time that I would have the privilege of working with these dies on the CottageBlog.
So here we are a year later and there is another super cute dog diecut. This CottageCutz Valentine Puppy is so dang cute and versatile. He comes with this heart so you can use it for your Valentine projects or you can use it without the heart for everyday projects.

This puppy looks so real to me it makes me want to pet it! So whichever dog you like best you'll know you can't go wrong becaues they're both so cute - heck if you can't decide which one to get - get both!


Monday, February 08, 2010

BE HAPPY EVERY DAY!!!

Happy Monday! It's always a wonderful weekend, when I have the opportunity to go to the crop at my local scrapbook store. It is not only fun but it gives me the opportunity to share my wonderful CottageCutz dies with the other women scrapbooking at my table.

The new Valentine release dies are so adorable. I used the Mad Hatter Cake die to make this fun tag. I added a little ink and stamped a cute saying on the tag.

The tag was the perfect addition to the layout of my grandson's first birthday!


Saturday, February 06, 2010

A Little Puppy Love

Good Morning Everyone! I am so excited to be making my first post. I am honored to have been chosen to be the February Guest Designer. The Valentine dies I got to work with couldn't have been any cuter!

These are the CottageCutz dies that I am showcasing today.


The CottageCutz Heart Doily is such a beautiful and versatile die. The minute I saw it on the site, I knew I wanted to cut it up to make lace. That is just what I did to frame the large circle. I cut thin strips of sugar coated cardstock and placed the strips over the top part of the Heart Doily to be cut, this created scallops. I then tucked them behind the circle for the lace effect. So pretty! I also used a complete Heart Doily to frame the CottageCutz Valentine Puppy.


The CottageCutz Valentine Puppy is adorable! I wanted him to stand out on my layout, so I cut him first in chipboard and then the cardstock. I glued them together to give him some dimension. I used darker colors for my Valentine Puppy to contrast against the mostly pastel colors of the papers. I cut the heart that the Valentine Puppy holds in his mouth from a bright sugar coated cardstock, as I did two more hearts for accents. The title is also cut from the same bright sugar coated cardstock and pop-dotted. This ensures that the title and accents are not lost on my page.

The New CottageCutz Valentine dies are so versatile, you can use them not only on your Valentine creations but all year long. So get creative and get scrapping!

Have a blessed weekend!
Karen

Come join us on Facebook!!

Hey Blog Readers!! We now have a new page on Facebook! Be sure to check it out and become a fan. You never know when we might post something special on Facebook. And you know you wouldn't want to miss anything like that!
Plus, now you can start posting your own Cottage Cutz projects onto our Facebook page! We have some very talented followers and it is time for everyone to enjoy your creativity!! Let's fill up the fan photos album! I can't wait to see what you've come up with using our Cottage Cutz dies.

Friday, February 05, 2010

The Making of a Gingerbread House

As soon as I saw this Limited Edition Gingerbread House Die, I knew I had to have it! I mean, who can't use a Gingerbread House die, right?! Every year, my girls and I make a Gingerbread house together. When they were younger, it was hard to keep the decorations from disappearing into their little tummies. But this year, they were really into the decorating and actually worked on it together as a team without wanting to eat all the little candies. Well sort of ;).

In order to jump start my layout, I used a Pagemaps sketch. I had taken so many pictures during the decorating process that I needed something to help focus me onto the best ones for a layout. This sketch worked perfectly for me.


I love all the wonderful detailing on this Gingerbread House die. I just ran it through my die-cutting machine with brown cardstock and then again with white cardstock. I built the house with the brown pieces and then used my Copic markers to color each of the candies and other fun details I had cut from the white cardstock. This method cuts way down on your piecing together time of your more intricate dies. And isn't it the wonderful details of dies like this Gingerbread House that we love the most!


Happily, there are still a few of the Limited Edition Gingerbread House dies available. If you haven't picked yours up, add it to your Valentine's shipment so you don't miss out because once it's gone - it's gone for good.

Wednesday, February 03, 2010

Watch for it Wednesday #46

I know it's Thursday not Wednesday - we'll just call this Watch for it Wednesday on Thursday ok?
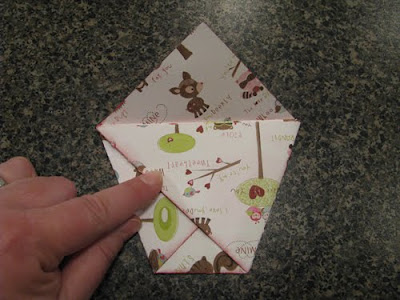
I remember in elementary school making these little pockets out of a square. I made all sizes and was fascinated that you could even drink out of one of these, but you had to drink fast or you'd get wet.
Anyway, I thought these would make cute Valentine pockets to hold a little note and a treat.
They're really simple to make.

I started out with a 5" square of double-sided patterned paper.
I'm using BoBunny Bandit paper. This paper went great with the Camping release and now I'm using for the Valentine release too!
Fold it in half to make a triangle. Scoring it first helps it to fold better.

Then take the left side corner and fold it up to the right side and crease.

Then take the right side and fold to the left and crease.

Take the top portion and fold one triange to the front and one to the back.
I used some Distress ink to ink all my edges before I applied my adhesive.

I added a border punch piece and used the cute little mini CottageCutz Love Postage Stamp die to embellish my pocket.
I cut a piece of white cardstock that is 2 5/8" wide and 4" long and folded it half for my tag.
There you go! A quick and easy little pocket to hold a cute Valentine!
You can also take both triangle flaps at the top and fold them over to make an envelope flap.
The CottageCutz mini's are just perfect to add a little touch of love - they are so cute!

Our Guest Design Team Member position goes to....

Karen Helmka of El Paso, Texas!

I am a 38 year old, Mother, Wife, Surgical Tech by trade, SCRAPBOOKER, lover of photography, reading, gardening and a running junkie. I live with my husband of 16yrs and our 6yr old son in El Paso Texas. My husband is in the military, so we move every 3yrs or so. I really enjoy this life because I get to live in so many different places and meet so many fun people.
I started scrapping in 2000 with Creative Memories. I didn’t get serious about it until the birth of my son in 2003. I have been on the 3Bugs in a Rug DT for the past few years and love it. I am lucky enough to have been published in Memory Makers, Scrapbook Trends, Creating Keepsakes and Scrapbook Ect. I love the creative outlet scrapbooking gives me along with preserving my family memories. I am honored to have been chosen to work with this incredible group of people! Thank you for this wonderful opportunity!
Karen will be posting on Thursday's starting next week, so watch for her wonderful work as she showcases some of our cute CottageCutz dies.
Watch for it Wednesday post will posted tomorrow instead of today, so we'll see ya back Thursday!

Tuesday, February 02, 2010

Feelin' Foxy

I'm excited to have my Valentine CottageCutz dies which are being shipped to me, but in the meantime I thought I'd take this cute CottageCutz Fox die and make him "feel the love".
That is just one great feature of these wonderful dies, you can adapt them for so many occasions.

I simply cut out a diecut heart and then mounted it on the same red paper as my card background and cut around it with my Deckled edge scissors and mounted my fox with a little mounting tape and wha..la! A Valentine card.
I'll be back tomorrow with Watch for it Wednesday!

Monday, February 01, 2010

A Tin of Fun

Happy Monday! One of my best friends has a wonderful young son (and I do mean young, a third grader) who loves Altoids. He has been working hard on a BIG school project all week with a fever and ear infection. I thought it would be fun to make him a little gift for all his hard work. So I decided to use my wonderful Cottage Cutz dies and decorate an Altoids tin. These are the items I used:
I picked out some cute paper to go with the Cottage Cutz Moose with lights. I am sure you noticed I did not use the lights on the Moose that is what is so cool about these dies. You can pick and choose what parts of the dies you want to use on your layouts or projects.

I didn't do this but you could take out the candy and decorate the inside of the tin too.

Sunday, January 31, 2010

New Heart Doily now available


Check it out! This lovely, lacey Heart Doily is now available to purchase as part of the Sugar Sweet Valentine release.


Thursday, January 28, 2010

Reel Fun!

As soon as I saw this Bait Shop Die from the Camping/Outdoors Cottage Cutz release, I couldn't wait to get my hands on it. It looks so much like our boat house at the lake. In order to make it even more authentic, I swapped the door and the window so that they were in the same places that they are on our actual boat house.

I have so many pictures of my girls fishing off the dock with Granddaddy (my Dad). But that is such a big part of the fun of going to the lake house that I just can't help but get the camera out every time! Now....these pictures were taken when my oldest daughter (now 7) was only about 3 years old. (See I told you I was going to be better about digging back into my picture files!!) You have to look closely at each picture to see the little fish that she has caught, but he is there.


In order to create my Bait Shop, I started with a light grey paper to match the wood planks in my pictures. Then I used my Copic markers to add some shading and detail. I also colored some of the smaller, detail shapes with the Copic markers because it lets me get a nice weathered look that is more difficult to achieve with colored cardstock alone.

This Bait Shop Shape is so versatile and could so easily be turned into a little rustic hunting cabin or even a tool shed. Plus I love all of the "extra" shapes I get with this die like the paddles and the cooler that can be used as embellishments on other projects and in combination with other dies.

Wednesday, January 27, 2010

WATCH FOR IT WEDNESDAY #45

MAKING FLOWERS

Welcome to Watch for it Wednesday! This week when I was working on a layout, I made my own flowers out of card stock. To make the flowers, I cut two small circles and then two circles a little bit bigger. You need four circles total, a button and embroidery thread.
The first thing I did was to crumple up the paper. You can also use a pen to draw around the outside of the flowers.
Unfold the circles and layer them on top of each other, the bigger circles on the bottom and the smaller circles on the top. Use the embroidery thread to sew the button in place. Now, you have a fun beautiful flower for your layout or scrappy project. You can also add leaves to your flowers.

I also tried this technique with the Cottage Cutz Large Hibiscus.
Cut three of the hibiscus shape in two different colors. Crumpled each of the three flowers and added the center of the hibiscus flower to the top flower. Then sew or attach the button to the center of the flower. This technique gives the flower a fun dimension. Almost a 3D look.
I think you could use this technique on many different shapes. It's easy, inexpensive and looks awesome on a layout! Try making your own flowers!!! Happy Wednesday!

Tuesday, January 26, 2010

Cottage Cutz Lodge

Last summer my friend invited my scrapbook friends and I to her cabin for a scrapbook retreat.
We of course took full advantage of this opportunity and enjoyed ourselves thoroughly.
We all took pictures to scrap of our retreat and I was saying how we needed a cabin die cut for our layouts, but none of us knew of any. So the minute I saw this CottageCutz Camping release I knew exactly which die was at the top of my list!
This Cottage Cutz Lodge is perfect for my retreat pages and of course a Thank you card for my friend for letting us come and stay.
This card will get set aside for our next retreat and I can't wait till we get to go again.
The snow just needs to melt first!!!


I used my Copic markers as well as my Ranger Distress Ink. I sponged a little of my white Dew Drop on the light blue for some clouds. I made my own "Thank you" log to put my sentiment on and then punched a tiny hole so I could hang my tiny lantern from a jump ring.


Sunday, January 24, 2010

SNOW TRIP LIST

Rain in my town means there is snow about an hour away. Visiting the snow is always fun. I thought it would be fun to decorate one side of the flash card and use the other side for the list of items I want to bring on my trip...

To make my list card, I covered one side of the card with snow flake paper and covered the other side with a piece of notebook paper. I used several of the snowmen from the Cottage Cutz Snowman Family die on the snow flake paper. It is the perfect die for my snow trip list. And when I get back from my trip, I will have the perfect embellishments for my layout.

Thursday, January 21, 2010

Polar Bear Club

This picture is from my crazy relatives in Charlotte, North Carolina. They started this tradition a couple of years ago, but this year they used this photo on a Happy New Year card.


So did you guess it???? Yes, I used the Grizzly Bear from the Camping Release and turned him into a Polar Bear. I don't know about you, but I think he makes a great looking polar bear, too. Now I can use this die all year round!

Wednesday, January 20, 2010

Watch for it Wednesday #44

My tip for today is to discuss ways you can take your die-cutting to the next level. Now, there is certainly no right or wrong way to make and use die cuts! Especially our Cottage Cutz dies that are so doggone cute on their own that they hardly need anything extra. And much of the time, these die cut shapes look great just as they are.

However for today's tip, I thought I would give you a few suggestions with some examples in order to get your own creative juices flowing in new and different ways so that you can experiment with some new die cutting tips on your next project.

Probably the easiest and quickest way to add some extra pop to your die cut shapes is through your choice of paper. There are so many cool and unique types of specialty paper available today that you can use to to make your die cut shapes look really authentic and also really POP off the page.

Some of my "staple" specialty papers that I always like to have handy are gold and silver. I just use a little bit here and there when I need it. I can't even begin to tell you how long I have had the two pieces of gold and silver that I am using right now because most of the time, all I need is just a tiny little piece of the paper.

Silver paper is great for anything metallic looking on your die cut shape. Just a little touch of shiny silver paper makes such a difference. Think about how great the new Cottage Cutz Lock and Key Shape will look using silver paper for the metal lock and key - or what about some of the mini shapes like the Chocolate Kiss or just use a small piece for the heart cookie cutter from the Valentine Baking Set Shape.

Here are a few more examples of die cut shapes where I have used specialty silvery paper in small amounts to give the appearance of metal on my finished shape.


Gold is another type of specialty paper I always keep on hand. Gold works so great for buckles, bells, jewelry, crowns, etc. I just cut out a tiny piece to lay directly over the part of the die I want cut out of the gold. Here are some examples where I have used my gold paper for accent.


The third type of specialty paper that I keep in my stash is a glitter paper. For me, I like to always have some white and black glitter paper, but I find myself using a lot of pink, too (but I scrap mostly girly layouts). And just think how cute the new Valentines Cottage Cutz dies would look with pink glitter accents on the hearts what about glittery pink icing on some those adorable cupcakes, etc!!

Now, I personally LOVE glittery accents (as evidenced by my collection of Stickles) so I actually try to keep a larger variety of glittered papers in my stash besides just the basics. For instance, nothing brightens up a Halloween pumpkin like orange glitter cardstock! My favorite collection is the Glitter Cardstock Matstack from DCWV. The smaller size papers allow me to get lots more color variety for my $$ which I really like!

Let me show you a few examples of die cut shapes where I have used some glitter paper on all or part of the die-cut shape.

I hope this post has inspired you to dig into your stash and see what types of fun and unique papers you have hiding in there that you could be using on your die cuts. Come back tomorrow to see a layout I created using the Cottage Cutz Bear Shape - but not how you think! Hmmmm.......what could I have done :) Guess I'll see you back here tomorrow to find out!

Tuesday, January 19, 2010

I'm Nuts for You

Last week we saw Ruth Ellen use this same BoBunny Bandit paper for her cute layout show casing the CottageCutz Raccoon. I couldn't resist using this cute paper to make a card showing the CottageCutz Squirrel/Whimsical.

I think it's pretty cool to be able to take dies from a Camping release and adapt them for all kinds of other occasions. I made the nut look Valentiney by cutting it out of pink cardstock and putting a little heart punch piece on it just like they did in the paper.
So whether your making camp layouts or not these dies are so versatile for all your projects.