Are you like me that sometimes has trouble separating the foam from the backing sheet??? Or are you new to using CottageCutz dies and are not to sure how and where you are meant to use the foam. Well then, this tip is especially for you.
I was just about to foam my
COTTAGECUTZ HAUNTED HOUSE die, and thought I would share this tip with you.
Please excuse the dirty nails…. Its just ink – I promise!!!!

 STEP 1-
 Firstly, put the CottageCutz die flat on the table – smooth side down with the picture facing up.
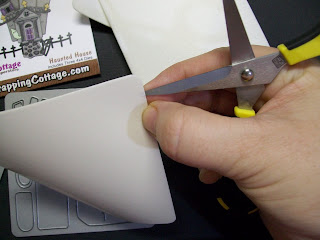
STEP 2- Take the foam that is supplied with the die and hold it so that the foam section is at the bottom and the backing sheet is on top.
STEP 3- Because I don’t have long enough nails to use, I use a pair of fine sharp point scissors to carefully wedge in between the Foam and the backing Sheet. It doesn’t have to go in far, just enough for you to be able to see the foam and backing sheet separate.
STEP 4- While my scissors are still in between the foam and the backing sheet, I very gently slide my scissor blade along until I have made enough of a split to hold just the backing sheet with my fingers and then pull it to separate if from the foam. You can know throw the backing sheet away.

 STEP 5–
 I carefully line up the sticky foam with the picture side of the die and stick them together.
 STEP 6-
 Use your fingers to carefully and firmly push the foam down onto the die and rub gently to make sure its attached properly . A good indication that it is attached properly is once you have rubbed the die, you seen the picture indentation show on the foam.
For those of you that are beginners in the die cutting world of
COTTAGECUTZ DIES, I hope this helps. And for those of you that are well educated on the subject, I hope you enjoyed the trip down memory lane.
Click link below to see a short video on how to use CottageCutz products...
http://www.scrappingcottage.com/index.asp?PageAction=Custom&ID=20


 I used velvety brown paper to cut the piece of caramel for the top of my apple. Then I sprayed it with a mixture of perfect pearls (*tip coming soon!!*) to give it some sparkle like real caramel. Now you just slip the new and improved into the plastic sleeve and voila - quick and easy upgrade to an otherwise boring photo holder. I scanned my new cover so that you could see the


