Monday, June 26, 2023

USA ☆ Pups

Hello and happy Monday!

It's Kris sharing with you today a cute and simple card featuring the Patriotic Pennants and the USA dies.  I can't believe it's almost JULY already, can you?!  


Design Steps:

I actually cut my card base last because I wasn't sure what size I wanted, but after die cutting my main panel and matting it, etc. I ended up with an unusual size for my base (6" x 5").  So we'll start there and build up!

White card base = 10" x 6"-- scored the 10" side at 5"
Plaid patterned paper = 4-3/4" x 5-3/4"
Blue layer = 4-1/8" x 5-1/8"


Next, I printed a digi sentiment onto white cardstock, then die cut it using the largest of the Nested Wacky Stitched Rectangles.  


I decided I wanted a red scalloped mat for it.  But the largest scalloped rectangle is exactly the same size, so I did some manipulating of the die... running it thru the machine 4x ... and just doing one corner and part of the sides at a time and moving the die in between each cut to extend the size both length-wise and width-wise.
 

I die cut the pieces from the Patriotic Pennants and the USA dies.  I hand cut the banners off of the string and glued the stars onto the string instead for a different look!  I then glued the bows from the pennants die onto the USA --- isn't it so cute?!  ☺  I also colored the dogs with Copic markers. 


Here's a close-up of the card front ☺


Wishing you all a blessed and safe holiday!!
- Kristine

Saturday, June 24, 2023

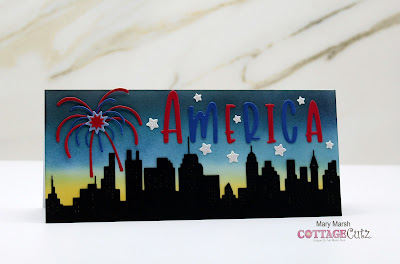
Patriotic City Skyline

Hello CottageCutz friends! Thanks for taking the time to stop and visit with us today. It's Mary Marsh here bringing you the Saturday edition of the Blog.

We have a brand-new release in the online store. It's our Patriotic 4th of July release with 12 amazing patriotic designs and bundle pricing at 40% off for a limited time. You can pick up the individual dies at 30% off . If you love making patriotic cards to honor a veteran, to celebrate the 4th of July or to display your love for America, we have you covered with this new release.

My card for today is featuring the Patriotic Rainbow & Fireworks dies in a slimline design. I love making patriotic cards and mail them out for the 4th of July celebration. So let's get started on some details on how I created my card. 

Design Steps:
I decided to make a nighttime city skyline card. I started off doing some ink blending of the sky using distress inks. I used Bristol smooth cardstock and prized ribbon, villainous potion, black soot, fossilized amber and wild honey inks. I think this cardstock blends the inks so smoothly. 
Panel: 8 1/2" x 3 3/4"
Then I cut the America phrase and the fireworks image in red and blue cardstocks. 
For the city skyline, I used the City Skyline Slimline die and cut it in black cardstock.
  
Now I am ready to start my card assembly. I attached the images with a clear drying liquid glue and double sided tape.  
I added some stars using a white glitter paper and mounted the image panel to a white card base measuring 8 1/2" x 3 3/4".  That finishes off my card for this week. See you next Saturday.


Wednesday, June 21, 2023

Travel the USA

 Hello Friends

We have a new release just in time to celebrate the 4th of July!  It is called Patriotic and the collections has 12 wonderful designs all perfect for our Nation's birthday! Check out this release HERE!

I am using 3 of the new dies the FireworksPatriotic Car, and Patriotic Camper.   I decided to use a slimline design to accommodate all the fun pieces.  


Design Steps:

1.  Using the Patriotic Camper cut all the pieces with the following card stock colors: light blue, navy, red, white and black 
2.  Assemble the pieces using a fine tip glue and I also found tweezers helpful
3.  Using the Patriotic Car cut out the pieces in the following colors of card stock: navy, white, red, black and light blue
4.  Assemble the pieces using a fine tip glue and tweezers
5.  Using the Fireworks die cut out the flowing pieces of glitter card stock: red and sliver.  Also cut out some regular navy card stock
6.  The card base is a white slimline measuring 3 1/2 x 8 1/2.  The star embossed card stock is 3 1/4 x 8 1/4.  Begin assembly on the embossed white piece gluing down the fireworks first
7.  After the fireworks are glued down pop up the car and camper.  Next add a strip of black for the road measuring 1/4 x 8 1/4 that has been stamped with sentiment and embossed in white

CottageCutz Products


Here is a peek at the new release and I must say I love all of them!

We have more inspiration on our YouTube Channel check it out HERE

Thanks so much for stopping by!  And I will see you next Thursday.

Blessings and Take Care


Monday, June 19, 2023

Patriotic Banner

Happy Tuesday crafty friends,
Today I am sharing a project with some of the new Cottage Cutz Patriotic dies. Here is what I made.
This fun Patriotic banner. God Bless The USA.

Here is a look at the banner hanging on my office desk. 

I started by using the USA Flag die, the USA Phrase die and the Fireworks dies. I cut them all out of white cardstock and then colored the flags with my markers. For the bases of the banners,  used wo layers of the scallop stitched rectangles. For the words God and Bless, they came from the Baptism Die and the word THE came from the Berry Phrases die set.


I used some digital papers I created to print out and make some mats for the bases. I used some foam tape to give the smaller layer a little lift and set it on an angle. 

I assembled the banner by adding some glitter tulle between the mat and the flag die. I then layered the words God Bless and The onto a double stitched rectangle die with some more digital papers I created and printed for a mat, on top. I also added some stars that were from the Fireworks die I cut out.

I also added a banner from the Patriotic Pennants die and some little stars to each. I colored the pennants alternating colors of red and blue. I then added a star to the center of each and a dot of glitter. For each corner I added one of the bows.

Here's a closer look at the A and Firework banner - pennant.

Here's a closer look at the firework. I added foam tape to give each layer a little lift.


Here's a closer look at the letter S. You can see for each letter,  I used several layers stacked to give them some depth. I layered each onto the bottom portion of each flag.

Here is a closer look at the U.


Here is a look at the banner hanging on a wall. I just adhered each pennant to some thin ribbon. I decided not to make holes on each corner to thread the ribbon throug because I wanted to use those cute little bows from the Patriotic Pennants die.

Here is one last look at my banner. It is hanging on my office desk and I get to enjoy it there until I put it out with the rest of my patriotic decor this weekend!


I actually used the scallop stitched set, however it is currently out of stock.
This one is a great alternative.

Be sure to head over to the Cottage Cutz YouTube Channel! You will want to see what great crafty inspiration our designers share!

Well that about covers it for today. Thank you so much for stopping by and spending some of your crafty time with me. Until the next time, have a wonderfully crafty day.

Melinda