Monday, April 17, 2023

Froggy Birthday

Hey there CottageCutz friends!  

Kris here again to share with you some crafty inspiration! For today's card I used the new Spring Frog w/ Mushroom and the Pond w/ Cattails and Lily Pad from the Easter/Spring Release.  


Design Steps:


I used some papers by Doodlebug Design and since I hate to waste pretty papers, I cut my red down to a 5-1/2" square, then I cut the inside out since it will be covered up anyways, and now I have a cute ladybug paper (backside of the red) to use on another project ☺

I cut some green and teal patterned papers to 5-1/4" wide and layered them onto card front (as shown in my completed card photo).

I used a sunrays stencil to apply green distress oxide inks to a white circle I had die cut using the Pierced Circles Set, then layered that onto 2 larger nested circles in shades of green.

I then die cut all my decorative elements from white cardstock and colored with Copics, and the sentiments I cut from blue and red cardstock + white glittered cardstock.  Easy peasy!


I hope you enjoyed my project today!  ✿ Kris


Sunday, April 16, 2023

Lattice Card with 3D Vellum Butterfly


Happy Sunday friends ღ

Kris here to share with you some crafty inspiration! I had some fun with vellum and metallic foil cardstock with the brand new Spring Butterflies from the new Easter/Spring Release.  

I decided to revisit a very old fun fold (I made some of these about 15+ years ago) but haven't made them in such a long time... it's called the Lattice Fold. 

Design Steps:

1.  I started with a double sided 12" piece of patterned cardstock and cut it to 5-1/2" x 8-1/2" - and scored the long edge at 4-1/4"

2.  I created a lattice template by cutting a piece of  65 lb. paper at 2-1/2" x 5-1/2"

3.  With paper placed vertically in front of me, I measured and made tick marks at 1/2" and 7/8" (from the left edge of paper) and drew straight lines to connect them as shown below.


4.  Along the very left edge of template, I made tick marks at 1/2".... 7/8".... 1-1/4".... 1-5/8".... 2".... 2-3/8".... 2-3/4".... 3-1/8".... 3-1/2".... 3-7/8".... 4-1/4".... 4-5/8"

5.  Along the 1/2" and 7/8" lines, I made tick marks at 1-1/4".... 2".... 2-3/4".... 3-1/2".... 4-1/4".... 5"


6.  I then used my ruler to draw diagonal lines to connect the tick marks as shown below.  Start at the top and connect the top tick mark on the left with the top mark on the 7/8" line.  Then 2nd line will connect to the 2nd tick mark on the left with the 1st mark in the 1/2" line and so on (see photo below)


7.  Fold your card base in half and align your template with the left folded edge of card.  Use clips to keep template in place and CUT only the diagonal lines.


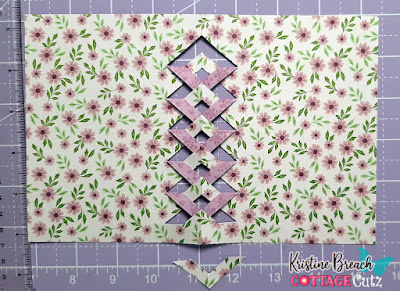
8.  Remove the template and open your base.  Carefully cut off the bottom mountain (or upside-down "V") as shown below.


9.  Skip the next mountain, and bend the next one down and fold tip under the mountain that it overlaps as shown.  Continue moving up, and skipping every other mountain.


10.  Next I took that mountain I cut off in the beginning and added it to the TOP to complete that unfinished lattice area, only gluing the top of the "V" on each side.


11.  Next. I cut a piece of coordinating cardstock (green) that is 4-3/16" x 5-1/2" and taped it to the inside right of card.  It's best to apply your tape/glue to the (inside) card base instead of the insert.

*IMPORTANT - do not just adhere tape or glue to your green piece as you normally would, or you'll have adhesive showing thru the lattice on the front of your card and possibly stick to your envelope.


12.  Next I applied some glue to the parts of the lattice that are near the edge of the green cardstock.


13.  I stamped a sentiment onto lavender cardstock and die cut it with the largest of the Nested Scallop Rectangles set, then attached it to a darker purple cardstock that I had cut at 3-1/8" x 4-1/8" and adhered to card front as shown.

14.  I die cut the Spring Butterflies 3x --- once from vellum and twice from pink foiled cardstock, but one of those I ran it thru the machine with less pressure so that it would keep the inner parts in tact.  


15.  I glued all of the pink full butterfly with all the tiny pieces directly to my card front as shown below.

16.  The next pink butterfly, I punched out all the tiny pieces, and only applied glue to the body and adhered to body already there.  Then I slightly bend the wings upwards for more dimension.


17.  The vellum butterfly, I punched out all the tiny bits and applied glue to just the body, then bent the wings upwards even more than the pink one, for a very 3D effect.  The glue I use is Dries Clear by Art Glitter Glue so it won't show under the vellum. 


Thanks so much for popping by today!  
Have a BLESSED Sunday y'all! ♥Kris

PRODUCTS:


Saturday, April 15, 2023

Congrats On Your New Home

Hello CottageCutz friends! Thanks for taking the time to stop and visit with us today. It's Mary Marsh here bringing you the Saturday edition of the Blog.

We have a brand-new Easter release with 17 new designs available in the online store. There is something for every card maker with faith-based dies, beautiful floral images, whimsical with bunnies and frogs and several lovely birds and butterflies.

You will be able to take the images beyond the Easter or Spring season. And for a limited time you can get individual dies at 30% off

Today for your viewing pleasure I am using the new Spring Birdhouse Cup die to create a congratulations on a new home card. My brother-in-law is building a new home and this is a card for him. 

Design Steps:

Since I knew the theme of my card, I started off thinking about my background. I have a paper pad with different heavenly skies backgrounds. I selected this one with a blue sky and sun rays. I thought it would work perfectly with the die images. 
The paper is 6" x 9" so I carefully cut it at 4 1/8" x 5 1/2". 

Yellow Card base: 4 5/8" x 5 3/4"
Blue Layer: 4 1/4" x 5 5/8"
Designer Paper Layer: 4 1/8" x 5 1/2"
Next, I cut the birdhouse & bird images in cardstock with colors that would coordinate with the background paper. 
I used an older die for my die cut phrase. It's the "Our New Home" die. I cut it in a darker blue shade of cardstock. 
Now that all my elements are cut, I am ready to start card assembly. I attached the layering panel and designer paper to the card base with double sided tape. 
Next, I attached all the images with dimensional adhesive. On the windows I cut a pale-yellow cardstock to give the illusion of inside light. I placed this in the window openings. 
That completes my card for this post. I hope I have given you a way to use this die. See you next Saturday.

dies I used to create card:


Friday, April 14, 2023

Spring Bunny Car Scrapbook Page


Hey Krafty Friends, Jen from Katahdin Krafts, back with another CottageCutz YouTube video on the CottageCutz Channel.  I used two dies from the latest "Easter" release, "Spring Bunny Car" and "Spring Party Car."  I also used one of my favorites "Spring Sentiments" to finish my layout.


My purple base paper is 8" x 8", the floral paper is 7.75" x 7.75".  The photo mat is sized to fit a 3" x 5" photo, but you can size this to your discretion.  

I really love coming up with ways of using the Cottage Cutz dies to embellish scrapbook pages.  I love how versatile they are, and how accomplished I feel when I finish a layout!

You can find all the layout details over on the  YouTube Channel!

While over on the channel, make sure you like and comment for a chance to win the "Spring Bunny Car" die!

The winner of the "Bunny Tree Cottage" die from my last video is Mary's Card Craft, the details for collecting your giveaway prize are over on YouTube!  

Thanks for stopping in, and happy krafting!


Thursday, April 13, 2023

Butterfly Sympathy

Hello Friends!

It is NEW RELEASE TIME!  The collection is called EASTER and it has 17 incredible pieces!  They are so perfect for Easter and Spring.   Right now you can save up to 30% on these individual dies. This sale will not last so stop by the store today right HERE

Sympathy cards are always difficult to make especially when the death is close to your heart.  So I decided to make a couple just to have in my stash. I used the Spring Butterflies


Designer Steps:
1.  Using the Spring Butterflies die cut out two on black card stock and set aside
2.  Cut a 4 x 5 1/4 piece of heavy white card stock.  Use red and yellow inks to blend along the top, bottom and left side of the card (as shown above)
3.  Give the ink time to dry and then stamp the sentiment on the right side of the card in black ink
4.  To add texture use a stencil and some white embossing paste.  Place the stencil over the inked white card stock and apply the paste.  Give the paste time to dry
5.  For the card use a yellow A2 base.  Cut a piece of black 5 3/8 x 4 1/8 and glue it to the yellow card base.  The final step is to glue the inked panel to the black card stock and add the butterflies.  Your card is complete

CottageCutz Product

I think this is one of our most beautiful collection so don't miss out!  I think it will sell out fast!


We have more inspiration on our YouTube Channel check it out HERE

Thanks so much for stopping by!  And I will see you next Thursday.

Blessings and Take Care