Sunday, February 16, 2020

Splish Splash Hello


Hi!

It's Anja here. My package finally arrived and this cute duckling die was the first to get on a card.


For this card I used:
- Cottage Cutz dies (Splish Splash Duckling, Expression Hello, Pierced Square Set),
- Distress Inks,
- white card base 15x15 cm,
- white card stock for die cuts,
- violet card stock for background (13,2x13,2 cm, 9,2x9,2 cm),
- patterned paper for background (13x13 cm),
- silver pigment ink,
- black pen,
- white pen,
- paper glue.

First I cut and colored the duck. I used black and white pen for the eyes.


Then I cut and colored the sentiment.


Then I cut all the pieces for the background.


 And assembled the card together.


This is all from me for today. I wish you all a sunny Sunday.

See you again next week.

Anja Z.


Cottage Cutz dies I used:


Saturday, February 15, 2020

Double Trouble Bunnies


Hello Scrapping Cottage friends! Thanks for taking the time to stop and visit with us today. It's Mary Marsh here bringing you the Saturday day edition of the Blog. 

We have a new release of Spring dies, and they are in the online store and 25% off for a limited time. There are 27 new dies in the release and each one is cuter than the next. They will be perfect for your Easter and Spring card making. The DT will be showing more samples in the weeks to come.

Today, I am featuring the new Double Trouble Bunnies die. These little bunnies are just too cute, and I have the perfect little boy in mind to send it too. But, it's not just for little ones. We all have friends and family who would love to get a card featuring these little bunnies. So let's get started with some details on how I created my card.

Design Steps:
As I have said so many times before, having a layout in mind at the start of my card is always a big boost for me. It jump starts my creative thought process. I love working with the sketches that are out there in the online world. That way I just choose the colors and designer paper and I am good to go.
I had this older MojoMonday sketch saved on my Pinterest board and I thought it would work well for my card today. 
I wanted some bright Spring colors for my card. I chose this watercolored designer paper from my collection and then paired colors that I thought would work well with it.
Daffodil Yellow Card Base:  4" x 5 1/2"
Designer Paper Layer: 3 3/4" x 4"

Square Panel: 2 3/4" stitched rounded square die (3rd largest).For this element of the sketch I kept it a square panel  and made it a 1/2" larger than what was called for in the sketch. I needed it larger to accommodate my images. 

Next, I cut the bunny images using grape, heather, gray and mint cardstocks. You could always cut everything in white cardstock and use the coloring medium of your choice. I just prefer using the colored cardstock.
I sponged clouds on the square panel using tumbled glass distress ink and a cloud stencil. It just adds a little interest to the outdoor scene. 
Now that all my card elements are cut, I am ready to start assembly. I started with the image panel. The images are attached with Ranger multi medium matte.I like this adhesive because it dries clear.  I also used dimensional adhesive to lift them off the sponged panel slightly.  
I attached the designer paper to the card base using double sided tape. I used a grape ribbon to come across the middle of the designer paper per the sketch. 
Attached the image panel with dimensional adhesive. I also cut 2 small pieces of ribbon and attached them to the side of the image panel. I didn't have enough of this color to make a bow and the tufts make a nice presentation. To finish off my card, I scattered some grape glittered enamel dots and this one is complete.
I hope I have given you an idea for a way to use this new die. Remember the new Spring release is on sale for a limited time for 25% off. We are also having a President's Day sale on selected CottageCutz dies. Check it out here

See you next Saturday!

dies I used to create card:


Friday, February 14, 2020

Latte Love

Happy Valentine's Day!  It's Jeanne today and I have a Valentine for you.  Actually, I sent this one to my youngest daughter - a gal who loves her lattes! (I also enclosed a Starbucks gift card.)
This card uses the same color palette as last week's card and some of the same elements.
I cut my pieces from various colors of cardstock using the new Juggling Spring Bunny and Spring Lamb & Chick dies, and the older Coffee & Cocoa Warm Wishes die.  I assembled all the pieces.
You may recognize this striped panel from last week - it's the panel I cut from the middle of my base panel!  I used the Nested Stitched Scallop Rectangles (middle size) to cut a white panel.
I stamped my sentiment on it using black ink.  I cut a panel 4.25 x 5.5 inches from white and embossed it with large dots.  The white was too plain for me and I felt this gave the card some visual interest.  The large dots contrast nicely with the smaller stripes.
I assembled it all on an A2 side fold card base.

Dies:
http://www.scrappingcottage.com/cottagecutzjugglingspringbunny.aspx
http://www.scrappingcottage.com/cottagecutzspringlambandchick.aspx
http://www.scrappingcottage.com/cottagecutzcoffeeandcocoawarmwishes.aspx
http://www.scrappingcottage.com/cottagecutzstitchedrectanglesetbasics.aspx

http://www.scrappingcottage.com/cottagecutznestedstitchedscalloprectangleset.aspx
Thanks for stopping by today!  Be sure to visit the online store where the new Spring dies are on sale for a limited time!

I hope you have a wonderful Valentine's Day and a wonderful weekend!

Thursday, February 13, 2020

Hello Spring

Good Morning Friends!

Hi Everyone!

I am so excited about our NEW RELEASE!!!  This release features Spring dies and right now they are 25% off for a limited time.  There are 27 different dies and they are just perfect for Easter and Spring cards.  There is everything from ducks to daffodils and more.  Check them out HERE!

Today, I am featuring the Daffodil Duck die!!

Design Steps
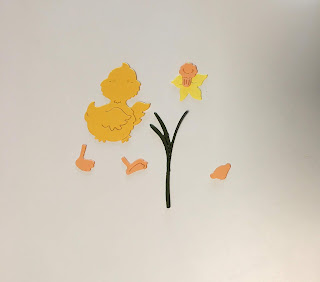
 1.  Cut all of the pieces out of yellow, orange and green card stock using Daffodil Duck
 2.  Shade the pieces I used my Copic markers to shade.  After shading assemble using a fine tip glue. Blacken the eyes with a fine tip marker and add white to the eyes using a gel pen
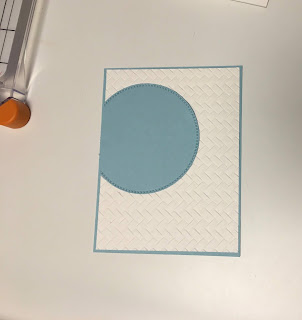
 3.  Use a white A2 card base, 4 x 5 1/4 piece of blue card stock, 3 3/4 x 5 piece of white card stock run through an basket weave embossing folder.  Glue the blue and white embossed card stock together
 4.  Use the Spring Grass die and cut it out of deep green card stock.  Use the Victorian Fence die and cut it out of white card stock.  Last cut a blue card stock circle using the second from the last Cross Stitched Circle die.
 5.   Cut a small piece of the circle off as shown below and glue to the card
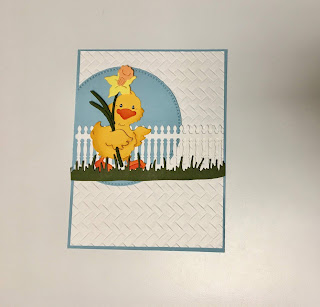
 6.  Next glue down the white fence and the grass on top of the blue circle
7.  Add the duck tucking the feet into the grass as shown.  Cut out three hello sentiments using the Hello Spring Bloom die.  Glue them together for a little dimension and then glue to the bottom right of the card.  Add the entire panel to the A2 white card base
CottageCutz Products


We are so excited that you stopped by today!  Your visit means so much to us!
Blessings
Pam

Wednesday, February 12, 2020

You Are My Honey

Hello! This is Sukie and today I'm sharing this adorable card for my design team post. My card was created with the Busy Bee die from the new release of Spring dies which are currently on sale.
This card was inspired by a selection of fun papers in my stash.  Once I selected my papers I went with a sweet card which can be used for Valentine's Day or as an anniversary card.
The Busy Bee die was used for the 2 bees and then I went with a few of the basic dies (Nested Stitched Scallop Rectangle, Nested Stitched Scallop Circle and Stitched Circle) for my card background.
In preparation of my card pieces, I stamped the sentiment inside the circle.  I also hand cut a little flag to use as an embellishment on my card.
I layered a solid black card base with the patterned paper background.  Next I added the 2 pieces cut with the Nested Stitched Scallop Rectangle die set on top.
The white circle was nested inside the scallop circle and the set of circles were adhered on my card base.
I popped up the bees on some foam dots for added dimension.  The two bees surrounded the sentiment circle and the flag was added as a finishing touch.
Here are the dies used on my card, available in the store: