Showing posts with label fall. Show all posts

Sunday, September 18, 2016

Happy Thanksgiving

Hello everyone,

It's Donna here another new release die cut!  If you have not had a chance to see all the new dies that were released this month, please stop over at the store a to see the beautiful die cuts. Also, I hope you have been inspired by the talented design team and all their beautiful creations.  I have created my card using the new Cornucopia die.

Here is my card:


Here is how I put my card together:

1.  Cut an A2 card - 4 1/4 x 5 1/2
2.  The first layer is 4 x 5 1/4
3.  The Third layer is 2 1/2 x 3 1/2 and the orange layer is 2 1/4 x 3 1/4
4.  Cut the cross-stitched circle out and leave the ring around the circle cutout and use a light distress ink.  
5.  I cut all my pieces (see the first diagram).  I cut all the pieces and matched all the small elements.
6.  I distress all my edges (see the second diagram) and started putting all the pieces together and added them to the cornucopia.

(first diagram)

(second diagram)

Dies I used:


Sunday, September 04, 2016

Happy Fall

Hello everyone!

It's Donna here thanks so much for stopping by today!  I am here with CottagCutz showcasing the 2nd part of the Christmas and Autumn dies release. If you haven't been over to the online store, you should definitely go and take a look at all the new goodies.  The best part is the Harvest Scarecrow is 25% off plus many more of the new release for a limited time. Don't procrastinate, rush right over to the store and get some of these wonderful dies. I love them all, I have so many ideas in my head I cannot get them all done fast enough!


I am featuring several of the new Autumn release dies, so lets get started on how I created my Split Step Card, it can also be called Side Step Card.  

1.  I cut all the pieces out and inked the edges.  My table was so messy, I did not get a chance to take a picture, 

2.  I cut the base of my card 8 1/2 x 5 1/2, 

2.  I then cut and scored my paper, where the red line is you put your paper in your paper cutter at 1" and cut down to 6 3/8.  The other lines you score at 1", 2", 3 1/8", 4 1/4 and 6 3/8.  This image is not mine, I found the image on google.

3.  After cutting and scoring the base of the card, I added my layers.  On the left side the layers measurements are 2 3/8 x 3 1/8, the plaid layer 2 1/4 x 3.  On the right side top layer measurements are 2 x 2 1/4, plaid layer 1 7/8 x 2, the second step is 2 x 1, plaid layer 1 7/8 x 7/8. The layer under the grass is 5 x 1,

4.  I added a couple of layers on the inside of the card to write or stamp a sentiment.  The measurements are 4 x 2 7/8, the white piece 3 7/8 x 2 1/2,

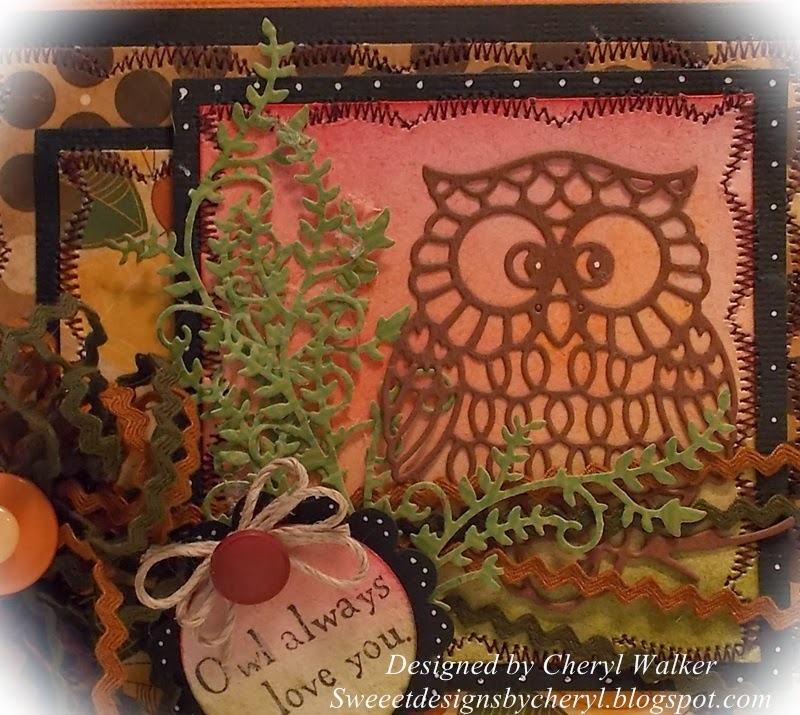
5.  I finished the card off by stamping my image on the second to the smallest die from the double stitched square dies.

Whew, I think I got everything!  I had so much fun making this card, I hope I have inspired you to make one for yourself.


Here are some more pictures of the card:

Card laying down flat.


 Closer look of the right side of the card.


 Closer look of the left side of the card.

Don't forget to check out some of the other design teams projects from this beautiful fall/Christmas release.  

CottageCutz Dies Used:


Sunday, November 17, 2013

Beautiful Fall Farm Scene

Hello everyone, and Happy Sunday! 
Today's card was designed forThe Scrapping Cottage using the Beautiful CottageCutz Farm Fall Die & Really Reasonable Ribbon's Seam binding/Hemp/and buttons.

I absolutely Love this fall scene, and think dusting the background just gives it a little added color. I used Really Reasonable Ribbons Seam binding in brown, and an orange color. Next I love the look of the hemp ran around the front of my card and over the scene. I did add a nice layered hemp bow over it. I also ran the hemp through the button, to look like it was sewn on.
Supplies Used:


Thank you for looking and have a lovely day!
Hugs to all,
Cheryl

Sunday, November 10, 2013

Owl always Love you

Hello everyone, today I wanted to share a Fun Fall Card using CottageCutz dies and Really Reasonable Ribbon.

For my card today I used the Sweet CottageCutz Harvest Owl, and I almost was going to add some gems to him, but decided for this card not to. The background behind my Owl is dusted with 3 different distressed inks. Next I used the Fall Vines as layers for some greenery, I thought the owl would look cute over the distressed background. The "Owl always love you" sentiment is from Victorine Originals. I added some mini ric rac for a bow, and to wrap around my card front. the Hemp bow is natural hemp 20lb. Love the camping design paper from BoBunny it works perfectly for fall!

Supplies Used:
BoBunny camping dp
Victorine Originals Stamped Owl sentiment
Really Reasonable Ribbon/Mini Ric Rac in chestnut and moss green
Buttons
Distressed inks for the background


You can CLICK on the photo's below to take you to the Scrapping Cottage!


Thank you for looking and hope you have a wonderful day! 
Hugs to all,
Cheryl

Tuesday, November 15, 2011

Thanksgiving Basket

We've been having so much fun showing you great creations to make for Christmas, but I wanted to sneak a Thanksgiving project in here before we missed it! I have always had a thing for cornucopias - so this Cornucopia die was a must have for me! If you start looking at all of the mini-shapes that are a part of this set (leaves, corn apples, pears, etc.), I'm sure you can start thinking of all kinds of ways to use this all year long. I cut all of the pieces out of Kraft cardstock, and then colored them with Copics. I think starting with the Kraft, gave everything a nice, rustic look.


Don't you think this would make a great decoration for Thanksgiving?

hugs,
Gini

Monday, August 29, 2011

I'm Ready for Fall!


I'm so glad the seasons change. I can't imagine it being hot or cold all year round. I am so ready for fall and here in Utah the only signs of fall is the kids are back in school. We've had plenty of hot temps here but that doesn't stop me from starting my fall cards.
Today I used the tree from MLS Summertime Fun die. I grabbed some fall paper from my stash and some matching cardstock for my trees and went to town. I also used the Raking the Leaves die from last years release and cut out 2 of the small leaves to add by the sentiment.


The twine I used was brown and white. The white stood out too much against my cream background so I took some Antique Linen distress ink and inked the twine a bit to subdue the white.


We love to hear comments from our followers so leave us a note and let us know what you like. Have a great week!

Monday, October 11, 2010

Happy Monday to all of you!


Hello Friends!

Sorry I am a little late posting today. We have been having some really nice Fall weather and I know my sisters in WI have been enjoying beautiful sunshine and changing colors. For todays card, I wanted to try and achieve a shabby chic kind of feel. I think I was successful. I have been wanting to go apple picking, but haven't made it yet. I hope to before apple picking season is over. Here in New England, there are lots of places to chose from, and you don't have to drive too far. We went apple picking when we lived in Arizona, surprisingly. The groves were smaller but the apples were good. I still prefer the cooler fall weather of the Midwest and the changing colors. Massachusetts has a very similar climate as my home state of Wisconsin. I do miss the wide streets and sidewalks of Wisconsin, but New England is beautiful too!

I used two mini dies today. Apples and CottageCutz Basket Mini (currently sold out). I will be back next Monday. Have a great week!! :) Janice