Showing posts with label Treat Boxes. Show all posts

Tuesday, March 15, 2022

Hello Spring Chicken Pop Up Slider Treat Box

Happy Terrific TuesDIE Scrapping Cottage friends!
Melinda here with you for another fun Tuesday. My project features a couple of dies from the marvelous new SPRING RELEASE along with some others!  Here's what I created.


I decided to make a little Pop Up treat box! Check out this fun interactive box.
Here it is closed and standing on an angle.

Here's a look at it with the little "drawer" slightly opened.

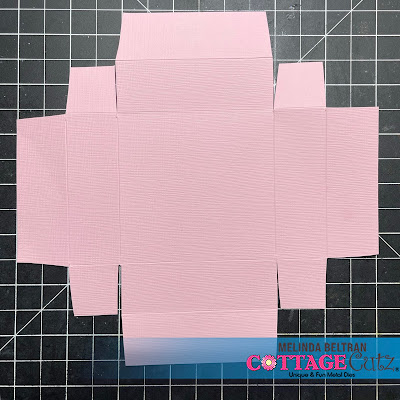
I started by creating the box base. It comes from a 7x7 piece of cardstock. I simply scored it on all four sides at 1" and 2" . I cut the squares and trimmed in the "flaps" just slightly.

I added adhesive and began to fold the sides up.

I made sure to add some ribbon around one of the two sides that has the flaps. This way the ribbon wouldn't pull out as I used it as a "pull" See photo above and below.

I turned in all four sides and that gave the interior of the box some sturdiness and gave it a finished off look.

Next, I turned to making the box "top" or belly band if you will. I used the largest die from the Slimline Stitched Rectangle set. I then scored it to match the top and sides.


I then added glue to the back side of the largest slimline scallop stitched die. I glued this to the pink "top" we just made. See photos above and below.


I scored the mats again once the white was adhered to the pink.


I then used the second smallest die from the double stitched rectangle set.

I ran it through my die cut machine a couple of times and it cut out fine. 


Next, I burnished the score lines and then ran a bead of glue along one of the seams and adhered the two ends together. 


I cut a strip of pink paper 1x4". Scored it and that is the base for the easel part.
Once I attached it to the under side 

Here's what it looks like with nothing in the box and once it was adhered to the inner top of the top and the center of the inside of the box. Here are some additional photos at varying stages of it opening.


Here is a pic of it closed.


I proceeded to decorate one of the square scallop eyelet stitched dies with the cute Spring Chicken Die. I added the word Hello from the Hello Spring Bunny Cottage Die.

Here is another photo of the sweet little box open. Inside is a bunch of sweet "chewy" little (bubblegum) eggs.


The Dies I used to create this project:


In case you didn't hear, The CottageCutz YouTube channel is up and running.  Head over and check out the latest video! There is a giveaway for subscribing too!

Well that about covers it for today! Until the next time, have a wonderfully crafty day!
Melinda Beltran

Sunday, January 30, 2022

Bunny Peeker Treat Box w/ Bonus Card

Happy Sunday Scrapping Cottage friends!
Melinda here with you today. It's another Sunday Funday and I hope you are enjoying some crafting! I am sharing a little more spring inspiration featuring dies from the new SPRING RELEASE! Today's project is a super cute little box with the adorable new Peeker Bunny w/ Pocket Die for the front!

The new Peeker Bunny w/ Pocket Die is part of the fantastic new Spring Release! I started by cutting out my die pieces in white cardstock. I then colored my various pieces in with my markers. I did also cut out the pocket piece in blue cardstock as well as a patterned paper for the sides of the box mats from my Doodlebug paper pad.


I decided to make my Peeker Bunny w/ Pocket the front of a cute little treat box, instead of a card. The box size I ended up using comfortably holds 3 Ghirardelli Chocolate Squares with some tissue. That's the perfect amount for a little gift for your co-worker's, teachers, etc. this spring season.

Box Assembly
I settled on starting with a piece of paper 5.25 x 5.25 size.


I scored all four sides at 1 5/8th. That is the next 1/8" line past the 1/2" mark.

Here is what it looks like when scored. It is not a perfect square size. I settled on this size to match the width of the pocket piece as close as possible.

Next you will want to cut it as shown. The easiest way to remember how to do this is just cut the line of the outside score to the first cross line. Then do a quarter turn and repeat. Do this all the way around. You will also want to cut a little slice out so that it makes assembly easy.

This photo shows you where to apply your adhesive. You will put it on the "top" of each of the four corner tabs you created. Once you do this, simply fold up the box and adhere the sides.

Here is what it looks like assembled.

This is a slight segue. I wanted to share all the various size boxes I worked up before I settled on my size. I wanted to come up with one that was as close to the width of the pocket without making it too complicated. Can you tell I am not the greatest at math?....LOL!

Here is one more look at the finished box. After I assembled it and took my photos, I realized I left off the sweet little ladybug that sits on top of the flower!!!! UGH! SOOOO.... I had to get it on somewhere!!! 

So I whipped up this cute card. I had extra pieces, so this came together easily. 
My finished card size is a 5x5 top folding card. I used a piece of white cardstock for my base. I then used the same blue cardstock for the pockets as a base mat. On top of that I layered some Doodlebug patterned flowers paper, a strip of some of the bright green paper in the same pad. I then used the Wacky Stitched square for another base and then some more Doodlebug patterned paper for a mat. I set my sweet little bunny in her pocket on top of that. I did add a little foam tape to the back of the die cuts to give them just a bit of lift and dimension.

Here is a side view. You can see that sweet little ladybug on top of this flower. 


Here you can see I used the double stitched rectangle and the hello and spring words from the Hello Spring Bunny Cottage.


The Dies I used to create this project:


In case you didn't hear, The CottageCutz YouTube channel is up and running.  Head over and check out the latest video! There is a giveaway for subscribing too!


Well that about covers it for today! Until the next time, have a wonderfully crafty day!
Melinda Beltran

Friday, April 10, 2015

Treat Boxes

Hello everyone, and Happy Friday to all!
Today I am sharing the Easter Treat Boxes that I made for my Son, and for my daughters boyfriend for Easter.

I used the recycled boxes, and made bands for these as well. But on these 2 I used the CottageCutz Chick with Egg die, and the Happy Easter Egg die, both from the Springtime Release. The Ribbon I used is Seam Binding from Really Reasonable Ribbon. Love the Springtime Release, as there are sooo many go to dies in this release. I really had a fun time making these treat boxes for the kids!


Thank you for looking and have a lovely day!
hugs to all,