Showing posts with label Tis the Season. Show all posts

Saturday, November 11, 2023

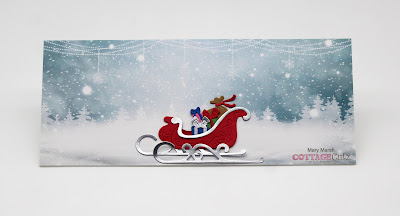
Santa's Sleigh

Hello CottageCutz friends! Thanks for taking the time to stop and visit with us today. It's Mary Marsh here bringing you the Wednesday edition of the Blog.

It's new release time!!! We have our Christmas 2023 release in the online store that has 40 designs. It's an old-fashioned Christmas theme. You can pick up the individual dies at 30% off for a limited time.

We also have a new Fall 2023 release in the online store with 15 designs. You can also pick up these individual dies at 30% off for a limited time.

Today for your viewing pleasure, I am featuring the new Vintage Sleigh die to create an outdoor scene in the slimline design. 

Even though it is a vintage sleigh design you can use it for a card with a more modern appeal. So, let's get started with some details of how I created this one.

Design Steps:

When I saw this Vintage Sleigh die, I thought it would show well on a slimline format. So, I looked through my designer paper for a background that would work for my idea. 

When I came across this pack of slimline card fronts (from Divinity Designs), I knew this pattern would be perfect for my outdoor scene. I liked the snowy landscape and the subtle white pine trees in the background. 

The designer paper is 3 3/4" x 8 3/4". I decided to keep that size and cut my white cardstock the same size. This will fit in a #10 business size envelope and it's flat for mailing. 
Next, I cut my sleigh in the usual red color and used a metallic silver for the runners and trim. I cut the presents in different colors of cardstock. I kept Santa's bag in a brown shade. 
I cut some of the pine trees from the Santa & Reindeer die for added embellishments. 
And for a sentiment I used the Tis the Season die from the Christmas 2022 collection. It's a larger sentiment but for a slimline design it works well to fill in the top part of my card. And I cut it in red cardstock for a bolder appeal. 
Now that my card elements are prepared I am ready to start assembly. I attached the designer paper to the card base with double sided tape and the sleigh with the same adhesive.  
Next, I attached the trees with clear drying glue. 
To finish off my card I attached the sentiment with clear drying glue.
That's my sample for this week. See you next Saturday!

Reminder: Marla has a new video and a giveaway on the CottageCutz YouTube channel. Click here.


 

Saturday, November 12, 2022

Gingerbread and Cocoa Easel Card

Happy Saturday Cottage Cutz Friends!
Melinda here with you, and today I am sharing a cute and easy Christmas themed easel card I created with some dies from the FABULOUS Part2 Christmas release!
Here is my finished card. It is an A4 sized card. I created an easel card base to give this little card some extra wow. My card features one of the super adorable Ginger friends. I also included the phrase die, Cookies & Cocoa with those cute chocolate chip cookies and that adorable cup of cocoa. I also used the tree from the Merry Christmas Tree die from the Christmas Release Part 1.  I mounted the cookies and the cup of cocoa onto the smallest nested stitched doily from that die set. I then layered some patterned paper mats onto the two different largest sized scallop stitched rectangle dies for some extra layers and dimension. To keep the Easel open, I added some layers of the double-stitched rectangle dies and used some thick foam tape to give them some lift. I added the "Tis the Season Sentiment" to those dies along with some patterned and cardstock mats.


Here's a closer look at the front of the card standing in the easel position. Here you can see all of the fun dimension I added to the die cuts with some foam tape. For the cup of cocoa, I added some dimensional white paint and some stickles glitter to add some dimension to the "whipped cream". I also added some stickles to the cute little hearts and the little snowflakes.

TIP: Making an Easel card is super easy!
Simply score the top of your card in half. Then cut a piece of the same base of cardstock paper you are using and cut it to the same size as the top. You will always adhere it to the lower half of the scored top only. This will allow the card to lay flat for giving and storing and will allow the top to stand once you use something in the inside to create a "stop".


Here's a look at the inside of the card. I used a Scallop Stitched Rectangle die and mounted it to the top of the inside of the card. This is where I will write my personal greeting.

Here's a closer and side view of the inside, "Tis the Season" sentiment. You can see I added some glitter to the sentiment. It adds a nice touch without being too overbearing.

Here's a closer look at the sentiment "Cookies & Cocoa" die. I cut them out of some plain white cardstock. I then colored them in with my markers. 


Here's a view of what the card looks like closed.

Here's a closer look at the gingerbread girl. I cut her out of some gingery brown cardstock. I edged her with some chalk and then added the cute little stitch lines. I colored her bow and scarf with some pink markers and my spectrum noir glitter pen. The photo doesn't capture the subtle glitter from the pen. I also added some stitch lines to her scarf and bow. 


Don't forget to head over to the CottageCutz YouTube channel and check out all of the amazing projects on there. Our video team is doing a wonderful job of filling the channel with all sorts of creative content! You don't want to miss it!

Dies I Used


Double Stitched Rectangle Set


Nested Stitched Doily Set


Nested Scallop Rectangle Set


Here's a look at the entire release. Be sure to head over and grab them while they last!


Well that about covers it for today! Until the next time, have a wonderfully craft-die day!
Melinda Beltran

Tuesday, November 08, 2022

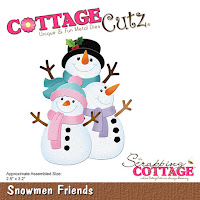
Snowman Friends

Hello CottageCutz friends! Thanks for taking the time to stop and visit with us today. It's Mary Marsh here bringing you the Tuesday edition of the Blog.

It's new Christmas release time!!! We have new dies in the online store. Our Christmas Part 2 release with 36 new designs is available and ready for shipment.

The individual dies are on sale for 30% off. It's only for a limited time so don't delay. You are going to love all the whimsical designs that are available in this release. There is something for everyone to make your Christmas cards extra special this year.


The Christmas Part 1 dies are also available with 21 new designs and on sale for 30% off individual dies.

Today, I am featuring the new Snowman Friends die. It's such a cute and playful die so perfect for a fun Christmas card. So, let's get started on some details of how I created my card. 

Design Steps:

I started with the card background. I had this 6x6 piece of bermuda bay ombre designer paper. I stenciled some snowflakes with white pigment ink and then embossed with an icicle embossing powder. I didn't realize the ep would be clear. In hindsight I should have used a white embossing powder. So, I just added some clear wink of stella to each snowflake IRL they are sparkly and stand out a bit more. 
My card colors are from the color challenge #921 on Splitcoaststampers. We are to use bermuda bay, melon mambo and granny apple green for our color trio. Optional was to use a snowman. 
bermuda bay, melon mambo, granny apple green

Then I moved onto my snowmen images. Their faces are so cute and happy. Just makes you want to smile looking at them. I cut them in various shades of cardstock. You could also cut in white and then color with your favorite medium. Either way works fine. 
My card base is the bermuda bay color. I used a white layering panel against the designer paper. 

Bermuda Bay card base: 4 1/2" x 5 3/4"
White layering panel: 4 1/2" x 5 1/2"
Designer paper layer: 4 1/8" x 5 3/8"
Now that all my card elements are prepared I am ready to start card assembly. I wanted a snowbank for the snowmen to stand on, so I used the Happy Reindeer & Snowman die. I cut 2 of the snowbanks and then used some dazzling diamonds glitter for a little sparkle. 
I attached the snowmen with double sided tape. 
I wanted a fun sentiment to compliment these fun images, so I decided on the "tis the season" sentiment. It's from the "Tis the Season" die. I cut it in the melon mambo cardstock. The same color I used for the showgirl's scarf. The snowflakes are part of this die so I used a few. 
To finish off my card, I attached the image panel to the card base. Well, that's it for me for this week. 
Reminder: Our YouTube Channel has a new video from Jen Hartsgrove. There is a giveaway for being a subscriber, liking the video and leaving a comment. Click here.


Saturday, October 29, 2022

Camping Snowman

Hello CottageCutz friends! Thanks for taking the time to stop and visit with us today. It's Mary Marsh here bringing you the Saturday edition of the Blog.

It's new Christmas release time!!! We have new dies in the online store. Our Christmas Part 2 release with 36 new designs is available and ready for shipment. 

The individual dies are on sale for 30% off. It's only for a limited time so don't delay. You are going to love all the whimsical designs that are available in this release. There is something for everyone to make your Christmas cards extra special this year.

The Christmas Part 1 dies are also available with 21 new designs and on sale for 30% off individual dies. 

Today, I am featuring the new Camping Snowman w/Trailer and the Tis The Season dies. I have friends who have a camping trailer, and this card would be perfect for them. I loved the trailer colors on the die packaging, but their trailer is light & dark gray. Since I was creating this card for them, I thought I should stick with those colors. Although I really like creating Christmas cards in non-traditional colors. That will be for another day. 

So, let's get started with some details of how I created my card. 

Card Details:

I started by cutting the trailer, snowman and mailbox in different colors of cardstock. The light that are strung across the trailer I colored with Copic markers. 
Then as I was deciding on how to create the background panel for my images, I remembered this designer paper with a winter snow scene. That made it really easy. The paper is so pretty I didn't want to cut a lot of it away so I made my card a 5 3/4" square. 

White card base: 5 3/4" square
Designer Paper Layer: 5 3/4" square
Next, I cut the Tis the Season sentiment. I thought red would be a standout, but it just didn't look right so I decided on a navy blue to compliment the background. I think it works nicely. 

Now that my card elements are prepared, I am ready to start card assembly. 

I attached the designer paper to the card base with double sided tape first. I thought this would make it easier to attach the images. 
For the images I used dimensional adhesive to lift them off the background slightly. 
To finish off the card I secured the "tis the season" sentiment with clear drying glue. There are snowflakes with this die, so I used them as embellishments on the card. 
And that's it for me for this week. I hope I have given you an idea for a way to use this new die. If you are a trailer owner or you know people with trailers this die is for you. You can pick it up for 30% off right now. 

See you next Saturday!!

Reminder: Our YouTube Channel has a new video from Marla Harris. There is a giveaway for being a subscriber, liking the video and leaving a comment. Click here

dies I used to create card: