Showing posts with label Stitched Leaves. Show all posts

Thursday, August 24, 2023

Fall Color

Hello Friend

I am making a few more fall cards.  I just love working with the color palette and it is my favorite time of year! I am so ready for the crisp air, football and beautiful colors!

Design steps:

1.  Use a brown A2 card base, 5 3/8 x 4 1/8 piece of cooper card stock, 5 1/4 x 4 piece of green cards stock, 5 1/8 x 3 7/8 piece of checked DP and a piece of cooper cut with the Wide Piereced Rectangle Frame die.  Glue the Cooper to the brown base, next comes the green and then the DP
2.  Use the Stitched Leaves die and cut out the following card stock colors: rust, plum, mustard, green, and kraft. Cut out the basket in dark brown using the Basket of Vegetables die.  Ink the pieces with complimentary colors
3.  Put a dot of glue in the center of the basket to hold in place then add the leaves

4.  Add the frame and then tuck in a few more leaves and acorns to the bottom of the basket.  You can now glue the basket edges down

5.  Layer your sentiment on green and add a twine ribbon

6.  I had a few scraps left over so I added them to the inside of the card


We have more inspiration on our YouTube Channel check it out HERE

Thanks so much for stopping by!  And I will see you next Thursday.

Blessings and Take Care


Saturday, August 19, 2023

Fall Leaves


Hello CottageCutz friends! Thanks for taking the time to stop and visit with us today. It's Mary Marsh here bringing you the Saturday edition of the Blog.

Our new Folk Art release is still available in the online store at 35% off individual dies. There are 19 new designs that are so perfect for cardmaking, journaling, and scrapbooking.

In fact, all of the releases from 2023 through Halloween of 2022 are currently on sale. Check them out here if you want to pick up any that you may have missed and still want. The sale won't be on long.

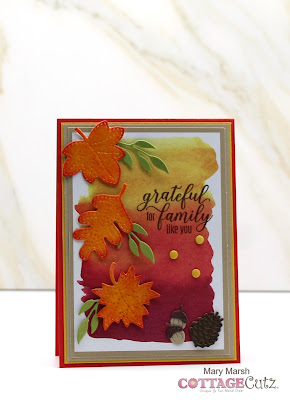
Since we are coming into my favorite time of the year, I decided to make a Thanksgiving card using the beautiful colors of Fall. The die is an older one from the 2018 collection "Stitched Leaves"

For my leaves, I first die-cut the leaves from Bristol smooth cardstock and then ink blended barn door and fossilized amber distress inks. I pressed them in Ranger Perfect Medium and then used clear embossing powder with my heat tool. This technique makes the leaves really pop. Although my camera isn't picking up all the shine that's on the leaves.
My background paper is from a kit I had in my stash.  I really like the color washed background. I layered it on a crumb cake (kraft) panel then crushed curry and my card base is the poppy parade.

Card Base: 4" x 5 3/8" 
Curry Layer: 3 3/4" x 5 1/4"
Kraft Layer: 3 5/8" x 5 1/8"
Image Panel: 3 1/2" x 5"
Next, I stamped my sentiment. I stamped in chocolate chip ink. 
Now that my card elements are prepared, I am ready to start card assembly. I attached all the layers first with double sided tape. 
I secured the leaves with double sided tape. I decided to add some other greenery using the Rustic Wreath die.
To finish off my card I added a pinecone and a couple of acorns and scattered a few curry enamel dots. I also added more leaf greenery to the bottom leaf. 
 
That's it for me for this week. See you next Saturday. 

Reminder: Marla has a video up on the CottageCutz YouTube channel. Click here.


Monday, July 09, 2018

Special Thank You


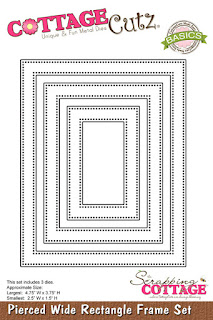
Hi, Lois here again with my Monday card.  As I mentioned last week, during the month of July the CottageCutz design team is reminding you of some older dies when making their cards.  My card uses two such dies -- Stitched Leaves and the Pierced Wide Rectangle Frame Set.


To start my card, I cut the stitched leaves from a piece of white cardstock.


I then colored the pieces with Copic markers.  I had originally planned to use a white pen to make the stitches more pronounced, as is shown on the packaging; but I was not happy with the results on the first leaf I tried.  So I turned it over and colored the back so it was not wasted.


I then cut the card base pieces and the frame.  The cream card base is 5 1/2" x 8 1/2", scored at 4 1/4"; and the inside of the frame is 3 5/8" x 4 3/8".  I used the largest frame die.


I adhered foam tape on the back of the frame.


After constructing the card, I laid out the leaves down the side of the frame to see how much room I would have for my sentiment.


I removed the leaves and stamped the sentiment.


I then replaced the leaves, gluing them down over and under the frame, as well as the acorns at the bottom.  And my card was finished.


CottageCutz dies used on this card are:

http://www.scrappingcottage.com/cottagecutzstitchedleaves.aspx

http://www.scrappingcottage.com/cottagecutzpiercedwiderectangleframesetbasics.aspx