Showing posts with label Stitched Heart Set. Show all posts

Tuesday, February 14, 2023

Sweet I Love You Card

Happy Valentine's TuesDIE Cottage Cutz Friends!
Melinda here with you, on this day to express....our love!   So I thought that was the perfect sentiment for my card today! I am sharing a sweet and pretty card I created with dies from the amazing new Flowers & More release from Cottage Cutz!

This release is amazing and a true MUST HAVE for your creative collection! All the dies in this collection are a wonderful addition and will fast be staples in your creative stash!
Here are my projects for today.

I created this simple yet pretty card featuring the Little Flowers and the Celebrate Banner dies from the new release! My card is a Horizontal top fold card. It is 4.25 x 5.5 with the fold along the 5.5 side and in landscape position.

I added a yellow cardstock mat sized at 4 x 5.25 and also a patterned paper mat sized at 2.5 x 5.25
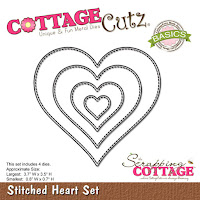
 I then cut out the Largest double-stitched circle, the three smallest stitched hearts in that set and the second smallest pierced circle die from that set. 
I then used my various colored markers and colored in the two larger hearts and the pierced circle. I didn't have the right colored patterned paper, so this was a great alternative. I just tried to stay to the inside of the pierced or dashed lines. Here is an example of the larger heart.

I then cut out the celebrate banner in white and colored in the various little hearts and stars. I added dots of stickle to various ones for a little extra touch.
Here's a closer look at the assembled piece. I added the sweet little flowers to the center of the pierced circle. I cut them out of white cardstock and then colored them in as well. I added some sequins and scattered them for an extra touch. I then added the sentiment, I Love You and curved the words around the circle.

Here is one last look at my finished card. I think it turned out super cute!

Flowers & More collection!
Here's a look at the entire collection of dies in this fabulous release.


Dies I Used

Celebrate Banner

Little Flowers


I Love You Sentiment


Stitched Heart Set

Double-Stitched Circle Set

Pierced Circle Set


Don't forget to head over to the Cottage Cutz You-Tube Channel where you can see some of our amazing design team members create some beautiful projects!


Well that about covers it for today! May you have a wonderful Valentine's day and enjoy a little love in your day! Until the next time, have a wonderfully craft-die day!
Melinda Beltran

Saturday, January 28, 2023

Vertical Easel Shaker Card

I WOOF U ♥ No bones about it

Hello CottageCutz friends!

Kris here, bringing you the Saturday edition of the blog (filling in for Mary today).  I have a fun-fold card FUR the puppy lover in us all!  This fold is called a vertical easel card (with a pop out shaker!) and I'm going to have the full tutorial for this style card, along with another version of this card right here on the blog this Monday! For now, enjoy this cute eye candy and have a craftastic weekend!

Today's card features the Christmas Puppies die from the Christmas 1 Release (which are all 30% off right now!).  I also used a few other dies as shown at the end of my post.  

-Front when closed / pulled out of envelope-

Aren't these puppies ADORABLE!  

I used the Stitched Alphabet die for the letters.

-Inside- 

The sentiment is printed off computer.  For the paw, I used a heart from the Stitched Hearts and the raindrops from the Stitched Sun, Clouds & Umbrella die.  You can see on the far left, there's a white panel for writing a message.

-View from the top-

The top folds and tucks under the bone panel just like a normal easel card :) 

And before I go... since this post is about the pups... I thought I'd share a pic of my absolute LOVE BUG (and bestie), Ava.  She's a Street Dog Hero rescue from Guadalajara and she brings so much joy and cuddles ♥  


Thanks for visiting today ~ see you back here on Monday for the full tutorial!

~Kristine


PRODUCTS:


Thursday, January 26, 2023

Let the Good Times Roll!

 Hello Scrapping Cottage Friends

It is Pam sharing with you on this fine Thursday!

I have another Valentine for you today.  I am loving the color palette for this one.  I have done several of the Classic 50's card in it.  And I just can't seem to get enough of these wonderful colors.  This time I have designed a slimline using the Classic 50's Collection.  I used 3 of the dies to make this cute card they are: Classic RadioSkates and Poodle Skirt.  


Designer Steps:

1.  Use a black slimline card base measuring 3 1/2 x 8 1/2
  • Cut a piece of black and white checked DP 3 1/2 x 8 1/2
  • Using the Whimsical Heart Slimline die cut a piece of white card stock
  • Use the Stitched Heart set cut a black heart out of card stock using the largest heart
  • Glue the checked DP to the card front and then glue down the white Whimsical Heart card stock
  • Glue the black heart to the middle of the card
2.  Using the following dies Skates, Poodle Skirt and Classic Radio cut the pieces out of the following card stock: black, yellow, white, pink, light and dark gray, and turquoise 
3.  Assemble the pieces using a fine tip, fast drying glue
4.  Arrange to skates side by side like pictured and pop them up inside of the black heart
5.  Add the radio to the top of the card and the poodle skirt to the bottom of the card by using dimension dots
6. Type your sentiment and print it on white card stock then layered it onto turquoise card stock. Glue it next to the skates on the left side.  Your card is complete

CottageCutz Products


We have more inspiration on our YouTube Channel check it out HERE

Thanks so much for stopping by!  And I will see you next Thursday.

Blessings and Take Care


Tuesday, January 24, 2023

Hot Cocoa Box

Hello Cottage Cutz Friends!
Melinda here with you, and today I am sharing a fun Hot cocoa box I made. I decorated it with some of the fun dies from the Christmas release. I love that you can invest in these seasonal dies, but use them well past their intended season. It is great to get a lot of mileage out of them!
Here's a look at my fun box. I used white cardstock for the base of the box. I then used some blue cardstock for the mats. From there I did all the fun stuff of decorating my box. 

here is another view of my box. You can see the front is just a bit shorter so you can pull out the hot cocoa packets.


Both pieces of the box. I have to take the time to measure out the two pieces. I will update this when I do. I made SEVERAL versions before I settle on what I was happy with. I think one of these days, I need to add in some photos of what my desk looks like when I am coming up with these boxes. There is a LOT of trial and error involved before I get it right...lol. Of course that is a part of the fun of crafting, right?! Dreaming up something and having it come together. I do know the large rectangles on the left side piece are 3.5 x 5. That is the right size for the Swiss Miss hot cocoa packs. 


Here is a photo of the box as I am putting the two pieces together.


Here is another picture as I am putting the box together.


Here is a picture of the base of the box as it is first put together.

Here is a picture of the bottom. I added some half beads on the bottom for the "legs". I also added some extra mats at the bottom for some extra stability.

Here is a closer look at the top. I added some of the super cute snowmen friends die to a scalloped rectangle mat. I added some pink paper and some pretty patterned paper too.


For both sides I used the scalloped rectangle and added a pink cardstock mat and some more of that pretty Doodlebug patterned paper. To that I added my hot cocoa mug with the little "steam curl" and the cookies & cocoa verbiage.

I think my little box turned out super cute and will be taking this to my office.

Dies I Used


Cookies & Cocoa

Santa Gnome w/Cookies

Snowmen Friends


Nested Scallop Rectangle Set


Stitched Heart Set


Well that about covers it for today! Until the next time, have a wonderfully craft-die day!
Melinda Beltran