Showing posts with label Star Window Slimline. Show all posts

Thursday, July 20, 2023

Christmas Deer

 Hello Friends

I am celebrating Christmas in July by making my very first card for the holidays!  I always start early and end late!!

I am using the Folk Art Deer.  This die is from our Folk Art release!  There are 19 wonderfully detailed dies in this collection.  Each die can be used together or separately.  They are perfect for multiple occasions even Christmas!


Design Steps:

1.  Use an A2 kraft card base, 4 1/8 x 5 3/8 red dotted DP, 4 x 5 1/4 tan DP and 1 1/2 x 5 3/8 strip of DP.  Ink the edges of all the pieces with TH Vintage Photo
2.  To add a little texture tape a stencil to the tan DP and use some Glitter Snow paste in small quantities all over the card front.  Let it dry to continue

3.  Using the Folk Art Deer cut it out of kraft card stock and shade with ink.  Using the Star Window Slimline Die cut out two red dotted DP stars and 2 gold stars.  Using the Victorian Border die cut out two borders in gold

4.  Glue the red dotted DP to the card front and then add the tan DP. Next glue the borders to the top and bottom of the DP strip then glue to card front as shown.  Glue the stars together with the gold star on the bottom but slightly showing on the right side of the star
5.  To add another layer of texture I dyed a piece of cheese cloth with a walnut spray ink.  I let it dry and then layed it on top of my middle strip as shown above.  To anchor the cheese cloth I added extra glue to the stars and pushed down firmly to make sure the glue held
6.  Add the deer and your sentiment.  For the sentiment I embossed in gold and layered it on a piece of gold card stock

7.  I added just a little greenery by cutting green leaves and red berries using the Woodland Birdhouse.  Add the greenery to the card along with the red berries and your card is complete


We have more inspiration on our YouTube Channel check it out HERE

Thanks so much for stopping by!  And I will see you next Thursday.

Blessings and Take Care


Monday, December 19, 2022

New Year's Slimline Shaker

Hello crafty friends!  Wishing you a Merry Christmas this week!

Kristine here with you today and shaking it up with a slimline shaker card for New Year's using the cute Polar Bear Trio with Igloo die from the Christmas #2 Release, and the Fifties Phrases #1 die from the Classic 50's Black Friday Release and more!

Let's Party 2023

The SCS color challenge the next 2 weeks is
Basic Black
Metallic Silver
Metallic Gold
And the dessert option is:  NEW Year's

I chose a slimline paper pack called Shine Bright.that has silver and gold with subtle Snowflakes.

CUTTING & SCORING

Black Cardstock:
 • cut 8" x 9", score along the 8" side at 4"-  score & burnish
• die cut Fifties Phrases #1

Silver Metallic (or foiled) Cardstock: 
• cut 8-3/4" x 3-3/4" 
• die cut Stitched Numbers

Gold Metallic (or foiled) Cardstock:
• die cut balloon from Star Windows Slimline set

Patterned Paper (Silver Snowflake): 
• cut 8-1/4" x 3-1/4" 

Patterned Paper (Gold with Snowflakes):

Acetate or Window Sheet: 
• cut 8-1/4" x 3-1/4"

White Cardstock:

DESIGN STEPS

#1  Cut all your layers and die cut pieces.

#2  Adhere your silver layer to card front.

#3  Rub a used dryer sheet or anti-static pouch to both sides of your acetate sheet and attach to back of star cut-out layer with double-sided tape.

#4 Using foam strips, outline the edges of acetate and around the star shapes.  Peel backing off the strips and add shaker elements inside your 3 sections.


#5  With your silver snowflake paper, pattern side down, carefully center it over your star layer, matching up the edges best you can and adhere.

#6  Turn shaker layer right side up and attach to card front.


#7  Color your polar bears and attach all die cut elements to card front as shown.


Wishing you all the crafty goodness in 2023!
Kristine

PRODUCTS:


Thursday, August 26, 2021

You Are Pawsome!

 Hello Scrapping Cottage Friends

It is Pam sharing with you today!

WE HAVE A NEW SENTIMENT PHRASES WITH SHADOWS RELEASE!!! You can pick up the entire bundle for an amazing 50% savings!! Or you can select individual dies at a 25% savings.  These dies have a wonderful font and look perfect with the Lil' Bluebird stamps!

I am using both the new release phrase dies and the Lil' Bluebird Puppy Love Stamp Set.


Designer Steps:


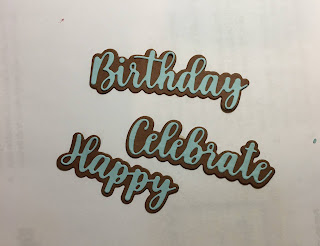
1.  Using the Happy Birthday w/Shadow and the Celebrate w/Shadow cut them out of blue and brown card stock as show above.  Glue the words to the shadows
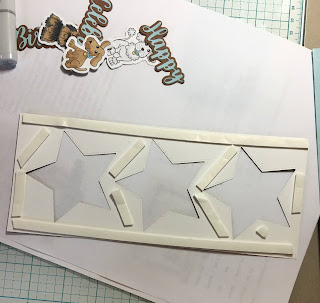
2.  Using the Star Windows Slimline die cut out a piece of DP.  Also cut out a slimline card in blue card stock
3.  Stamp your images using the Puppy Love Stamp Set.  Use the colors above to color the stamped images
4.  Use the coordinating dies to cut out the puppy images.  I also cut out 3 paws that I colored in black
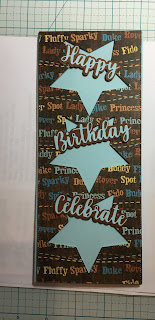
5.  Take the piece of DP that you cut out with the Star Slimline die and place dimension tape on the back and then pop it up onto the blue slimline base
6.  Also use some dimension tape on the back of the words and place them on the card as shown above
7.  Glue in the pups and add the paws and your card is complete

CottageCutz and Lil' Bluebird


Thanks so much for stopping by and make sure to check out the new Phrase with Shadow dies.  They are a must have and can be used so many times on your wonderful creations!

Blessing and Take Care
Pam