Showing posts with label Retro Tag Toppers. Show all posts

Tuesday, May 19, 2020

Puppy in a Garden Cart

Hi Janja here. Welcome to the blog.
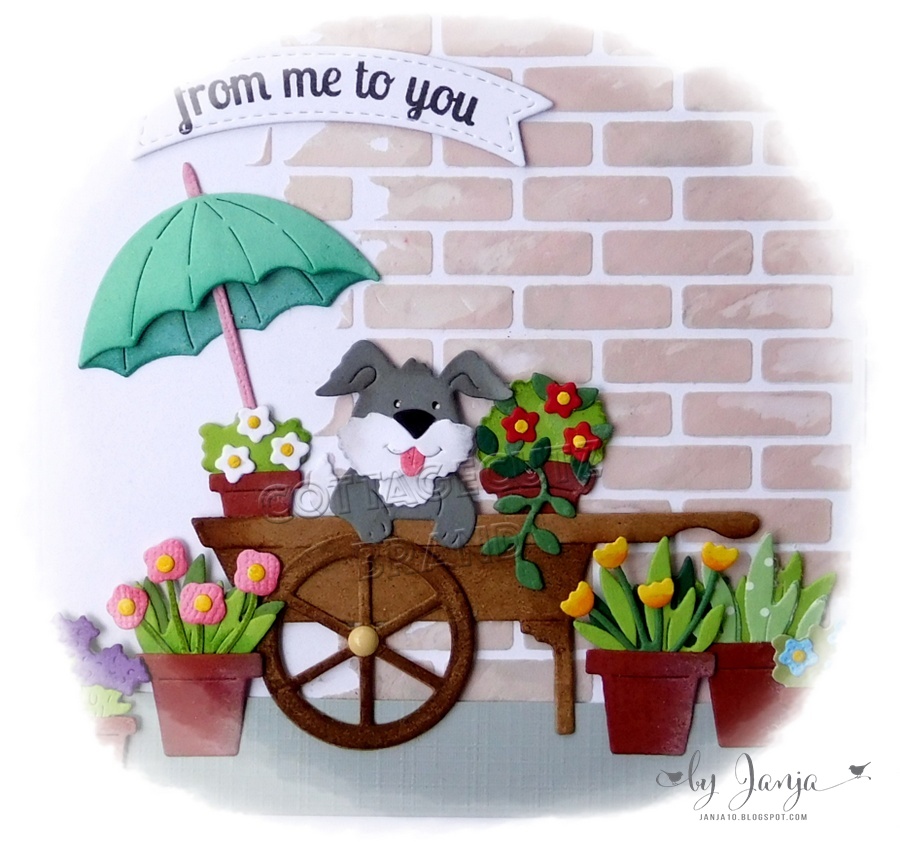
Today, I want to share with you a card with a cute puppy in a garden cart.


- CottageCutz dies: Puppy in Garden Cart, Potting Shed (potted plants), Retro Tag Toppers
- blank card: 5 5/16 x 5 5/16" (13,5 x 13,5 cm), folded
- white cardstock: 4 3/4 x 4 3/4" (12 x 12 cm)
- grey paper strip: 4 3/4 x 5/8 " (12 x 1,6 cm)
- different colors of cardstock
- different colors of ink pads
- brick wall stencil
- white texture paste
- spatula
- enamel dot
- glue, double-sided adhesive tape, self-adhesive foam pads

I used different colors of cardstock for all the cutouts and colored the edges with slightly darker ink pads.
You can also use white cardstock and then color all the cutouts with any color media.


Cut a square out of white cardstock. Then apply a white paste, stained with grey and red ink, over the brick wall stencil and let it dry.


Cut a banner out of white cardstock and stamp a sentiment.


Add a grey strip to the bottom edge of the brick wall.
Complete the card.


Thank you for stopping by.
Janja


Tuesday, April 07, 2020

Happy Easter

Hi Janja here. Welcome to the blog today.
Just a few days separates us from Easter. So today I have one simple Easter card for you.


- CottageCutz dies: Double Trouble Bunnies, Retro Tag Toppers, Rectangle Set
- blank card: 4 1/4 x 5 1/2" (10,8 x 14 cm), folded
- patterned paper: 3 15/16 x 5 3/16" (10 x 13,2 cm)
- colored cardstock
- colored ink pads
- embossing powder - white
- glue, double-sided adhesive tape, self-adhesive foam pads

Cut all the pieces out of colored cardstock and color them along the edges with colored pads.


Then cut out the red banner and emboss a sentiment on it.


Trim a selected patterned paper and cut two rectangles out of red and white cardstock.
Later, I cut a piece of green cardstock for the grass and added tiny flowers.


Completed card.


Thank you for stopping here today.
Janja


Wednesday, December 11, 2019

Happy Holidays

Hello!  This is Sukie and today I'm sharing this adorable Christmas card.  This sweet bird sitting on the snowy branch is the cutest!
The cardinal is from the Jolly Cardinal die set and inked with my Oxide Inks.  I cut out a circle from the Circle Set and a doily from the Nested Stitched Doily Set.  The sentiment is from the Happy Holidays die set which was adhered on a flag from the Retro Tag Toppers die set.
I went with a Christmas plaid background for my card base and layered in with the doily and circle cuts.
The cardinal was centered inside the layered doily.  I placed the first sentiment flag directly above the doily.
The second flag was added to the bottom edge of my card finishing off the curved sentiment design.
Here are the dies used on my card, available in the store:

Tuesday, October 29, 2019

Let's Go Sledding!

Hello Scrapping Cottage creative friends!
Janja is here with you with another happy holidays card.

In my opinion, I used one of the cutest dies from the Christmas Part 2 release. I wanted this motif to really stand out so I didn't over-decorate the card.


- blank card: 5.5 x 5.5" (14 x 14 cm), folded
- patterned paper: 5 x 5" (12,7 x 12,7 cm)
- white cardstock: 5.3 x 5.3" (13,5 x 13,5 cm)
- colored cardstock
- colored ink pads
- glue, double-sided adhesive tape, self-adhesive foam pads

Cut moose and gnomes out of colored cardstock. Color the edges with colored ink pads for more depth.


Cut off the patterned paper and cut out the white cardstock frame.


Sometimes I can not find the right paper in my drawers. So, I colored a white cardstock with dark brown and white. I got the aged pink color. 
When the color dries cut out a square in the middle. Keep it slightly smaller than the inside of the frame.


Attach the frame to the cardstock and trim the outer edges with your favorite paper cutter.


Cut a white strip and stamp a sentiment.


Complete the card.


Have a nice day. 
Janja


Wednesday, May 15, 2019

Birthday Wishes

Hello!  This is Sukie and today I have a happy and bright card to share which is perfect for a Spring or Summer Birthday.
I found the patterned scrap of pink, white and black paper in my stash which coordinated perfectly with the solid colors.
I used each of the solid card stock sheets and cut out all of the Stitched Flowers knowing I would have enough for 2 cards.  I also cut out a couple of leaves from the same set and a banner from the Retro Tag Toppers.
I put 5 of the flowers together layering the different colors.  I added some foam dots to the back of each of the flowers for added dimension.
Once I created my card base, I anchored 3 of the flowers to fill up the center of my card base.
Next, I placed the remaining flowers clustering them together.  The leaves were trimmed and tucked in amongst the flowers.  I also added 3 of the flower centers as extra embellishments.
The finishing touch was a heat embossed sentiment from the Pink & Main Hello Sweet stamp set.  I curved the sentiment along the banner so it fit perfectly.
Here are the dies I used on my card, available in the shop:


Tuesday, December 18, 2018

Cards with pets

Hi, Janja is here.
Christmas is almost here and we all probably ended up with our Christmas cards.
Today, I prepared three cards with some new dies from Pets release.


- white card base: 4.25 x 5.35" (10,7 x 13,9 cm), folded
- kraft card base: 5.3 x 5.3" (13,5 x 13,5 cm), folded
- colored card stock
- different ink pads
- plastic stencil: brick wall
- double-sided sticky tape, double-sided foam tape, foam pads, glue
- glossy accents


Start this card by cutting a fish, bowl and cat. 
I used colored card stock. For greater depth, I used different ink pads. On the picture is missing a shelf that I cut out later.


Use a plastic stencil brick wall for the background.
Cut the background to size 5 x 5" (12,7 x 12,7 cm). Paste it with a double-sided sticky tape to the card base. Stamp a sentiment. 
Attach the fish bowl and cat to the shelf with foam pads. 
Use glossy accents for air bubbles.


-------------------

Cut out all the pieces with the die - Rufus The Hound. I used the die - Fireplace with Accessories for small bows.


Cut two patterned papers of this size: 4 x 5.2" (10 x 13,2 cm) and 4 x 2.9" (10 x 7,3 cm). I printed the sentiment in Word. 


For the final touch, draw a shadow around the dog with a brush. Apply a glossy accents to the water in a bowl.


------------------------

Cut out and assemble Miss Kitty. 


Prepare background and two frames. Cut out two circles and stamp a sentiment. Attach frame and Miss Kitty to card base as shown using double-sided foam tape. 
Finally, add a little pearl to the flower.


Have a nice day.