Showing posts with label Olena Levchenko. Show all posts

Thursday, September 03, 2015

Celebrate the Season card


Hello Everyone!!!  Olena here today!
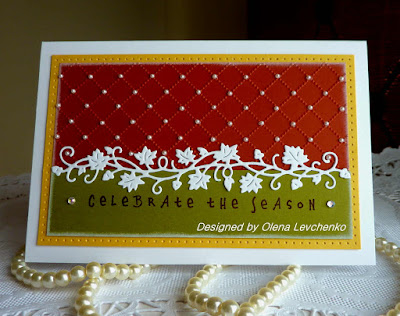
Today I'm showing you my new Fall card I created with beautiful  "Harvest Vine" die.
To make card, start by cutting white card stock using the "Harvest Vine border" die. So, we have beautiful white leave vine border.

The next step is background on card. For this I used white, yellow, orange and green pieces of card stock. I think these three colors the best combination for fall card.
I used a 5.5" x 3.75" white base card. Then, I cut yellow, orange and green colors in different sizes. 
The yellow piece of card stock 5.25" x 3.25" I pierced the edges using special tool with needle, with orange piece 3" x 5"  I embossed using embossing folder. On green piece of card stock 5" x 1" I stamped sentiment. You can stamp any fall sentiment, but I like this one.

Assembled all layers and adhered to the card base. Then adhered the white vine between orange and green panels. Embellished embossed panel with white small pearls.
Finished card size 5.5" x 3.75".

For this project I used:

Card Supplies:
CottageCutz dies: "Harvest Vine".
Card stock: white, yellow, green and orange.
Inks: red and white.
Stamps: Celebrate the season sentiment.
Other: Wire Fance embossing folder,  scissors, paper trimmer, scor-buddy, craft glue, pierce tool and self adhesive white pearls.
 
Thanks for visiting, I hope your day is wonderful!


Sunday, August 23, 2015

May all your Wishes come true! card

Hi there and welcome to CottageCutz Blog.

 I love making handmade greeting cards and today I'm showing you my new card I created with beautiful dies.

 
Today I have a new card using die images from a new Summer 2015 release and an older. I used "Clown Fish", "Greenery" and "Vine" dies.


To make card, start by cutting orange and white card stock using the "Clown Fish" die. So, we have orange and white fishes. Don't trough away white pieces from cutting, we need these pieces late.
Adhere the orange fishes on black piece of card stock. One fish is normal way to adhere, the other one is reverse side. After all, place white pieces of fish in missing spots on orange fish. You can see details if you click on image. 
Then, cut fishes around with scissors. We have beautiful Clown fishes with orange, white and black colors. Add clear shimmer on fishes for sparkling.


The next step is seaweed. Start by cutting green card stock using the Vine and Greenery dies.

To create a background, cut white cardstock using Circle die template and sponge ocean green, yellow and blue craft inks. Make the center area a bit lighter then edges by sponging yellow ink, then green and around circle with lt.blue craft inks. Next, stamp seaweed and corals using Md.brown ink. 

The next step is putting all cut pieces to ocean circle using foam tape and craft glue.

Prepare a 3 3/4 by 5 1/2 inch white card base. Layer the ocean background with Tiny Bubbles embossed card stock and adhere to the card base with craft glue. 

The final step, stamp sentiment in the bottom of card base using orange craft ink. You can use different sentiment, but I like this on. Embellish card with Clear Dew Drops and self adhesive small pearls.

For this project I used:

 Card Supplies:

CottageCutz dies: "Clown fish", "Greenery" and "Vine",
Card stock: white, black, green and orange,
Inks: yellow, lt.green and lt.blue,
Stamps: Seaweed, Coral and sentiment,
Other: Tiny Bubbles embossing folder,  scissors, paper trimmer, scor-buddy, foam tape, Clear Dew Drops and self adhesive white pearls.


Monday, August 03, 2015

CottageCutz post - Hibiscus Flower Gift bag

Hello Everyone from Olena!!!

  Today I am sharing with you my new project I created with beautiful 
CottageCutz dies.


For my project, I used small turquoise gift bag from Dollar Store. 

First, I cut "Hibiscus Flower" out 2 times using orange and green card stock. Glued images together.


Next, I cut classic and scalloped squares and glued together for making background on gift bag. 
Added image on created background and glued on gift bag.  Decorated image with rhinestones. 
I, also, added stamped sentiment on tag on gift bag. Inside the gift bag, I put orange gift wrapper. 
I think, this is cute gift bag perfect for gift card or small gift things. 
Love it!!!!!

For this project I used:


Thursday, July 23, 2015

CottageCutz post - Sun & Cloud Gift card Holder

Hello Everyone from Olena!!!
  Today I am sharing with you my new project I created with beautiful 
CottageCutz dies.

 For my project I used Gift Card Holder and Sun & Cloud dies. 
Very easy to make these gift card holder.

  First, I cut gift card holder out using green-blue card stock. Than, I did made a background for card holder using cloud stamp. 


 Next, I cut images out couple times using white and yellow card stock. After these, I glued on gift card holder sun and cloud using double foam tape.

 
 Added sun on back of gift card holder and stamped sentiment.

 
And finally, I added gift card inside gift card holder.

For this project I used:


Monday, July 13, 2015

It's time to party....

Hello Everyone!!!

  Today I am sharing with you my new summer party project I created with beautiful 
NEW Tropical Release.


 For this project I used super cute images from new Tropical Release: Happy Fish 1, Happy Fish 2 and Happy Dolphin. I think this is good idea put cut image on your straw. 


Very simple project.
I cut all pieces out, sponge with different colors of inks. Then, I punched circle using craft punch and glued each image on circle and on straw. Super cute images.....


Friday, July 03, 2015

Just Saying Hello card

Hello Everyone from Olena!!!
  Today I am sharing with you my new summer "Just Saying Hello" card I created with beautiful 

 
For this project I used "Surfboard 1", "Surfboard 2", "Filigree Clouds" and "Wave border" dies.

First, I cut all pieces out, sponge with different colors of inks. Then, I made sand background using craft paper and stamped sentiment. After all, I put all cut pieces on card using glue and double tape.

 For this project I used:


Tuesday, June 30, 2015

Summer gift tag set

Hello Everyone from Olena!!!

  Today I am sharing with you my new summer gift tags I created with beautiful 
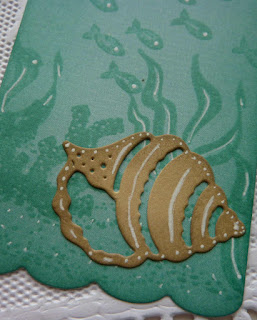
 First, I cut Scallop insert card/tag  out couple times using green-blue cardstock. Then, I created undersea background using different stamps. 

 Next, I cut "Moon shell" and "Conch sell" out using lt.brown cardstock and sponge with md.brown ink the edges. All shells I glued on gift tags.


Decorated gift tags with white ribbon.

For this project I used:


Saturday, June 13, 2015

CottageCutz post - Hello card

Hello Everyone!!!

  Today I am sharing with you my new Summer card I created with beautiful 
 NEW Tropical Release.


For this project I used "Flamingo" and "Hibiscus Flower" dies.


First, I made hot beach background using different colors of cardstock.

Then, I cut "Flamingo" and "Hibiscus Flower "out couple times using pink and cream cardstock. For sun I used regular circle punch. Glued all cutting parts on beach background. After all, I stamped sentiment and decorated with rhinestones.

 For this project I used: