Showing posts with label Nested Scalloped Circles. Show all posts

Monday, April 24, 2023

Hello Friend Easel Card

Hello Friends!  

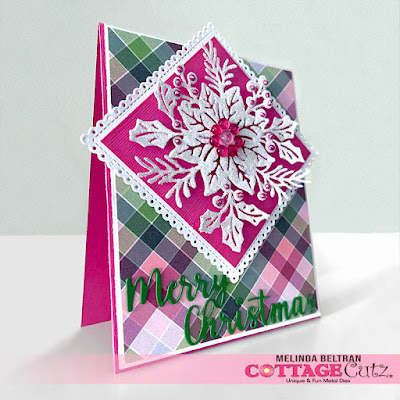
Kris here with an easel card for a friend.  I used the new Spring Birdhouse Cup and some papers that were meant for Fall, but I just LOVE the colors so I went with it.  These birds are so cute, and what a fun idea for a birdhouse---out of a cup?!  I actually have a collection of birdhouses, but not quite like this one ☺   


and here's what it looks like closed (taking it out of the envelope)


Design Steps:

I cut my magenta card base at 5-1/2" x 11" and scored at 5-1/2" and at 2-3/4".

I cut (2) pieces of patterned paper at 5-1/4" x 2-1/2" and glued onto the front of card.

I die cut the largest scalloped circle from the Nested Scallop Circle Set
and I die cut the 2nd largest die from the Pierced Circle Set and glued onto the scalloped circle.


I die cut the Spring Birdhouse Cup from white cardstock as well as a red/white polka-dot paper.  I then colored my pieces with Copic markers.


I sponged some Peacock Feathers (Distress Oxide Ink) onto my white circle and then assembled my die cut elements onto it.


I then added foam strips on the back LOWER HALF of my circle piece and attached to the center of my card front.

For the INSIDE of card:

I cut (2) pieces of white cardstock (for writing a message) at 5-1/4" x 2-1/2" and taped to upper 2 portions.

I cut a piece of patterned paper at 5-1/4" square and taped to lower half.

I cut a piece of green cardstock at 5-1/4" x 1-3/4"

I cut a piece of white cardstock at 5-1/4" x 1-1/2" and stamped a sentiment and some leaves, then taped it onto the green piece.

*Important!!  I then added foam tape to the back of sentiment piece and attached to inside - it acts as an easel top prop up the front of my card.  


and here it is in display position:


PRODUCTS USED:


I hope you enjoyed my card today!

Remember, all the individual dies in the Spring/Easter Release are still 30% OFF for a limited time!


~Kristine

Thursday, July 28, 2022

Bee Happy

 Hello Scrapping Cottage Friends, 

We have a huge Christmas in July sale going on right now! The last day for the sale is tomorrow! So don’t miss a chance to save up to 65% off!  Check it out HERE

We also have a new release and it is just plain adorable.  It is called Strawberries and Bees perfect for those fun summertime cards. There are 16 designs in this new collection and you can get the individual dies for 30% off right now! This sale will not last so shop today to get the incredible savings.

Here is my card for today using two new release dies Honey Bee and Bee Phrases.


Design Steps:

1.  Start with a black A2 card base with the front flap cut in half.  2 pieces of white card stock cut at 4 1/8 x 5 3/8 and 5 3/8 x 2. 2 pieces of DP cut at 4 x 5 1/4 and 1 3/4 x 5 1/4

2.  Glue the DP pieces to there matching white layer and then glue them to the black card base

3.  Use the Scalloped Circle die second from the largest and cut two pieces of yellow card stock.  Use the Cross Stitched Circle die third from the largest and cut two pieces of white card stock.  Glue the pieces together (One will go on the inside of the card)

4.  Use the Honey Bee die and cut out pieces using: yellow, mustard yellow, black, red, vellum and brown

5.  Shade the pieces with ink and a small applicator.  Assemble the pieces with fine tip glue and then arrange onto the white circle as shown above.  Use a white gel pen to dot the eyes

6.  Using the Bee Phrase die cut out the mustard yellow and red card stock.  Shade with ink and a small applicator

7.  Glue the scalloped circle to the edge of the front flap as shown above.  Glue down the sentiment

8.  I decided the card need just one more little bee so I cut out the second bee and glued it to the bottom right of the card as shown


9.  For the inside stamp the white circle with your sentiment and then glue directly under the front circle and your card is complete


CottageCutz Products


We have more inspiration on our YouTube Channel check it out HERE
Thanks so much for stopping by!  And I will see you next Thursday.

Blessings and Take Care


Tuesday, January 04, 2022

Birthday Badges


Happy Tuesday Cottagecutz fans. I hope you had a wonderful new year. I can’t believe how quickly Christmas went. What I do know is that come June I’ll be working on Christmas for next year.

Anyway it’s Wendy bringing you the blog today and I thought I’d use the Black Friday release to make some birthday badges. I think it’s really cute for youngsters to have a name badge at a birthday party. So this is how I made them

Firstly I cut out 3 of the ‘Nested Stiyched Scalloped Circles’ in a bronze brown colour. I have also cut out 3 of the ‘Stitched Rounded Rectangles’ as we’ll need these shortly


I use 38m broach bars to make my badges and secure wit a hot gun. I then use the small rectangle as cut above to extra secure the broach bar in place


Next I printed some names on this beautiful cream pearlescent card and cut out with the ‘Stitched Circle Set’


I wanted to add a little background to the badges so I cut out some green circles in the same size


Next I used the ‘Grass Slimelime’ to cut some hills from the circles


I then attached the grass to the bottom of the badges and they are a perfect fit


Next I added the names to the brown badges 


To finish off, I used some of the designs from the ‘Black Friday’ release, which I will list below and you have your badges


I really hope you like the badges as much as I did making them. 
Have a wonderful week and I will see you on Friday with another project

Dies I used:


Don’t forget to check out our YouTube channel for new fancy designs


Sunday, October 31, 2021

Two Pretty Poinsettia Cards

Happy Sunday Scrapping Cottage friends! I'm so glad you stopped by. Melinda here with another project. Today I am sharing two pretty cards. Both cardst feature the gorgeous Poinsettia and Holly Flower Christmas Die. It is one of the new dies in the Christmas Part 1 release. Now is the perfect time to pick them up! They are 30% off! That is a terrific savings. 

Here is a look at my first card. 


I started by cutting out the beautiful Poinsettia Die Cut from the 1st Christmas Die Release. I covered it with some wet adhesive and then poured some fine, white glitter all over. I set it to dry and then dusted off the excess glitter.

I then used a large 3D glue dot for the middle and cut some little foam squares. This is what I used to adhere the die cut onto the base.

Here you see I adhered the Poinsettia cut to a stitched circle die base I cut from some red cardstock. I adhered that onto a scalloped white circle base. Once it was in place, I used some more wet glue and then adhered some dew drops to the center.


Here's a look at the dew drops I used.

I then used my Nuvo Drops and added some to all the spots on the die cut that were the little little holly berries.


Here's a closer look at the decorated die cut. I love that it has a little lift from the mats.


To finish off the card, I cut the new Merry Christmas sentiment out of some white cardstock. I layered it onto a strip of red cardstock. I adhered both elements to the patterned paper base. From there, I adhered the entire thing onto a black top folding A4 cardstock base.


For the second card, I repeated the same process for the Poinsettia Die Cut. I cut it out of some white cardstock. Glued and glittered it.

I then cut a piece of pink cardstock. I then inked the edges and mounted it onto the Scalloped stitched square base. 
I then added some foam tape to the back side of this mat. 

Here's a photo of the dew drops I used on this card. You can also barely see the Thistle colored stickles glitter glue I used. I dotted all the little holly berry centers.

Here's a closer look at the Merry Christmas die cut. I cut it out of some Green cardstock. I chose not to use the pretty outline that comes with the die.

Here's a closer look at the pretty Poinsettia.

Here's a look at my completed card. For the base, I used a piece of patterned paper I created and printed out. I cut it to a 3.75 x 5 size. I mounted all that onto a piece of white cardstock and then the entire thing is attached to the pretty pink card base. The finished card size is a standard A4 top folding card.

I think my two cards turned out super pretty. I hope you like them. You can easily re-create these cards with the help of these wonderful dies!


The Dies I used to create these projects:


Well that about covers it for today! 

The CottageCutz YouTube channel is up and running. We are featuring videos every Wednesday. Drop by and subscribe so you don't miss one and give us a thumbs up on our videos.

Make sure to come back by each day for some more great crafty inspiration from the super talented team. Don't forget to head over and take advantage of the great savings on these and more of the fabulous Sale!

Be sure to head over and check out the fantastic
CHRISTMAS PART 2 RELEASE!!!!
SOME AMAZINGLY CUTE DIES! 
This release has the Merry Christmas with Shadow die.

CHRISTMAS PART 1 RELEASE!!!!
SOME MORE AMAZINGLY CUTE DIES! 
This release has the Poinsettia die.

Until the next time, have a wonderfully crafty day!