Showing posts with label Mary Marsh. Show all posts

Monday, July 17, 2023

Holiday Front Door


Hello CottageCutz friends! Thanks for taking the time to stop and visit with us today. It's Mary Marsh here bringing you the Monday edition of the Blog. I am filling in for Kristine today who is enjoying some family time this week. She will be back next week with a couple of posts. 

Our new Folk Art release is still available in the online store at 35% off individual dies. There are 19 new designs that are so perfect for cardmaking, journaling, and scrapbooking.

They allow you to add a beautiful touch of folk art to whatever you may be creating - birthday, thank-you, new home, thinking of you and even Christmas. The design team has featured many creative ideas using these dies so take a look back at our posts for inspiration.

Today I am featuring a card that I made for the Christmas in July color challenge #956 on Splitcoaststampers. We were to use cherry cobbler, pool party and old olive for our color trio. 

pool party, cherry cobbler, old olive

I used the Holiday Door (Christmas 2022 collection) die for my card and cut in the challenge colors.  I ink blended the pool party cardstock to get a deeper shade of blue. My sentiment is an older die from 2018 -  Christmas Greetings.

The background designer paper is from a "tidings of Christmas" collection.

That's it for me for this post. See you again on Saturday.


card details:
Paper: cherry cobbler, old olive, pool party, sahara sand, mossy meadow, tidings of Christmas dsp (Stampin' Up), glass slipper, sugar daddy (BazzillBasics)
Paper Size: A2
Ink: tumbled glass distress ink (Ranger)
Accessories: holiday door die, christmas greetings die (CottageCutz)


Saturday, July 15, 2023

Folk Art Rooster Thank You

Hello CottageCutz friends! Thanks for taking the time to stop and visit with us today. It's Mary Marsh here bringing you the Saturday edition of the Blog.

Our new Folk Art release is still available in the online store at 35% off individual dies. There are 19 new designs that are so perfect for cardmaking, journaling, and scrapbooking.

They allow you to add a beautiful touch of folk art to whatever you may be creating - birthday, thank-you, new home, thinking of you and even Christmas. The design team has featured many creative ideas using these dies so take a look back at our posts for inspiration.

 Today, I am featuring the new Folk Art Rooster die as a thank you card. A friend of ours gave my hubby a bougainvillea plant that he was looking for and not willing to pay the exorbitant price that the nurseries were asking for. She found one that need some tender loving care and gave it to him. He has quite the green thumb and it's already looking good.  So, he wanted to send her a card to express his thanks. 

Card Details:
I started my card with the card colors. I had this designer paper that I thought would make a great background. It has a folk-art appeal to it.

Navy panel: 4 1/4" x 5 1/2"
Designer Paper: 4" x 5 1/4"
Then I cut the rooster in navy and red colors. 

I was originally going to make this a fun fold card but I changed my mind at some point and just made it a double arrow card. To make the arrows I cut navy cardstock at 3" x 4".  Then on the 3" side I scored at the 1" point. On the 4" side, I made a mark at 2".
I lined it up as you see in the photo and scored. Then turn and score from the tick mark to the other edge of score line. 
When the scoring is done, use your bone folder to burnish and fold into the arrow shape. 
To attach to the designer paper, you add adhesive to the flap. I used double sided tape. 
Then attach the arrow shapes to your designer paper. 
Now I am ready to stamp my image panel. I found this die cut shape with a navy blue edging from a card kit in my stash and decided to use it as a frame for my rooster.  I stamped the thank you sentiment in navy ink and attached the rooster with dimensional adhesive. 
I attached the image panel to the card base. It was at this point I decided not to make this a fun fold card. It was going to be a free-standing card and I didn't want that, and I also couldn't get the bottom arrow panel to tuck in like I wanted. So, I lifted the designer paper from the navy panel and added it to a card base measuring 4 1/4" x 5 1/2". 
I stamped and decorated this panel that was originally going to be under the front image panel flap. I used a couple of flowers from the Folk Art Flowers die. 
That's it for me for this week. I hope I have given you an idea for a way to use this cute Rooster die. See you next Saturday.

Reminder: There is a new video on our YouTube channel from Marla Harris. Click here to see a beautiful Christmas in July card using the Folk Art dies. 


Saturday, July 08, 2023

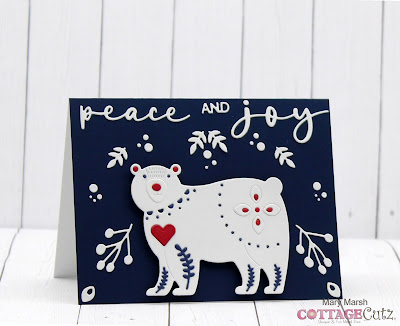
Folk Art Bear at Christmas.

Hello CottageCutz friends! Thanks for taking the time to stop and visit with us today. It's Mary Marsh here bringing you the Saturday edition of the Blog.

Our new Folk Art release is still available in the online store at 35% off individual dies. There are 19 new designs that are so perfect for cardmaking, journaling, and scrapbooking. 

They allow you to add a beautiful touch of folk art to whatever you may be creating - birthday, thank-you, new home, thinking of you and even Christmas. The design team has featured many creative ideas using these dies so take a look back at our posts for inspiration. 

Today, I am featuring the new Folk Art Bear die on a Christmas card. I think my completed card has a bit of a Nordic appeal. So, let's get started with some details of how I created my card. 

Design Steps:

I wanted my bear mostly white with a few touches of color. For that color I used red and navy blue, and I did the die inlay technique. 
Next, I cut my phrase in white cardstock from the Peace and Joy Wreath (Christmas 2022).  
I started assembling my card. I attached the bear with repositionable tape to get an idea of where I would place my peace and joy phrase. 
I cut some greenery from the Folk Art Flowers Mixed die to layer on the card front. I also realized I forgot to inlay the red heart for the bear. I also added dimensional adhesive to have the lifted slightly off the background. 
To finish off my card, I added more greenery. This time it's cut from the Folk Art Fox die. I also scattered some circles around for added interest. They were cut from the dies I mentioned above. 
That's it for me for this post. See you next Saturday!


Friday, July 07, 2023

Christmas Poinsettia

Hello CottageCutz friends! Thanks for taking the time to stop and visit with us today. It's Mary Marsh here bringing you the Friday edition of the Blog.

We have a 4th of July sale going on right now in the online store. It runs through today (Friday) at 9:00 pm (PDT) with savings of up to 70%. There are so many great dies on sale right now. 

My card for today is showing one of the Christmas dies from last year's collection. It is currently on sale at 30% off. The die is the Poinsettia Floral

For my card I used the colors from this week's color challenge #955 on Splitcoaststampers. It is also a Christmas in July theme. The colors we were to use are poppy parade, petal pink and soft succulent. 

petal pink, poppy parade and soft succulent

I don't have petal pink cardstock, so I used powder pink for my poinsettia. Since there are no veins in this die, I added them with powder pink ink and a brush and for the top layer I used a R20 Copic marker. The top layer idea came from my teamie Kristine. 

The leaves are cut in soft succulent cardstock and then shaded with the same ink for a deeper hue. After I finished this card, I found some soft succulent glimmer paper, so I cut the holly leaves in that paper for a little shine. I decided not to remove the other piece of cardstock but kept it for a darker border.

Stamped my Merry Christmas sentiment in poppy parade. To complete my card I added a few poppy parade enamel dots and the card base is also poppy parade cardstock. My card is a bit larger than I usually make - it measures 5" x 6". 

Well, that's it for me for this post. I will be back tomorrow with a card from our new Folk Art collection. 


Saturday, July 01, 2023

America....Land That I Love

Hello CottageCutz friends! Thanks for taking the time to stop and visit with us today. It's Mary Marsh here bringing you the Saturday edition of the Blog. It's the 4th of July weekend, and I am sending patriotic wishes to all. 

We have a brand-new release in the online store. It's our Patriotic 4th of July release with 12 amazing patriotic designs. You can pick up the individual dies at 30% off . If you love making patriotic cards to honor a veteran, to celebrate the 4th of July or to display your love for America, we have you covered with this new release.

There is also a 4th of July sale going on right now in the online store. It runs through July 7th with savings of up to 70%.

My card for today is featuring the USA Flag and the Patriotic Rainbow dies in a slimline design. I love making patriotic cards and mail them out for the 4th of July celebration. So, let's get started on some details on how I created my card.


Design Steps: 

The inspiration for my card came from a red truck that I saw driving by me recently. I loved the flag furling in the wind from the back of his truck. So, my card idea was born.

I cut my flag in red, white and blue. I love how the detail in this die that gives the impression that it is waving in the wind. 
Next, I cut my truck. I used an older CottageCutz die - Flatbed Truck w/Accessories. It is still available in the online store. 
I stenciled some clouds in broken china distress ink and added a 1/2" section of black cardstock with small white lines down the middle as a road for the truck. 
My card elements are ready and I can start card assembly. I attached the truck and the flag with dimensional adhesive. The America Phrase was secured with clear drying glue. 
To finish off my card, I stamped my sentiment and scattered a few stars. 
That's it for me for this week. See you next Saturday.