Showing posts with label I love You. Show all posts

Tuesday, February 14, 2023

Sweet I Love You Card

Happy Valentine's TuesDIE Cottage Cutz Friends!
Melinda here with you, on this day to express....our love!   So I thought that was the perfect sentiment for my card today! I am sharing a sweet and pretty card I created with dies from the amazing new Flowers & More release from Cottage Cutz!

This release is amazing and a true MUST HAVE for your creative collection! All the dies in this collection are a wonderful addition and will fast be staples in your creative stash!
Here are my projects for today.

I created this simple yet pretty card featuring the Little Flowers and the Celebrate Banner dies from the new release! My card is a Horizontal top fold card. It is 4.25 x 5.5 with the fold along the 5.5 side and in landscape position.

I added a yellow cardstock mat sized at 4 x 5.25 and also a patterned paper mat sized at 2.5 x 5.25
 I then cut out the Largest double-stitched circle, the three smallest stitched hearts in that set and the second smallest pierced circle die from that set. 
I then used my various colored markers and colored in the two larger hearts and the pierced circle. I didn't have the right colored patterned paper, so this was a great alternative. I just tried to stay to the inside of the pierced or dashed lines. Here is an example of the larger heart.

I then cut out the celebrate banner in white and colored in the various little hearts and stars. I added dots of stickle to various ones for a little extra touch.
Here's a closer look at the assembled piece. I added the sweet little flowers to the center of the pierced circle. I cut them out of white cardstock and then colored them in as well. I added some sequins and scattered them for an extra touch. I then added the sentiment, I Love You and curved the words around the circle.

Here is one last look at my finished card. I think it turned out super cute!

Flowers & More collection!
Here's a look at the entire collection of dies in this fabulous release.


Dies I Used

Celebrate Banner

Little Flowers


I Love You Sentiment


Stitched Heart Set

Double-Stitched Circle Set

Pierced Circle Set


Don't forget to head over to the Cottage Cutz You-Tube Channel where you can see some of our amazing design team members create some beautiful projects!


Well that about covers it for today! May you have a wonderful Valentine's day and enjoy a little love in your day! Until the next time, have a wonderfully craft-die day!
Melinda Beltran

Thursday, February 09, 2023

Two Simple Floral Cards

Happy Thursday Cottage Cutz Friends!
Melinda here with you, and today I am sharing two pretty and very easy cards I created with the amazing new Flowers & More release from Cottage Cutz!

This release is amazing and a true MUST HAVE for your creative collection! All the dies in this collection are a wonderful addition and will fast be staples in your creative stash!
Here are my projects for today.


I created this simple yet pretty card featuring the Flower 1 die from the new release! It is such a great sized die and very, very easy to put together. I cut the pieces in white cardstock and then used my markers to color them. Once colored, I mounted the flower onto a piece of yellow cardstock. Underneath that is a purple gingham mat and all that is adhered to the scallop stitched rectangle. For the larger part of the card's background, I cut out the Vintage Trellis slimline die in white cardstock. I then cut it down to fit onto the larger yellow mat. I then added a patterned paper mat and then a purple mat all onto my white cardstock base. 

Here's a closer look at the pretty flower 1 die. I added some sequins and some stickles to create the "veins" on the petals. For the sentiment, I used the I Love You die and cut it out of white cardstock. I then colored the letters with my purple marker and adhered all that onto the smallest scallop stitched rectangle. 


Next up, I created this pretty and simple card with the little flowers die set from the release. I cut all of them again in white cardstock and then colored them in.

I then layered them onto the double-stitched oval. I then staggered and layered in a series of double-stitched and scalloped ovals from both sets. I mounted all of that onto some polka dot papers and adhered it all to my white cardstock base. I then used the sentiment love you and cut that from some more white cardstock. Very easy but effective.

Both of these cards came together quickly and can be reproduced quite easily! 

Here is a look at the fabulous collection!

Flowers & More collection!

Grab it fast while you can get the entire bundle for one amazing low price!


Dies I Used


Flower 1

Little Flowers


I Love You Sentiment


Double Stitched Oval Set


Scallop Oval Set

Nested Scallop Rectangle Set


Vintage Trellis Slimline


Don't forget to head over to the Cottage Cutz You-Tube Channel where you can see some of our amazing design team members create some beautiful projects!


Well that about covers it for today! Until the next time, have a wonderfully craft-die day!
Melinda Beltran

Tuesday, January 10, 2023

Hey Sweet Heart Folded Flap Card

Happy Tuesday Cottage Cutz Friends!
Melinda here with you, and today I am sharing a fun and colorful Valentine's day card. Here's a look at my finished project. I used the sweet Mrs. Gingerbread Die as the focal image from this year's Christmas release.

Here is a look at my finished card. I started with a 5.5 x 5.5 white mat. I then used a pink cardstock mat and some yellow mini hearts patterned pattern.


Here's a closeup of the sweet little Mrs. Gingerbread die. I used some Doodlebug patterned paper for her hat and dress. I mounted her onto the 3rd pierced circle die from the set. I then used a smaller circle punch for the mat. I added a couple of hearts from my stash.

I used a scallop punch and some circles along with some hearts for the last part of my sentiment.

Here I used the Hey from the Berry Phrases Sentiment along with the Sweet as a Christmas Cookie die.


Here is the center slightly open. I used a small Velcro circle to help keep the flaps closed.

Here is a closeup of the inside. I used some of the heart stitched dies along with the I Love You 


How to do the center of the card
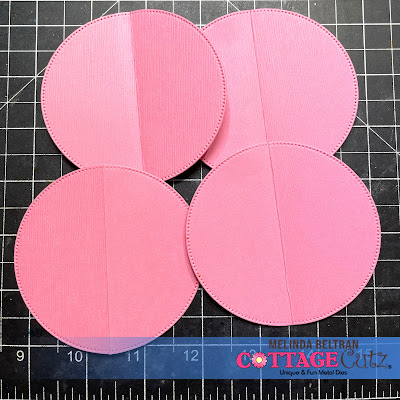
I used the largest Pierced Circle from the set and cut it out 4 times. I also cut a separate piece of white cardstock at 3.75 inches squared. I folded the circles in half.


Next I glued half of the circles to each side of the square. This is what it looks like in the photo above.

This is what the back of the card looks like once the 4 circles are attached. This photo is with the circles open.

This is what it looks like when the circle are closed.


I then used the next size circle down and used the pink cardstock for mats.

I then cut the circles in half and attached half on the front flaps and on the inside flaps. If you decide to put the mats on, make sure you leave a little room so they will close. I ultimately decided not to use the pink mats for the inside.

Dies I Used

Mrs. Gingerbread Gnome


I Love You


Berry Phrases


Sweet As A Christmas Cookie


Pierced Circle Set


Stitched Heart Set


Well that about covers it for today! Until the next time, have a wonderfully craft-die day!
Melinda Beltran